- Right click on the wireless icon in the task bar located at the bottom right of your screen and select Open Network and Sharing Center
- Select Manage wireless networks from the left-hand sidebar
- Select Add; Click on Manually create a network profile
- In the Manually connect to a wireless network window, specify the following and click Next:
- Network name: AirYorkPLUS
- Security type: WPA2-Enterprise
- Encryption type: AES
- Once you've successfully added the AirYorkPLUS profile, click on Change connection settings
- In the Security tab, ensure the network authentication method selected is Microsoft: Protected EAP (PEAP) and click on Settings
- In the Protected EAP Properties window:
- ensure Validate server certificate is selected
- under Trusted Root Certification Authorities, select GlobalSign Root CA
- under Select Authentication Method, ensure Secured password (EAP-MSCHAPv2) is selected and click Configure
- Uncheck Automatically use my Windows logon name and password... and click OK to close all windows
- At this point, you have configured your AirYorkPLUS network settings and should see a pop-up asking for you to click to provide additional information, as shown below; if the pop-up does not appear, click on the wireless icon in the task bar, choose AirYorkPLUS from the list of available networks and click Connect
- In the Windows Security box, enter your Passport York credentials and click OK to connect
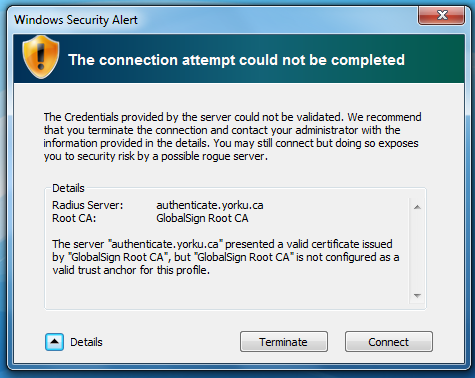
- If you see the following authentication error message then please click Connect

Open Network and Sharing Center

Select Manage wireless networks


Click Change connection settings

Security tab settings

Certificate settings

Loggon setting

Additional information popup

Passport York credentials
Authentication Certificate Error