August 2021
Background
Here, we're going to apply ThrowTheSwitch's Unity unit test framework to C programs. The test framework is available on GitHub. Three files need to be downloaded from the GitHub. There are a few more files that need to be developed within VPL to make it work, and those are described below.
We're targeting C in this activity because C is still relevant in engineering and computer science curricula, notably in domains like operating systems and embedded systems (microcontrollers).
Step 1. First Steps
Start a VPL assignment as normal.
Step 1a. Name & description
Provide a name and any instructions for the student in the first screen of the VPL activity. Save.
Step 1b. Modify maximum grade
VPL assignments default to a grade out of 100. I find that this provides too high a perceived weight to the assignment. Instead, I prefer to grade out of 1. Hit save.
Step 1c. Point to local VPL server
Go to Gear -> Local execution servers (a.k.a. Advanced settings / Local execution servers) and type in
https://xxxxxx.yyyyy.yorku.ca
end_of_jails.
You need to modify the above (xxxxxx.yyyyy.) to point to the specific VPL server for your department.
Step 2. Add Student Template
- studentTemplate.c (student will modify this)
- studentTemplate.h (student not expected to modify)
This is the student template C file:
// this is studentTemplate.c.  Place it in the "Requested Files" section of VPL.
#include "studentTemplate.h"

/* --------------------------------------------------
 * This is a C function.  Modify it as needed to run
 * a good for loop.  VPL will call this function and verify
 * that it returns the right value, answer, for an arbitrary
 * input, maxLoops.
 * -------------------------------------------------- */
int32_t myForLoop(int32_t maxLoops)
{
    int32_t answer = 0;
    int32_t loopNumber = 0;

    /* -------------------------------------------------------------
     * For loops in C are like for loops in Java and Matlab
     * reference: https://www.programiz.com/c-programming/c-for-loop
     * ------------------------------------------------------------- */
    for(loopNumber = 0; loopNumber <= maxLoops; loopNumber++){
        // Update the value of answer each time the loop runs.
        answer = answer + 3;
    }

    // Give back the final answer.
    // VPL will examine this value.
    return answer;
}
The studentTemplate.c file is what the students will modify. In this case, there is nothing for the student to change. The .c file will all a header (.h) file, hidden from the student:
// this is studentTemplate.h.  Place it in the "Execution Files" section of VPL.
#include <stdint.h>

int32_t myForLoop(int32_t);
Step 3. Add Unit tests ("solution")
Here you design your unit tests for the student submission in the file
- testStudentTemplate.c
The file is stored in "Execution files" of VPL. This is where you write up the unit tests. The "main" function found at the bottom will run tests based on the unit tests you write in each function. Note that the Unity framework uses function pointers to call the functions, so the brackets are missing when they get called.
// this is the testStudentTemplate.c file.
// it's what the prof uses to evaluate the student's submission.
#include "unity.h"
#include "studentTemplate.h"

// add these two b/c https://github.com/ThrowTheSwitch/Unity/blob/master/docs/UnityGettingStartedGuide.md
// and https://stackoverflow.com/questions/61114392/linker-error-with-unity-c-unit-testing-framework
void setUp(void){
        // set stuff up here
}

void tearDown(void){
    // clean stuff up here.
}


void test_myForLoop_40(void)
{
    // The specific test types are found in unity.h
    TEST_ASSERT_EQUAL_INT32(40*3,myForLoop(40));     // expected out vs. input
}

void test_myForLoop_10(void)
{
    // The specific test types are found in unity.h
    TEST_ASSERT_EQUAL_INT32(10*3,myForLoop(10));     // expected out vs. input
}

void test_myForLoop_0(void)
{
    // The specific test types are found in unity.h
    TEST_ASSERT_EQUAL_INT32(0,myForLoop(0));     // expected out vs. input
}

void test_myForLoop_5000000(void)
{
    // The specific test types are found in unity.h
    TEST_ASSERT_EQUAL_INT32(5000000*3,myForLoop(5000000));     // expected out vs. input
}

// add more test functions here...
// void test_function_name(void){}

// Run the tests...
int main(void)
{
    UNITY_BEGIN();
    RUN_TEST(test_myForLoop_40);        // sub test 1
    RUN_TEST(test_myForLoop_10);        // sub test 2
    RUN_TEST(test_myForLoop_0);         // sub test 3
    RUN_TEST(test_myForLoop_5000000);   // sub test 4

    // add more RUN_TEST()s as needed.
    return UNITY_END();
}
There are four separate unit tests. You can have more or you can have less.
You can see, above, the use of TEST_ASSERT_EQUAL_INT32(). This will examine look for an equality condition on a 32-bit integer as the output of the student's function. But there are more tests, all defined in unity.h. There are tests for floating point values...

there are tests for strings and arrays...
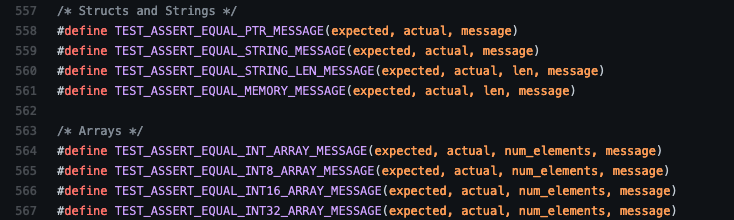
... and boolean tests...

... and lots and lots of integer tests. Dig into unity.h for more.
Step 4. Add Unity files
The Unity unit testing framework files can be pulled directly from GitHub:
- unity.c (download raw from GitHub)
- unity.h (download raw from GitHub)
- unity_internals.h (download raw from GitHub)
Each of these needs to be placed in VPL's Execution Files.
Step 5. the Run and Evaluate scripts
The vpl_run.sh and vpl_execute.sh shell scripts do not need to be modified. Leave them blank.
Step 6. Evaluation
There is no need to modify the vpl_run.sh or vpl_evaluate.sh scripts. Instead, we're going to rely on the Unity unit testing framework's "standard out" output. This will be compared to the contents of the evaluate.cases file, which is found in the in the Gear -> Execution Files (a.k.a. Advanced Settings / Execution files) menu. The contents for evaluate.cases is:
case : Test 1
output = /(0\sFailures)/i
Basically, it'll look for the string "0 Failures" within the output.
Step 6. Modify completion status
This is not required, but it's a really good thing to do in your class. Completion tracking is a built-in feature in eClass/Moodle. You should activate it for your course and add it to each of your activities to provide students with an easy-to-follow guide that they can follow throughout the semester.
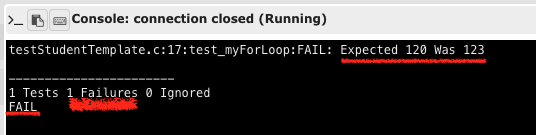
Step 7. Check as "Demo Student"
Check to see that the testing system has the right output for a given input. Here you can see that when I ran the student template, and had configured the activity to only have a single test of the for loop, the Unity test told me that it failed (120 was expected but it got 123):
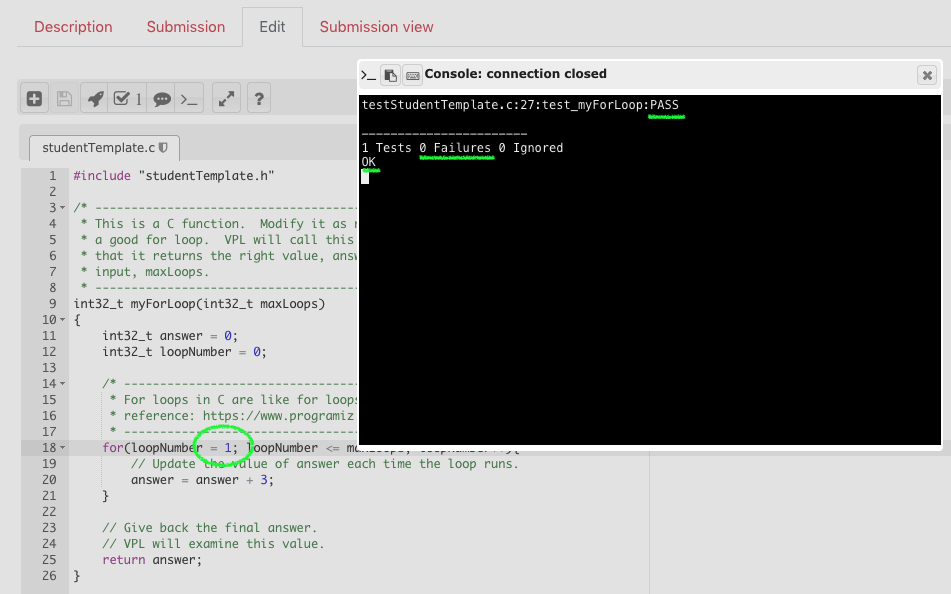
A quick update to the student submission and we can see that it's all good. We got 120 as an output (40*3).
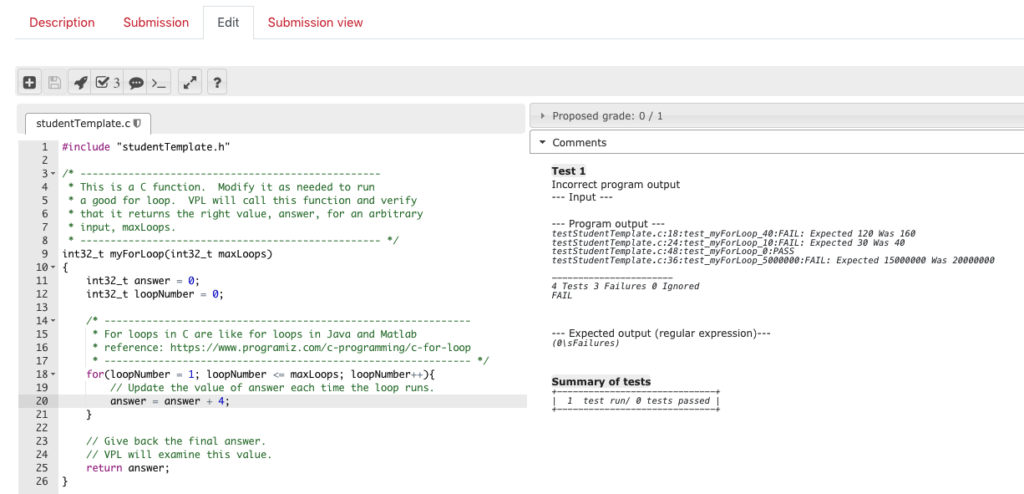
Next, I added three more tests of the For Loop: an input of 40, an input of 10, an input of 0 and an input of some large number. With an incorrect student program, the evaluation tab produces this output:
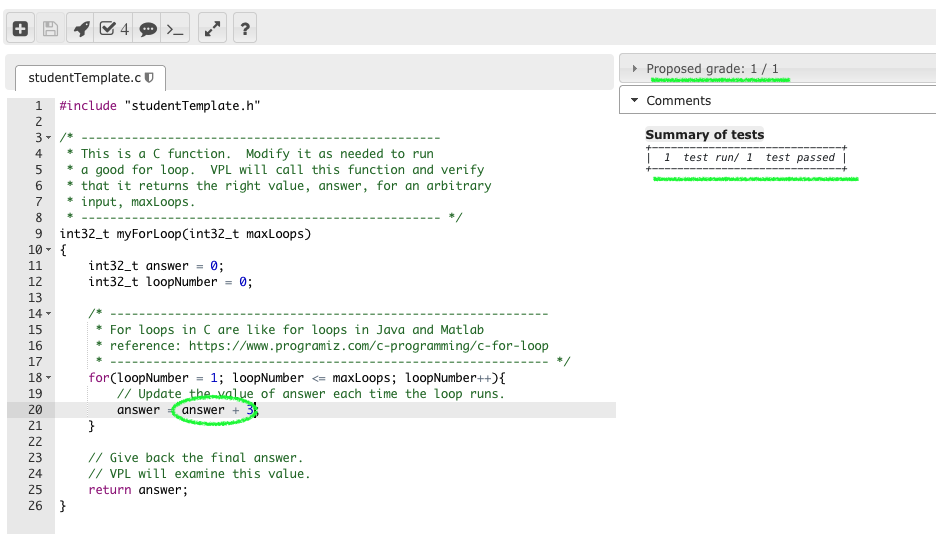
After fixing the student code, we can see that the four little tests that make up the complete test were successful:
Looking to Improve
There are limitations to this approach of conducting evaluations. We are searching the output for the string "0 Failures". It's possible to fake this output and mistakenly grade a student's incorrect solution as correct. A more robust approach would require customizing the vpl_run.sh and vpl_evaluate.sh scripts to validate the student solution in a way that avoids this. This customization is found in other blog posts on this site.
James Andrew Smith is an associate professor in Electrical Engineering and Computer Science Department in York University's Lassonde School. He lived in Strasbourg, France and taught at the INSA Strasbourg and Hochschule Karlsruhe while on sabbatical in 2018-19 with his wife and kids. Some of his other blog posts discuss the family's sabbatical year, from both personal and professional perspectives.