EECS 2021 Lab Kit
The EECS 2021 lab requires you to have both (1) the Grove board with an ATMEGA328P chip on it (you got it as a part of the EECS 1011/21 lab kit last year), as well as (2) a Snap programmer.
The Grove kit (officially called the "Grove Beginner Kit for Arduino") is sold for about $40 from the YorkU Bookstore (alternate general link)if you do not already have it.
The Wiki for the Grove kit is found here. Need the drivers for it? Check this link. Original (from the Bookstore)
The above links provide you with alternative suppliers if you need to access them.
The Snap programmer is Microchip's low cost programmer for ATMEGA, SAMD, PIC16, etc. parts. The York Bookstore sells the programmer as a kit: Snap + USB cable + ribbon cable. The programmer, by itself, is available directly from Microchip at their store. You can also find it there:
- YorkU Bookstore (Snap + micro-USB to USB-A cable + Adafruit 1953 ribbon cables)
- Findchips.com (PG164100; no micro-USB to USB-A cable, no Adafruit 1953 ribbon cables)
- Microchip Direct (PG164100; no micro-USB to USB-A cable, no ribbon cables)
- Mouser.ca (PG164100; no micro-USB to USB-A cable, no Adafruit 1953 ribbon cables)
- Digikey.ca (PG164100; no micro-USB to USB-A cable, no Adafruit 1953 ribbon cables)
Alternatives to the Grove board.
While we use the Grove board in this class because it was originally used in EECS 1011 and 1021, you may use alternatives such as:
- The ATMEGA328P-Xplained (Findchips link; it's available from the other vendors listed above)
- This includes a built-in debugger. It's inexpensive but does not have any possibility for expansion without soldering. This last point is a big downside unless you have access to a soldering iron.
- The Arduino UNO R3 (Findchips link; it's available from the other vendors listed above, as well as local vendors in many countries)
- It requires the same trace cut as the Grove board (see video )
If the Grove board approach is not working for you, you may consider one of the two options above -- but please talk to your instructor first, before buying anything!
Modifying the Grove board for use with an external programmer.
The EECS 2021 lab kit contains a Grove Beginner Kit for Arduino. We modify the board by cutting the reset trace between the USB converter chip and the ATMEGA 328P chip. This allows us to program the board with external programmers like the Snap (or PICKit 4) programmer in MPLAB X as opposed to the Arduino IDE. Here is a video of the modification undertaken with the Grove board:
The process of cutting the trace is very similar to the one we would have to undertake if we were using an original Arduino UNO R3, as shown in this video. Here is the process of cutting the tract on the Arduino UNO. We use the higher-end PICKit 4 programmer in this video. It is more expensive than the Snap but doesn't need to be reflashed to work with ATMEGA chips.
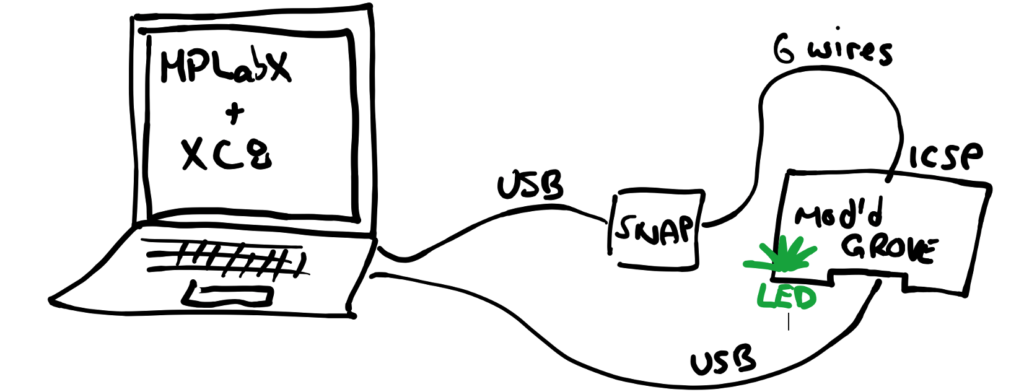
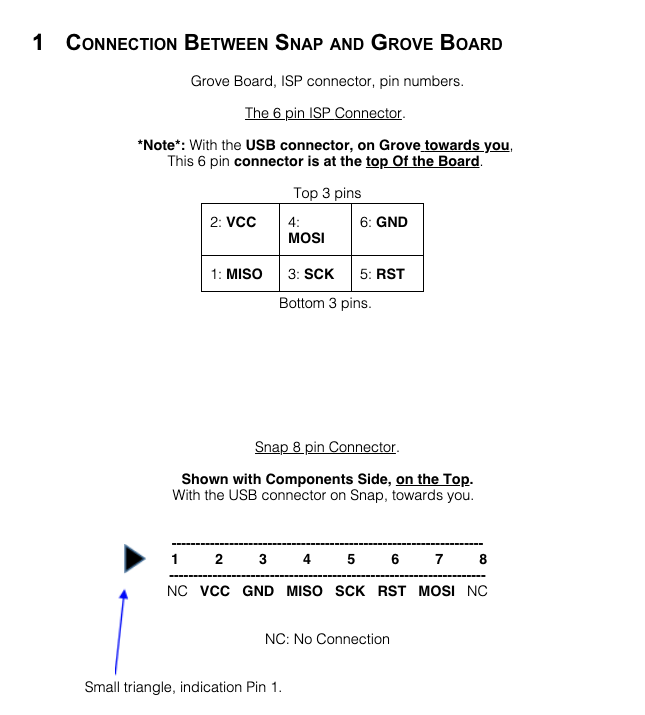
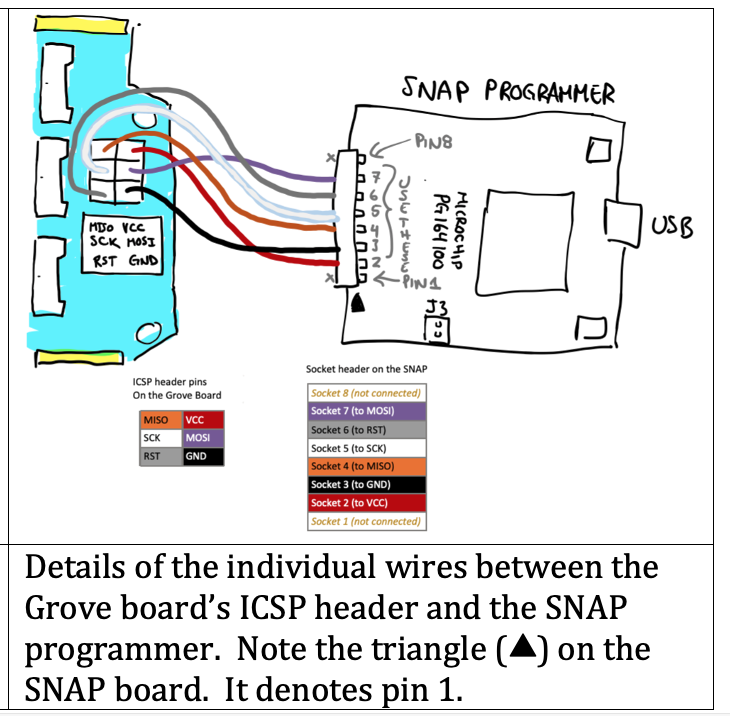
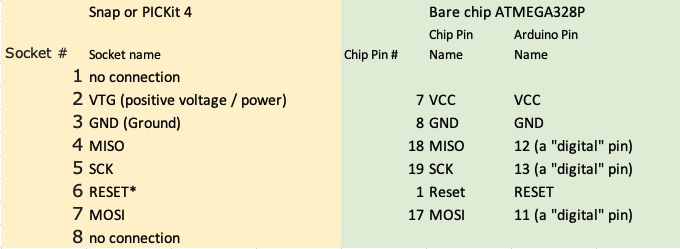
The wiring scheme for the Snap Programmer.
Depending on your perspective, you may find one of the following diagrams more helpful or useful than another. They all result in the same thing: connecting the Snap (or PICKit 4) programmer to the ATEMGA328P chip on your board.
Wiring scheme 1: Pin names and numbers only.
Wiring scheme 2: Illustration of the Snap and Grove (or Arduino UNO) board.
Wiring scheme 3: If you are building a breadboarded ATMEGA328P device
If you decide to create a breadboard ATMEGA328P project, it's important to get familiar with the individual pin names on the actual chip. Sites like
- https://www.circuito.io/blog/arduino-uno-pinout/
will help.
Here is an example of making an Arduino using a breadboard and discrete components:
Note that you won't be putting an Arduino bootloader in the EECS 2021 project. You don't need it because you've got the external programmer (Snap or PICkit 4).