In Computer Architecture classes or Embedded Systems classes, it can be really useful to allow for students to be graded on assignments that allow them to interactively explore the inner workings of a microprocessor. One way is to have the students create programs in a hardware description language like Verilog or VHDL. Another way is to have students write programs in a language like C or Assembler that runs on a simulator. That's what we're going to look at here.
A year ago I attempted to do that with VPL and the simulation engine behind Microchip's MPLAB X. It didn't work. The Microchip simulator is too resource-intensive to work within VPL's "jail". It would have been nice because the simulator supports so many different processors (PIC16, AVR, SAMD, etc.). But the resource issue, combined with the well-known half-baked implementation of the processor models made this a bad option.
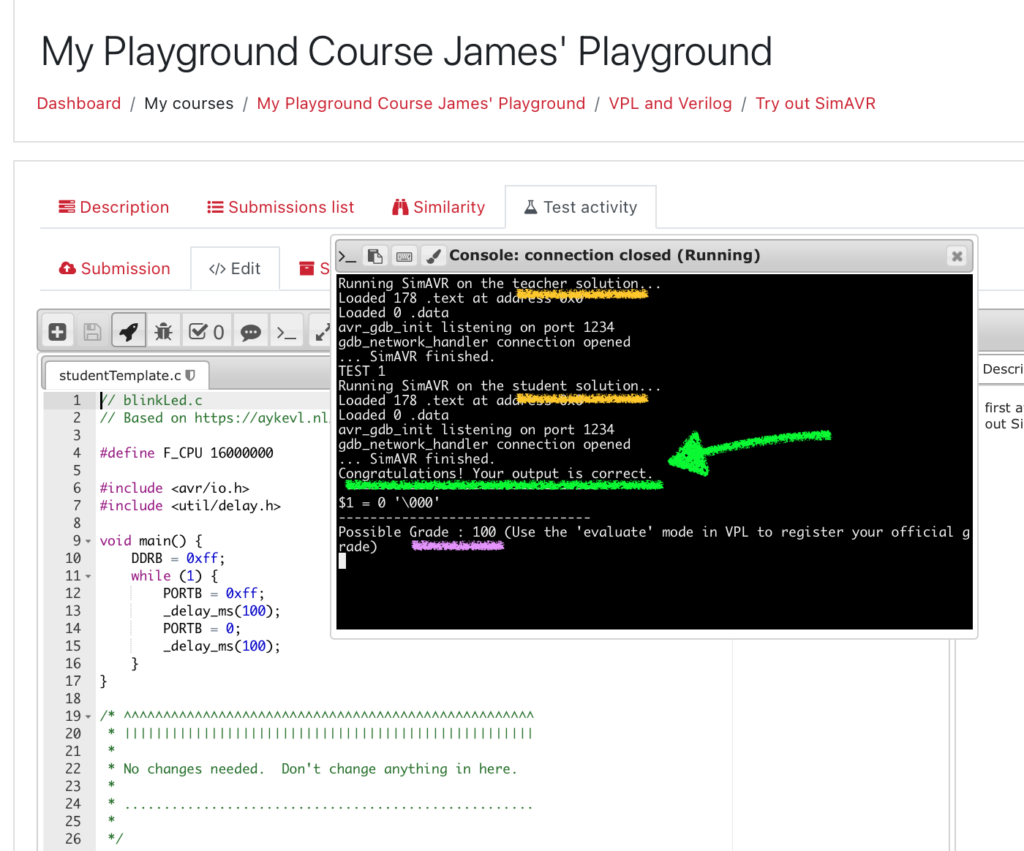
So, this year I went with simAVR, a well-established simulator for the AVR series of processors, like the ATMEGA328 on the Arduino UNO. It's light-weight and appears to support more of the internal processor hardware. And, it works, as you can see in the screenshot below.
In this blog post I will step you through how to get a Virtual Programming Lab assignment with simAVR and-and-running. The assumption is that you are using a VPL server at your own college or university and that simAVR, avr-gcc and avr-gdb are already installed. Note that this will not work on the VPL developer's server that is linked to directly in the default VPL installation.
Overview
Like with other VPL activities that follow the model set by Dr. Dominique Thiebaut's original tutorials on VPL I use a pair of shell scripts, vpl_run.sh and vpl_evaluate.sh at the core of this exercise. The simulation with simAVR is run twice in each case: first for the teacher solution and second for the student submission. The output of each is examined by the shell scripts to see if there are any differences. If they match, then the student gets 100%. If they don't, then the student gets a zero.
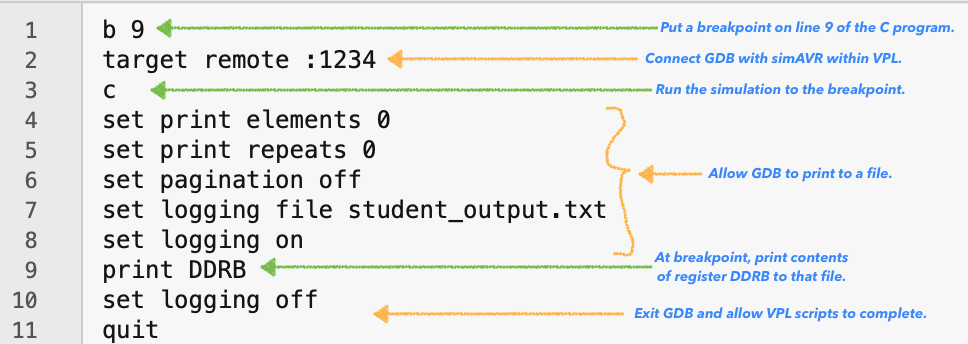
In a normal VPL exercise, the teacher solution and student submission are run directly on the VPL server's processor. But here, we're interested in how these programs work on a processor that is different than the VPL server's own 64-bit processor. So we have to route the teacher solution and student submission through an 8-bit simulator, simAVR. This requires compiling the two programs on an 8-bit compiler, avr-gcc. Then, the output of avr-gcc is sent to simAVR, where it waits for a debugger program, avr-gdb, to tell it how to proceed. You, the instructor, will have to write a pair of GDB scripts that will walk the debugger through to the point in the complied programs that you want to evaluate. In the example presented in this blog, it will be to break on line 9 of the C-program and to examine the contents of Register DDRB, the "Data Direction Register for Port B" on the ATMEGA328P processor. The teacher solution will result in a DDRB value of 0. As long as the student solution produces that on line 9 of their submission, then the student will get 100%.
If you're a computer architecture purist and feel that the student assignment should be in Assembler, you can extend this tutorial to use inline Assembler or to have the main function in C call an Assembler function.
All of this is a little intimidating as there are a lot of steps. If you haven't explored VPL before, I suggest that you try a simpler example in C, Python, Java or Verilog, either from Dr. Thiebaut's original tutorials or some of mine.
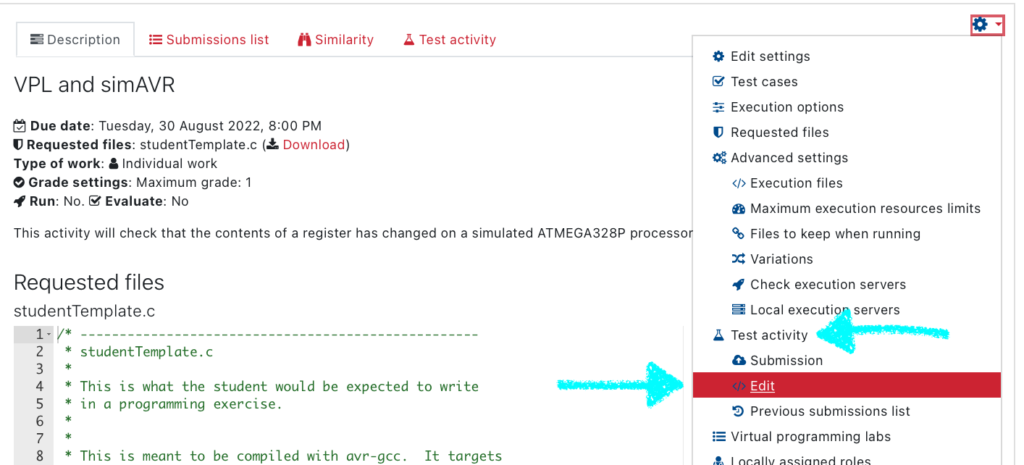
Add a VPL Activity to eClass / Moodle
Click on the eClass/Moodle "Add an activity or resource" button. Select Virtual Programming Lab. Name your activity. Change the points (score) to 1 (or whatever value you normally assign for a single question -- I like giving it a small score). Set the submission period. Click on "Save and display."
Now you are ready to start adding in files.
Add the Student Template File
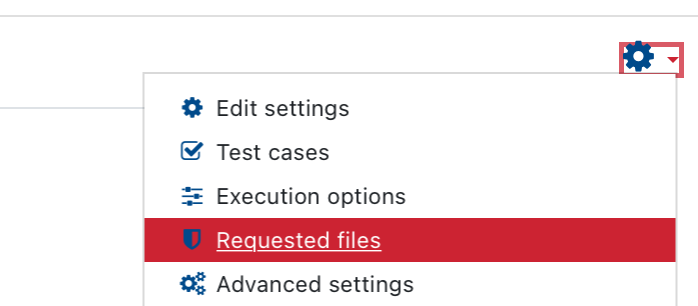
Go to the Gear icon and select "Requested Files". When prompted for "Create a new file", name the student template file. I'll call it studentTemplate.c. This will be a C-language file. In a normal activity, you would leave the contents of this file blank or only partially filled in. But for this tutorial, I'll make the whole thing available to you.
Add the Run and Evaluate Shell Scripts
Next, you need to set up the "shell scripts" for Virtual Programming Lab.
The first shell script is "vpl_run.sh". When a student clicks on the rocket icon on eClass / Moodle, this is the script that executes. This allows the student to practice their work without getting a grade. To get a grade they need to run the other script -- the one with a checkmark -- that we call "vpl_evaluate.sh" internally.
This second shell script, "vpl_evaluate.sh", is written a bit differently. There are two major differences introduced in this evaluation script: First, comments to the student are transmitted to eClass via "Comment :=>>". Second, a grade is transmitted to eClass via "echo "Grade :=>> \$grade"". Both of these pieces of information are important as the student will see them in the eClass/Moodle grade book.
Another thing to note about these two script files that is not straight-forward is that both of them create a new script called vpl_execution. That's why they both start with "cat > vpl_execution <<EEOOFF" and end with "chmod +x vpl_execution", then "exit 0". So, basically, it's a bash script that creates another bash script and it's that second bash script that gets executed when VPL is in either "run" or "evaluate" modes.
Add the Two GDB Scripts
This simulator requires three things to happen. First, the C program is compiled and an executable file is created. This executable file is then sent to the simAVR simulator. The simulator then waits for a debugger program to start. This debugger program, GDB, will communicate with the simulator and command it to start, stop and print out information that is then picked up by the vpl_run and vpl_evaluate scripts.
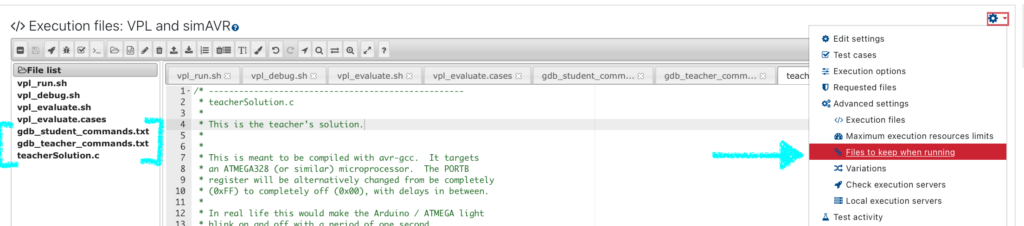
The GDB debugger will run twice: once when the teacher solution is simulated and once when the student solution is simulated. In each case there is a script that the GDB debugger follows: one called gdb_teacher_commands.txt and one called gdb_student_commands.txt. These scripts establish the connection to the simAVR simulator, step through it and output results to a file, as shown in the right. These two files need to be placed in the same location as vpl_run.sh and vpl_evaluate.sh: go to the Gear, then Execution Files.
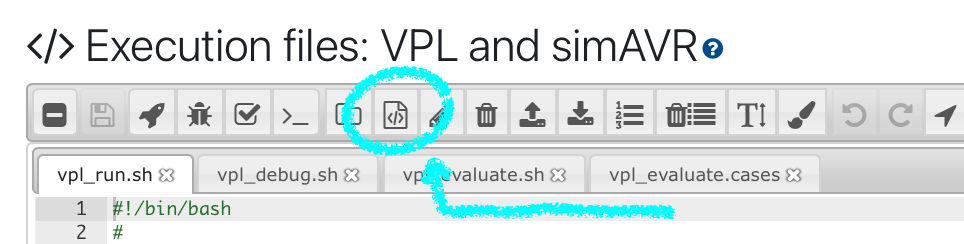
Use the "New File" icon to add in these two GDB scripts. Then click on the cute old-school floppy disk icon to save these two new files.
In this example, I've chosen to have both the teacher and student simulations halt at the breakpoint on Line 9 of the two C files. Then we output the contents of the DDRB register. As long as the DDRB register is the same in both the teacher and student solutions then the VPL scripts will see that we have the right answer and then give the student a 100% score (e.g. 1 point).
Now, for most other assignment questions, it'll be important to customize which line in the C programs to have a breakpoint at and what value to print out, whether it's the contents of a register or the value of a variable. Having a local copy of simAVR, avr-gcc and avr-gdb on your own computer is going to be really important for this. Also, you may wish to consider breaking up each C program into two parts: a main function and a function called by that main function. That way you can ask the student to submit the function and have it called by a main function controlled by the teacher's main function. Unit testing in this way will allow you to specify the point in the program to stop and evaluate the student's work without worrying about how long the student's file is, how it's been written, etc. It also makes it harder for the student to muck around with the testing routine.
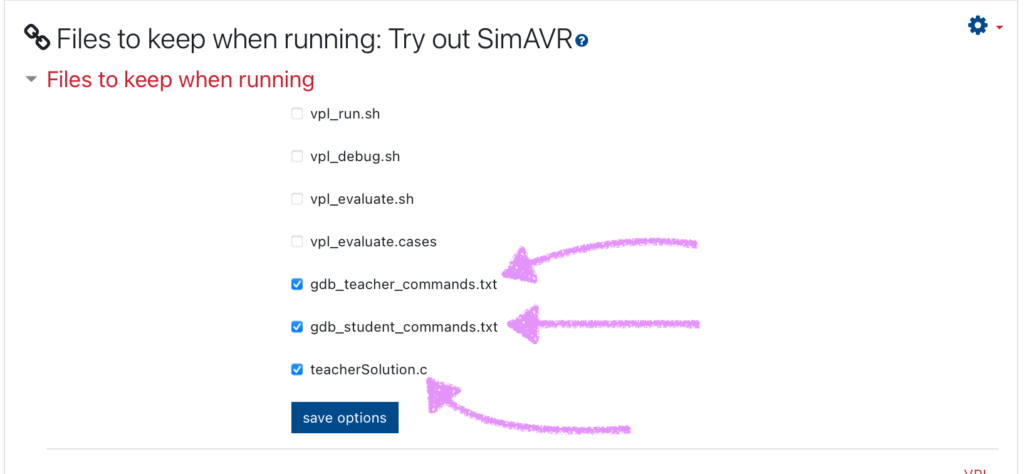
Next, you need to specify which files to keep during execution of the scripts.
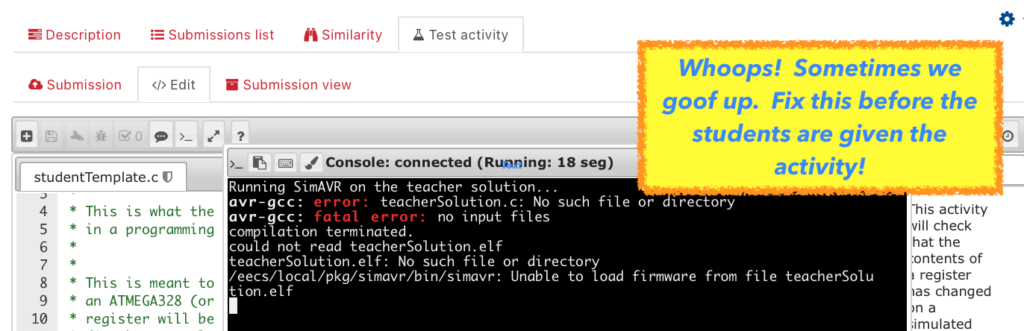
If you don't specify that you want these files kept, then the exercise will fail, generating an error as shown at the bottom of this blog page.
Tell VPL to keep the GDB and teacher's solution available during processing
Files to keep while running. This is important, as these text files need to be available while the script is running:
Point eClass to the local VPL server
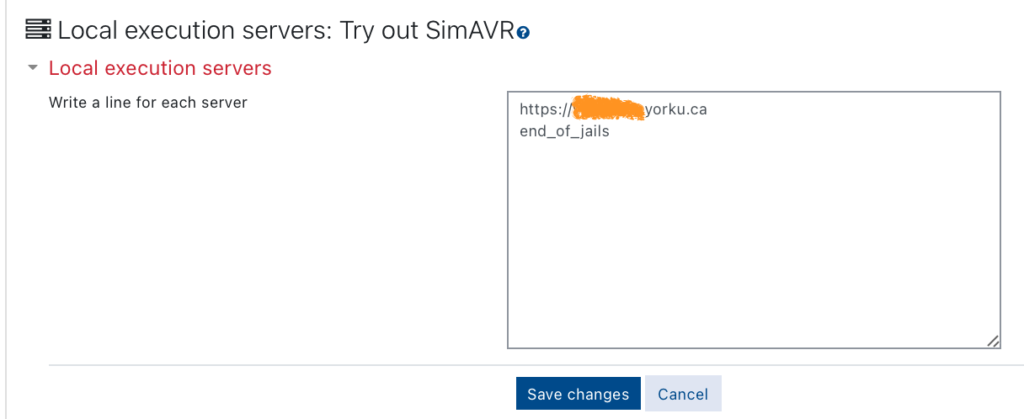
Next, you need to tell eClass that it should point to the local VPL server for testing the scripts and not the developer's machine in Spain. Choose the VPL server at YorkU if you're here at York University. Otherwise choose the one at your institution. By default, it won't have avr-gcc or simAVR on it and neither will the VPL development server, located in Spain.
Test out your activity
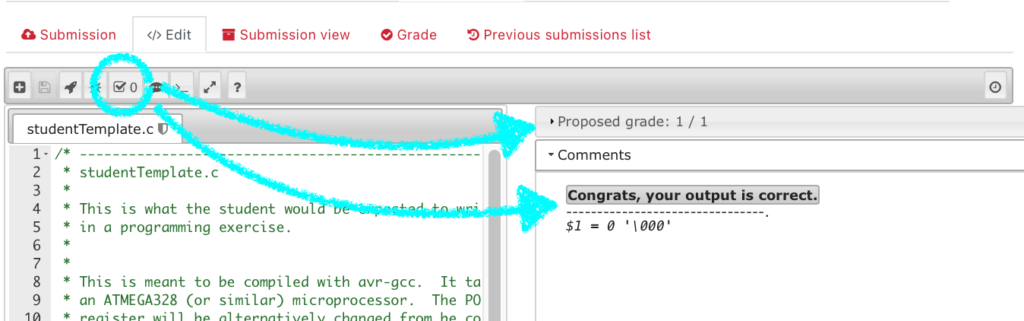
Before releasing this to your students, test to make sure that it works. VPL has a test section. Open the editor in this test section and you'll be presented with the student template. Paste over it with your teacher solution, or edit directly in the editor.
When you've got all the text in place within the editor, hit the disk icon to save your work, then the rocket "run" icon to make sure it compiles and tests right. Then click on the "evaluate" icon to ensure that the grade and feedback is appearing as intended.
Internally, VPL will temporarily generate two files teacher_output.txt and student_output.txt. The contents of these two files should be $1 = 0 '\000'. The "dollar-sign one"is a stand-in for the DDRB register "variable" and the "equal sign zero" means that the contents of DDRB is zero. You can see that in the screenshot below.
But all of that is hidden. What you and the student will see, at the end of the evaluation provides is both a grade and feedback to the student, as shown below.
Fix any errors
It's easy to get tripped up along the way to setting up an assignment. Errors will often make themselves known when executing the run or evaluate scripts. Below you'll see the error that appeared because I forgot to specify teacherSolution.c as a "file to keep".
Conclusion
This was a long post. Assessing a student's program on a simulated microprocessor within VPL isn't as straight-forward as, say, assessing a generic Python or Java program. However, this shows that the VPL environment is adaptable and can be applied in new ways. Next up I am aiming to rework this to be more unit-test-friendly, either in an ad-hoc way or by using the Unity framework that I described in a previous post. I'll be giving this a whirl during EECS 2021 here at York University this year. The students have had previously had experience with VPL with their Java programming in EECS 1021. Now we'll be using VPL in the context of computer architecture discussions, using both the simAVR simulator and, later in the semester, Verilog.
Acknowledgements
First, a big shout out to the EECS Department tech team here in the Lassonde School: Mr. Jason Keltz and Mr. Paul Griffith in particular for helping with VPL and the Linux systems that we use for this work. Thank you to YorkU's UIT for your continued support on eClass/Moodle. Thank you to all the people who develop and maintain Virtual Programming Lab and thank you to Dr. Dominique Thiebaut, Prof Emeritus at Smith College, for the original tutorials on VPL that were instrumental in this work.

James Andrew Smith is a Professional Engineer and Associate Professor in the Electrical Engineering and Computer Science Department of York University's Lassonde School, with degrees in Electrical and Mechanical Engineering from the University of Alberta and McGill University. Previously a program director in biomedical engineering, his research background spans robotics, locomotion, human birth and engineering education. While on sabbatical in 2018-19 with his wife and kids he lived in Strasbourg, France and he taught at the INSA Strasbourg and Hochschule Karlsruhe and wrote about his personal and professional perspectives. James is a proponent of using social media to advocate for justice, equity, diversity and inclusion as well as evidence-based applications of research in the public sphere. You can find him on Twitter. Originally from Québec City, he now lives in Toronto, Canada.