In the previous post I showed you how to use VPL and simAVR together to write a basic activity that would test to see if a student could change or assign the value of a register in the simulated microcontroller using the C programming language. While it was the most straight-forward way that I could think of to set up a proof-of-concept, I don't think that it will scale well to regular assignments. For that we need unit testing.
If you're like me and was never trained on unit testing, think of it this way. You want the student to write a function and you want VPL to test that function. And only that function. If you allow the student to write an arbitrary main function they'll be able to write whatever they want and, likely, will write something unintentionally simple that defeats the purpose of the learning in the assessment.
So, you want VPL to contain a non-modifiable main function that calls the student's function and only allow the student to write and modify the contents of that function. Furthermore, you'll run the test once the function returns to main so that the student can't control the outcome of the test directly.
What you're doing is testing a single unit of code: a function. In other words, the assessment is running a unit test on the function. In my Java course, I use jUnit to accomplish that. For a regular C assignment I like using Unity within VPL. But here, I'll just have the student's function return to the teacher-controlled main function, halt on a breakpoint and test the values of a variable and the register value. It's ad-hoc unit testing.

Overview
Like with other VPL activities that follow the model set by Dr. Dominique Thiebaut's original tutorials on VPL I use a pair of shell scripts, vpl_run.sh and vpl_evaluate.sh at the core of this exercise. The simulation with simAVR is run twice in each case: first for the teacher solution and second for the student submission. The output of each is examined by the shell scripts to see if there are any differences. If they match, then the student gets 100%. If they don't, then the student gets a zero.
In a normal VPL exercise, the teacher solution and student submission are run directly on the VPL server's processor. But here, we're interested in how these programs work on a processor that is different than the VPL server's own 64-bit processor. So we have to route the teacher solution and student submission through an 8-bit simulator, simAVR. This requires compiling the two programs on an 8-bit compiler, avr-gcc. Then, the output of avr-gcc is sent to simAVR, where it waits for a debugger program, avr-gdb, to tell it how to proceed. You, the instructor, will have to write a pair of GDB scripts that will walk the debugger through to the point in the complied programs that you want to evaluate. In the example presented in this blog, it will be to break on line 9 of the C-program and to examine the contents of Register DDRB, the "Data Direction Register for Port B" on the ATMEGA328P processor. The teacher solution will result in a DDRB value of 0. As long as the student solution produces that on line 9 of their submission, then the student will get 100%.
If you're a computer architecture purist and feel that the student assignment should be in Assembler, you can extend this tutorial to use inline Assembler or to have the main function in C call an Assembler function.
All of this is a little intimidating as there are a lot of steps. If you haven't explored VPL before, I suggest that you try a simpler example in C, Python, Java or Verilog, either from Dr. Thiebaut's original tutorials or some of mine.
Try out model teacher solution outside VPL first
On your own machine, use avr-gcc, simAVR and avr-gdb to ensure that you can call a stand-alone function and return from it. Once returned from it you'll want to test the values found within two variables:
- PORTB
- theVariable
We're going to compile two files, teacherSolution.c and teacherMain.c. The teacherSolution.c file will form the basis for the student solution later -- the function under test -- that we expect the student to have control over. The teacherMain.c file will call the student's function and return from it. We'll combine the two into an executable file for simAVR called teacherExecutable.elf:
avr-gcc -Os -g -o teacherExecutable.elf teacherMain.c teacherSolution.c -mmcu=atmega328p
Next, launch simAVR on the executable:
simavr -g -m atmega328p teacherExecutable.elf &
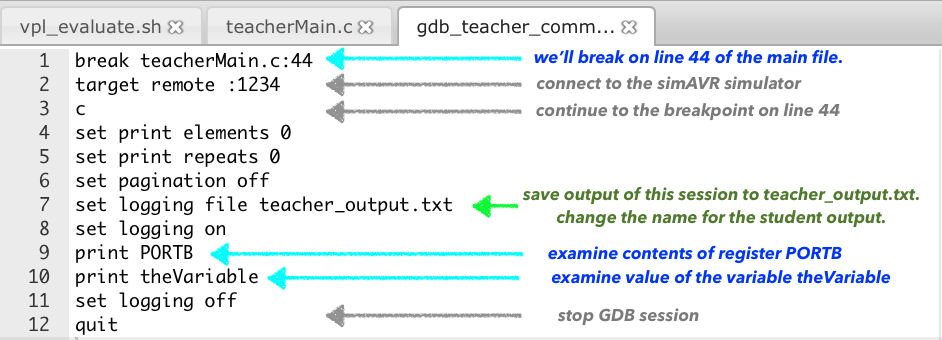
Now, launch GDB. As shown on the right, using the GDB script,gdb_teacher_commands.txt, script, put a breakpoint on line 44. This line is found after the student's function. It's at this breakpoint that you'll use GDB to print the values of PORTB and theVariable and to store them in a file called student_output.txt:
avr-gdb teacherExecutable.elf -x gdb_teacher_commands.txt &> temp.txt
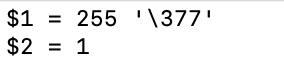
The resulting teacher_output.txt file should have two lines in it:
Add a VPL Activity to eClass / Moodle
As before, you then need to set up a VPL activity in eClass / Moodle. Set the grade for this activity to whatever you want, but the assumption is that it will be 1. That's the grade that will be assigned by the evaluation script later.
Set the submission period. Click on "Save and display."
Now you are ready to start adding in files.
Add the Student Template File
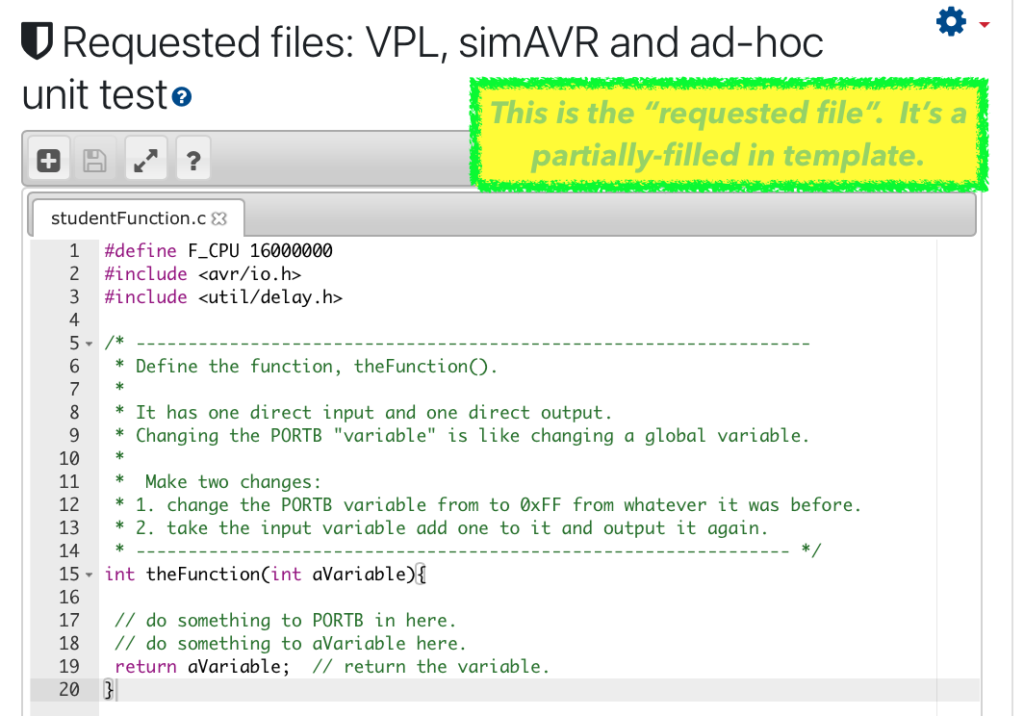
The student template, in my opinion, should be partially filled out. Think Goldilocks: not too much, not too little. Just enough to get the student started and thinking about the problem. I call the file studentFunction.c. This version of it is designed to have the student fill it in.
I like to keep a copy of the solution (e.g. studentFunction_theSolution.txt) in the same VPL folder as the vpl_run.sh script. The solution isn't accessible to the students, but is to the instructor.
Add the Run and Evaluate Shell Scripts
The run and evaluate scripts, vpl_run.sh and vpl_evaluate.sh, are the same as in the previous example, except for one big difference: the compilation line has been modified to allow both the main file and the specific function file to be compiled together, both in the context of the teacher solution and in the context of the student submission.
Add the Two GDB Scripts
The two GDB scripts are
- the teacher script: gdb_teacher_commands.txt. This runs when VPL is verifying the model teacher solution.
- the student script: gdb_student_commands.txt. This runs when VPL is examining the student's submission.
In both cases, GDB will halt at line 44 of the main file, teacherMain.c, after the function that we're interested in (theFunction()) in has run. There are two versions of this function that are defined, in two different files: studentFunction.c and teacherSolution.c. The first, studentFunction.c, is a template for the student to fill in. The second version, teacherSolution.c, is the teacher's solution.
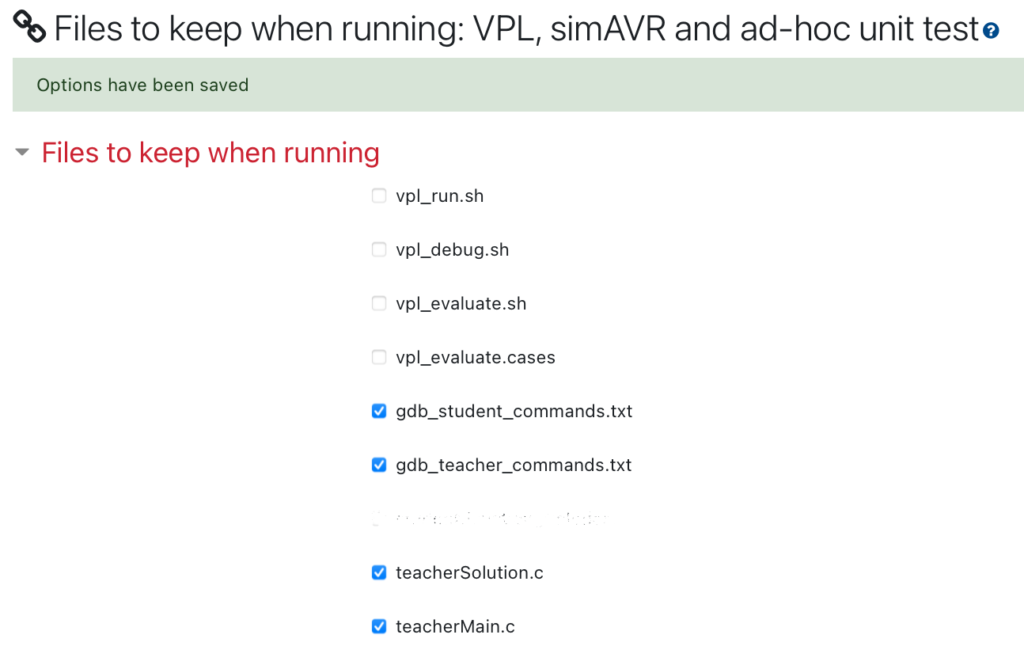
Tell VPL to keep the GDB and teacher's solution available during processing
There are four files that you need to specify that need being kept during the VPL compilation and analysis process: gdb_student_commands.txt, gdb_teacher_commands.txt, teacherSolution.c, and teacherMain.c.
Test out your activity
Before launching the activity for your students, run and evaluate your solution using the "run" and "evaluate" icons in Test Activity -> Edit.
Common Errors
There are some common errors including:
- avr-gcc isn't found. That's likely because you haven't set the VPL server name right and are pointing to the Spanish developer site. Go to "Local Execution Servers" and write two lines. The first line is the https:// address of your local VPL server. The second line is end_of_jails.
- file not found. One of your text or .c files may be included in VPL but you haven't specified that it should be "kept". Go to "Files to keep when running" and check the name of the file.
Conclusion
Acknowledgements
First, a big shout out to the EECS Department tech team here in the Lassonde School: Mr. Jason Keltz and Mr. Paul Griffith in particular for helping with VPL and the Linux systems that we use for this work. Thank you to YorkU's UIT for your continued support on eClass/Moodle. Thank you to all the people who develop and maintain Virtual Programming Lab and thank you to Dr. Dominique Thiebaut, Prof Emeritus at Smith College, for the original tutorials on VPL that were instrumental in this work.

James Andrew Smith is a Professional Engineer and Associate Professor in the Electrical Engineering and Computer Science Department of York University's Lassonde School, with degrees in Electrical and Mechanical Engineering from the University of Alberta and McGill University. Previously a program director in biomedical engineering, his research background spans robotics, locomotion, human birth and engineering education. While on sabbatical in 2018-19 with his wife and kids he lived in Strasbourg, France and he taught at the INSA Strasbourg and Hochschule Karlsruhe and wrote about his personal and professional perspectives. James is a proponent of using social media to advocate for justice, equity, diversity and inclusion as well as evidence-based applications of research in the public sphere. You can find him on Twitter. Originally from Québec City, he now lives in Toronto, Canada.