Steps to Download Ivanti Secure
- Download Ivanti Secure Installer (64 Bit) or Ivanti Secure Installer (32 Bit). Please visit How can I tell if my computer is running a 32-bit or a 64-bit version of Windows? if you need to determine if your Windows OS is 64 bit or 32 bit.
- When you start the download of the Ivanti Secure installer file, you will be first prompted to log in to York University Computing Downloads using your Passport York credentials.
- Depending on your browser, you might be able to choose Run to begin the installation or you will have to Save the installer file first. If you have to save the file, it will appear under your downloads (PulseSecure.xNN.msi)

- Click on the file name in your downloads and/or Run the file. The InstallShield Wizard will open. Click next and install. You might have to click Yes to allow the installation on your computer user account. Click finish to complete the installation.
- Once you finish, the wizard screen disappears. The Ivanti icon has been added to your system tray.
- Log out from York University Computing Downloads

and proceed with Ivanti setup using the icon in your system tray.
Steps to Configure Ivanti Secure Access Client
- Confirm that Ivanti Secure Access Client™ is running by clicking on the Ivanti Secure Access Client™ icon in the system tray:

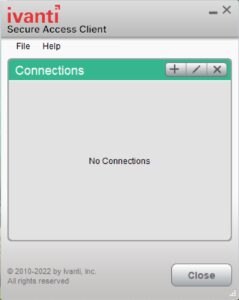
- After clicking on the Ivanti Secure Access Client™ Icon in the system tray the Ivanti Secure Access Client™ window is presented as follows:
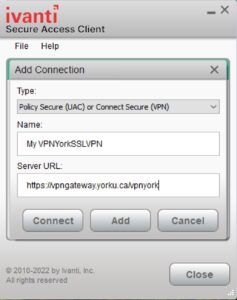
- Click on the "+" sign to add a connection.
- In the Name field enter a description name for your SSLVPN profile.
In the Server URL field put in the server name for your SSLVPN Profile:- (e.g. https://vpngateway.yorku.ca/vpnyork for regular VPN) in the Server URL field and click ADD.
- Your Ivanti Secure Access Client™ panel now has an entry for “My VPNYork SSLVPN”.
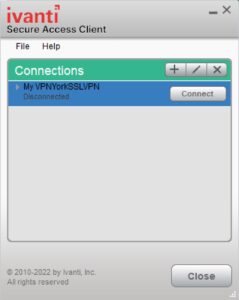
- Click “Connect” to start your SSLVPN session.
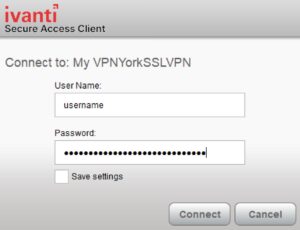
- Enter your PPY username and password and click on Connect.
- You are now connected to the VPNYork SSLVPN.
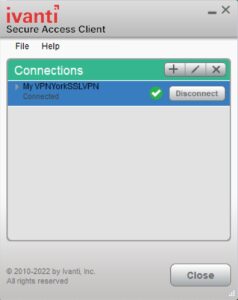
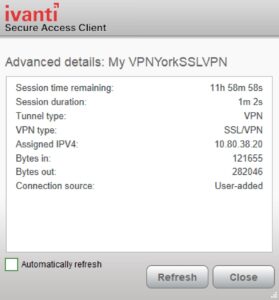
- For details on your SSLVPN session select File > Connections > Advanced Connection Details
- To end your SSLVPN session Select “Disconnect” next to “My VPNYork SSLVPN”.
- Session now shows “Disconnected”.
2FA Authentication
Starting on July 29th, 2021, the regular VPNYork profile (https://vpngateway.yorku.ca/vpnyork) will require two-factor authentication, Duo 2FA.
For additional information on how to connect to Ivanti Secure VPN with Duo 2FA, please visit the information security website. You can find answers to frequently asked questions about 2FA on the FAQ page.