
York University offers a range of internet access options to keep you connected on campus:
- AirYorkPLUS: Secure, high-speed Wi-Fi available across campus.
- eduroam: Wi-Fi for visitors from participating institutions
- AirYorkGUEST: An open Wi-Fi network for guests and visitors
- Wired Internet Access in Residence: Reliable, high-speed wired internet for students living in residence
- Virtual Private Network (VPN): Securely access university resources and services from off-campus locations, ensuring your data remains protected while working remotely.
Whether you’re in class, studying in residence, or visiting from another institution, York University’s internet services keep you connected and secure. To ensure optimal performance of your Wi-Fi connection, please consult our recommendations on choosing a Wi-Fi client device.
**Please note any other wireless networks available on campus at York are not supported by UIT and should be avoided.
Featured Services
Overview
AirYorkPLUS provides wireless internet access to York community members featuring improved security, performance, convenience and mobility. AirYorkPLUS is for current students that use Passport York login for their daily academic online activities at York University.
Features:
Single sign on
Once you configure your Wi-Fi client (laptop or tablet computer, smartphone, etc.) with your Passport York credentials, the client will automatically connect to AirYorkPLUS as soon as it is within range of an AirYorkPLUS access point.
Security
Network traffic is encrypted between the client and the AirYorkPLUS access point.
Performance
Better performance in high-density settings such as lecture halls and libraries where many Wi-Fi clients are active simultaneously.
Most performance improvement are available only to Wi-Fi devices with dual-band radios. For further details, please consult UIT's recommendations on selecting/purchasing a Wi-Fi client device for use on-campus at York.
**Please note that you will only be able to access AirYorkPLUS as an active York student. Once you leave or graduate, you will no longer have access. Please consult the AirYorkGuest page for information on how to connect once you are not longer and active student.
How do I access it?
You will need a Passport York username and password to connect to AirYorkPLUS
Configure and connect to AirYorkPLUS as per instructions for the operating system of your device below:
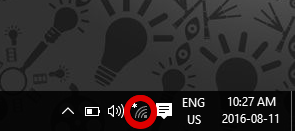
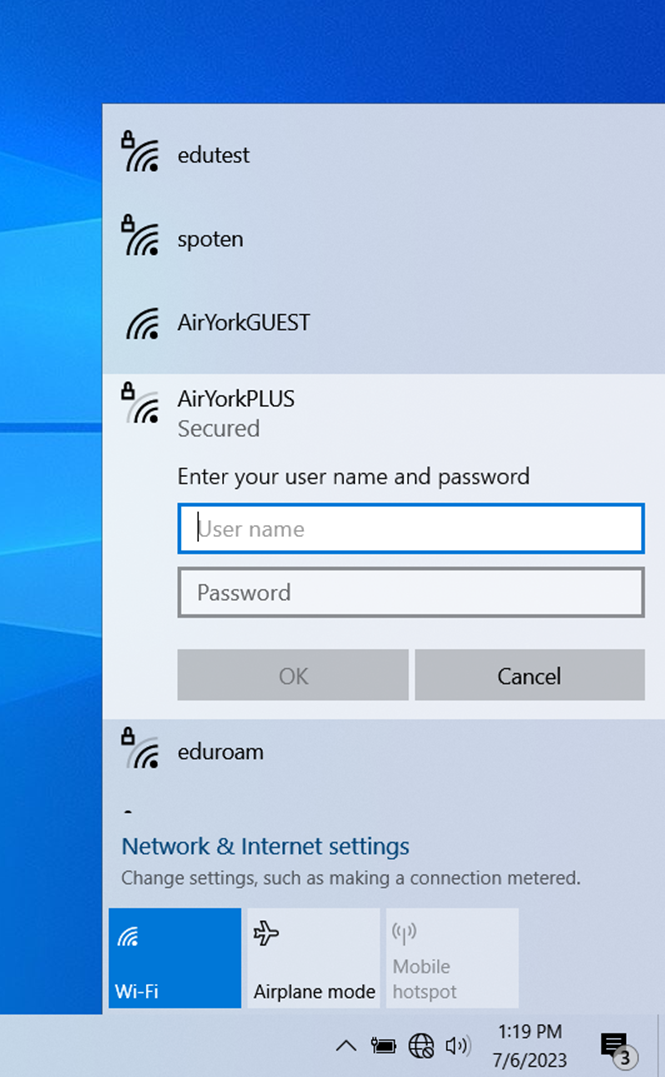
1. Click on the wireless icon in the task bar located at the bottom right of your screen.
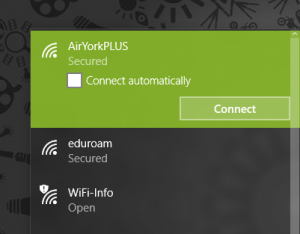
2. Select AirYorkPLUS from the list of available networks and click Connect.
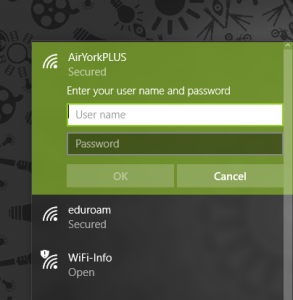
3. Enter your Passport York credentials as shown and click OK.
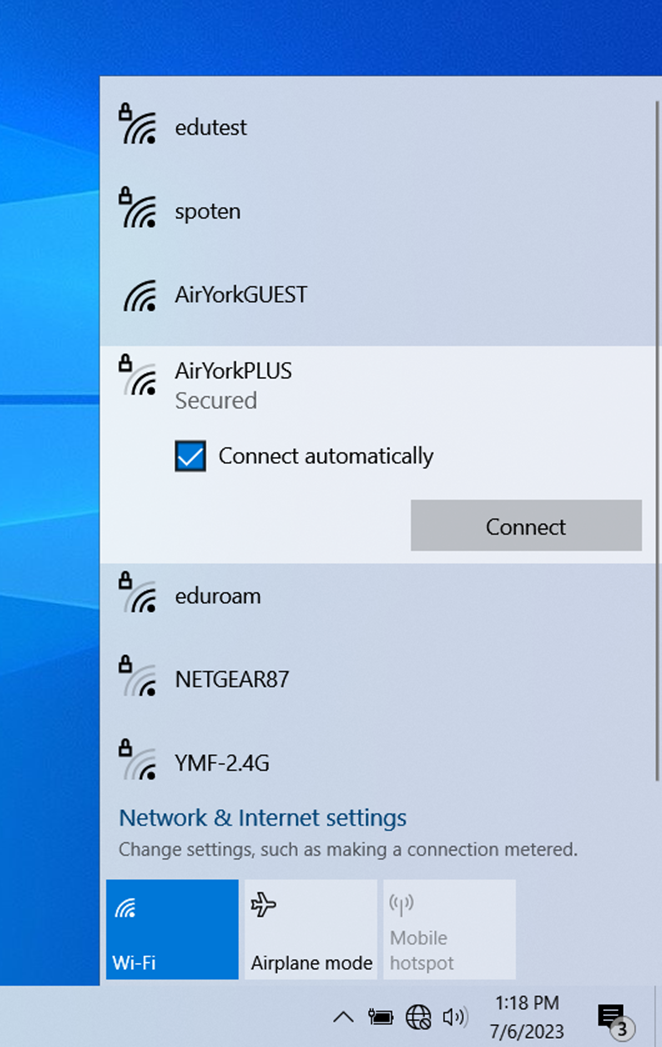
1. Click on the wireless icon (the globe or Wi-Fi symbol) in the taskbar located at the bottom right of your screen.

2. Select ‘AirYorkPLUS’ from the list of available networks and click Connect.
3. Enter your Passport York credentials as shown and click OK.
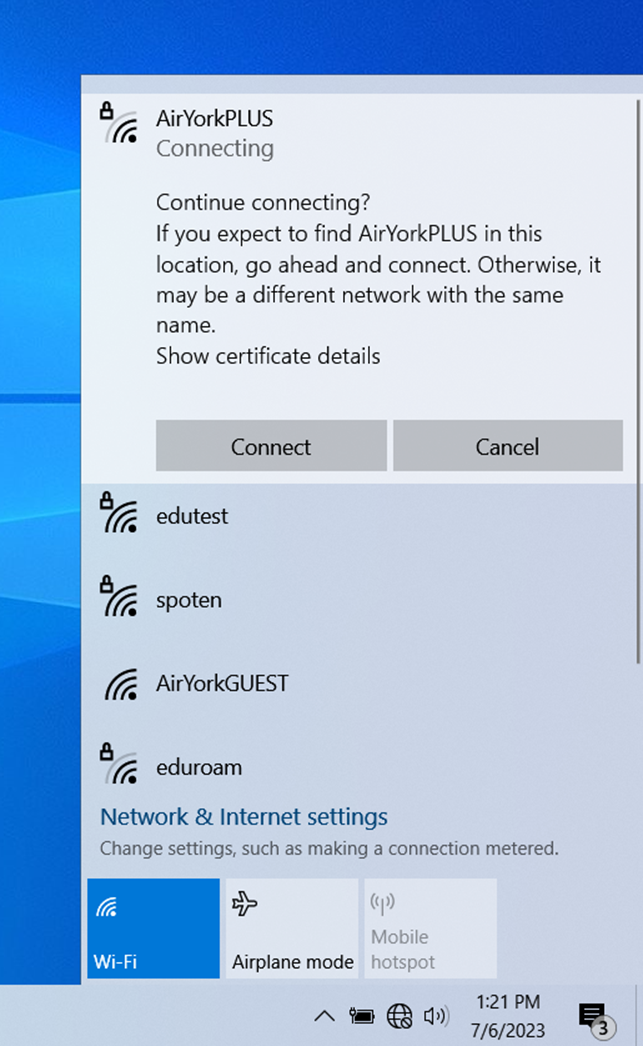
4. Click ‘Connect’ again to accept the certificate details.
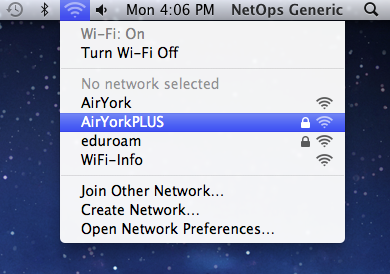
1. Click on the wireless icon in the task bar located at the top right corner of your screen and select AirYorkPLUS.
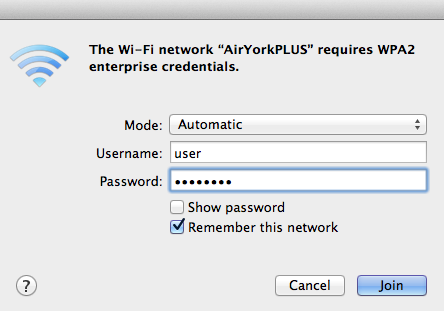
2. In the authentication window, enter your Passport York credentials and click Join.
3. The Verify Certificate window will pop up, asking you to verify the authenticate.yorku.ca certificate for the AirYorkPLUS network is issued by GlobalSign Root CA; click Continue to connect.
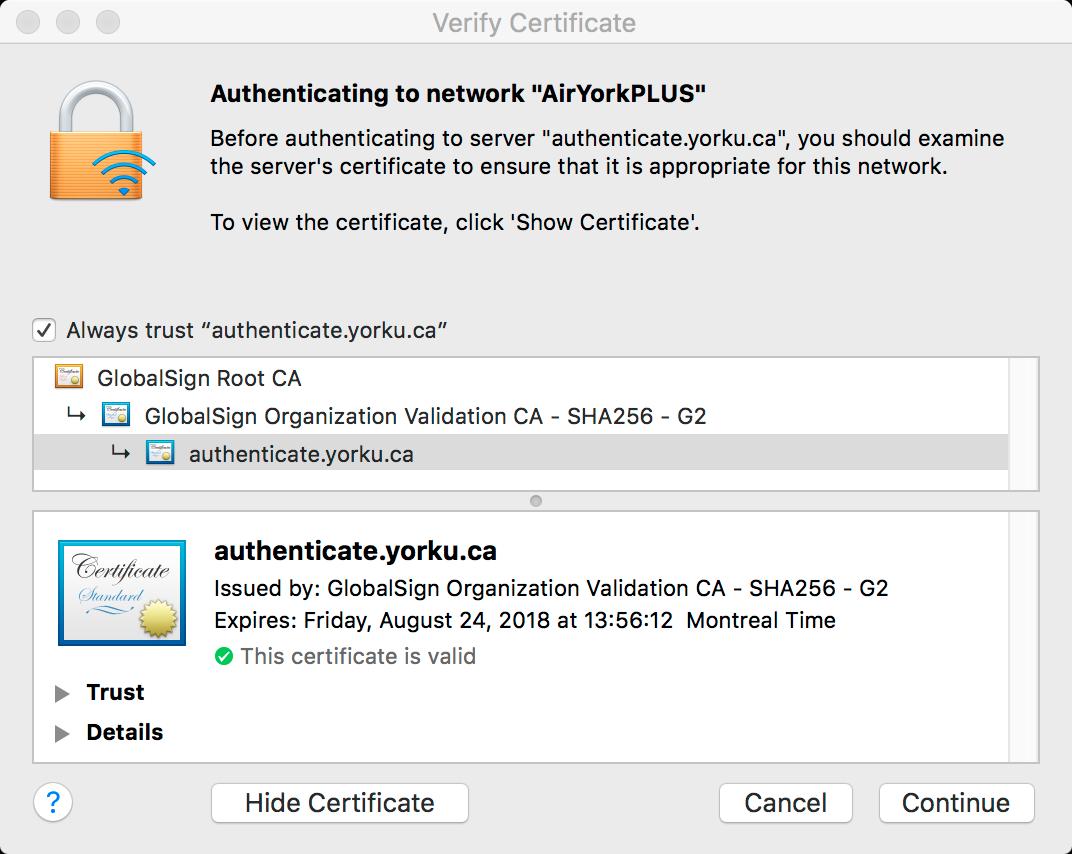
1. From your device home screen, activate the menu button and select Settings:
2. Click on Wi-Fi.
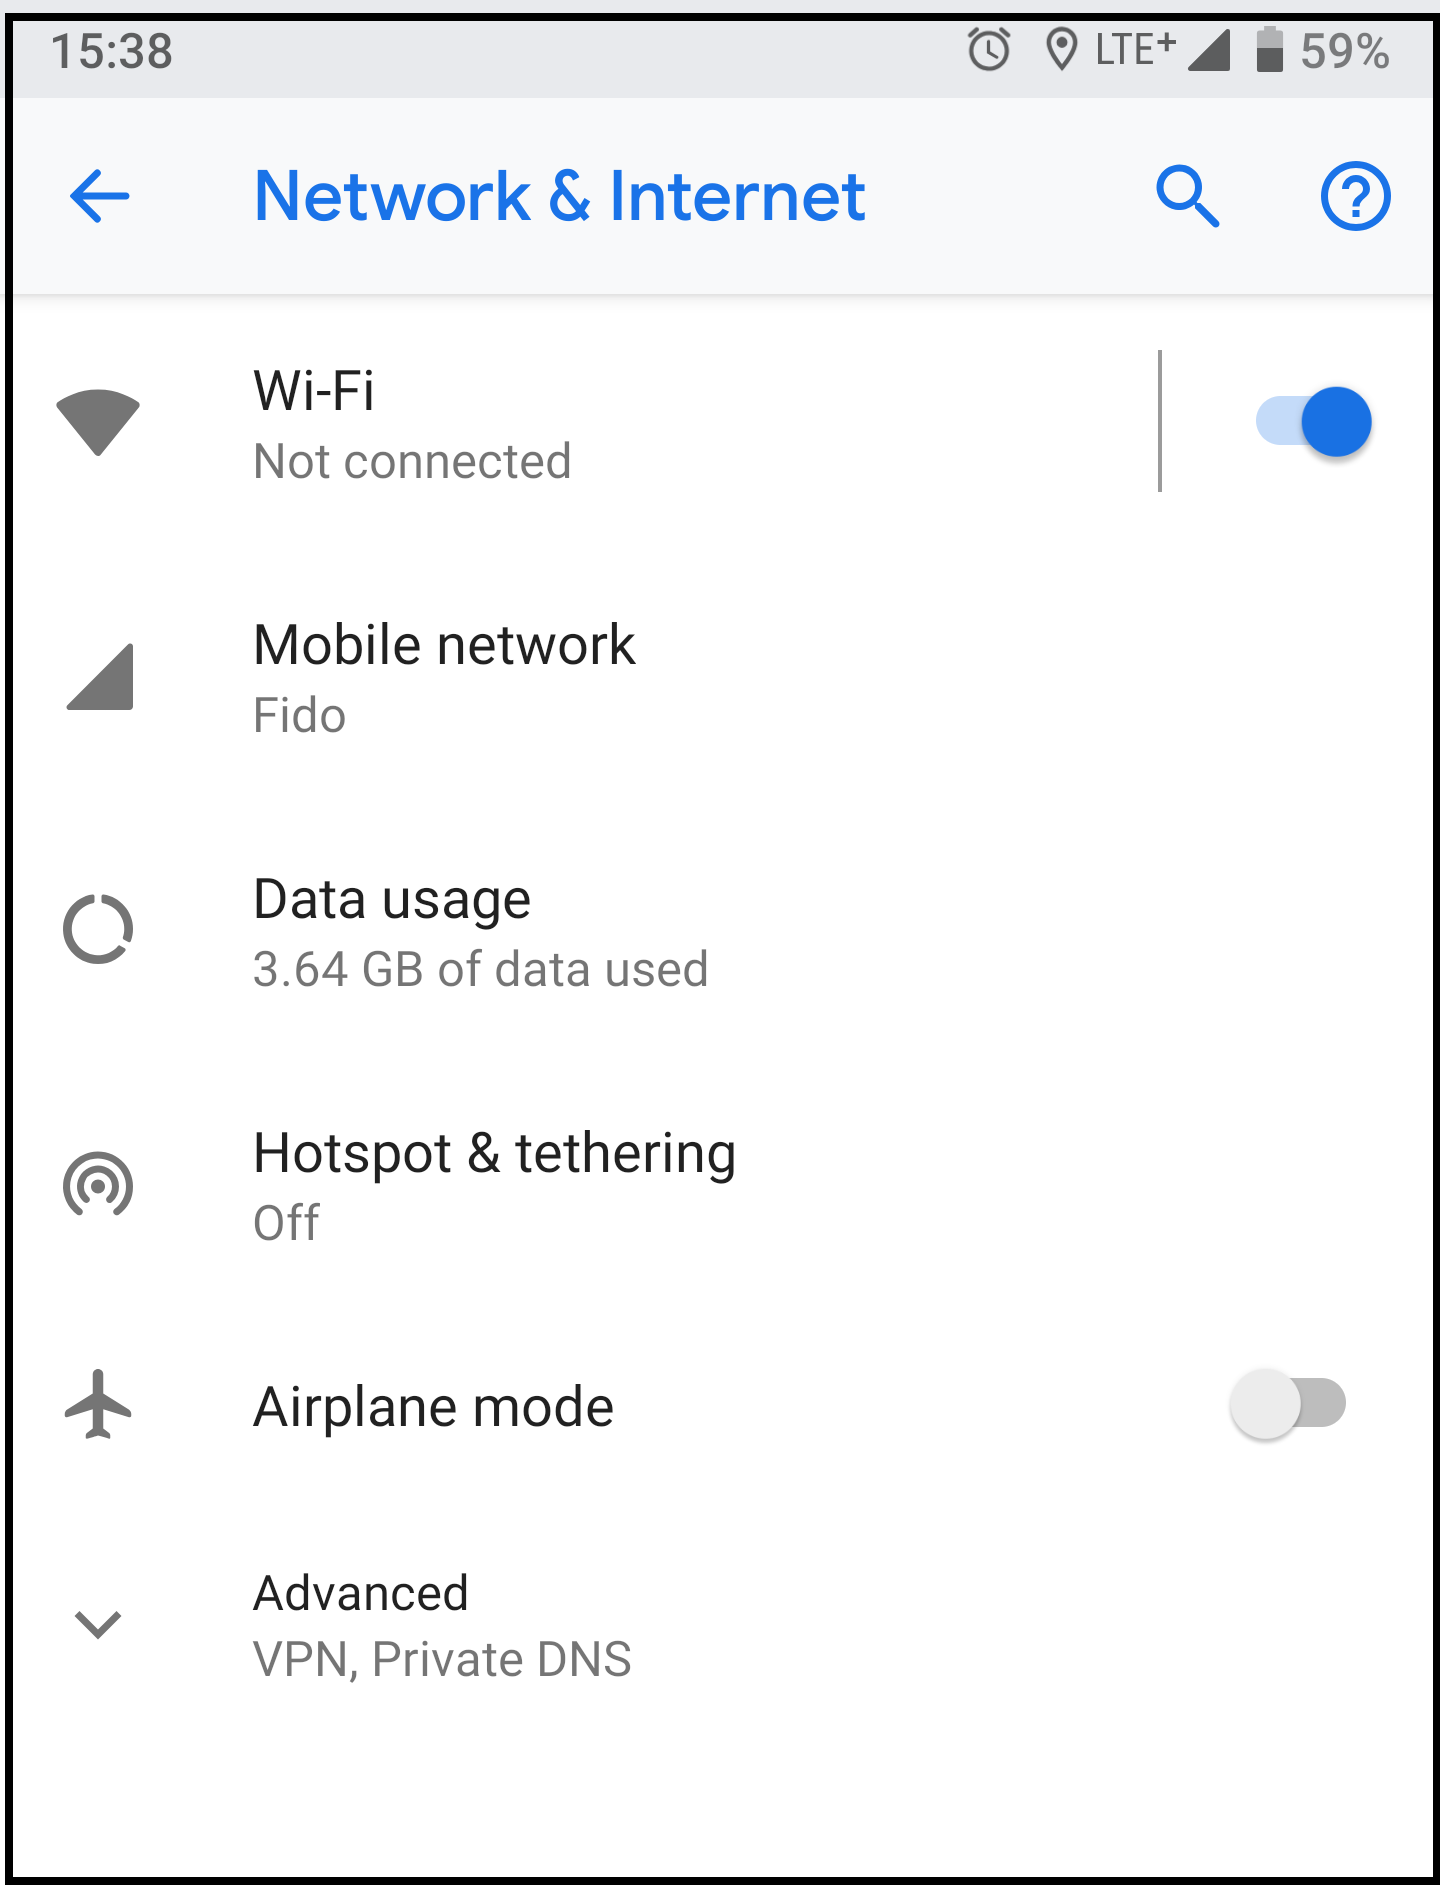
3. Select AirYorkPLUS from the list of Wi-Fi networks.
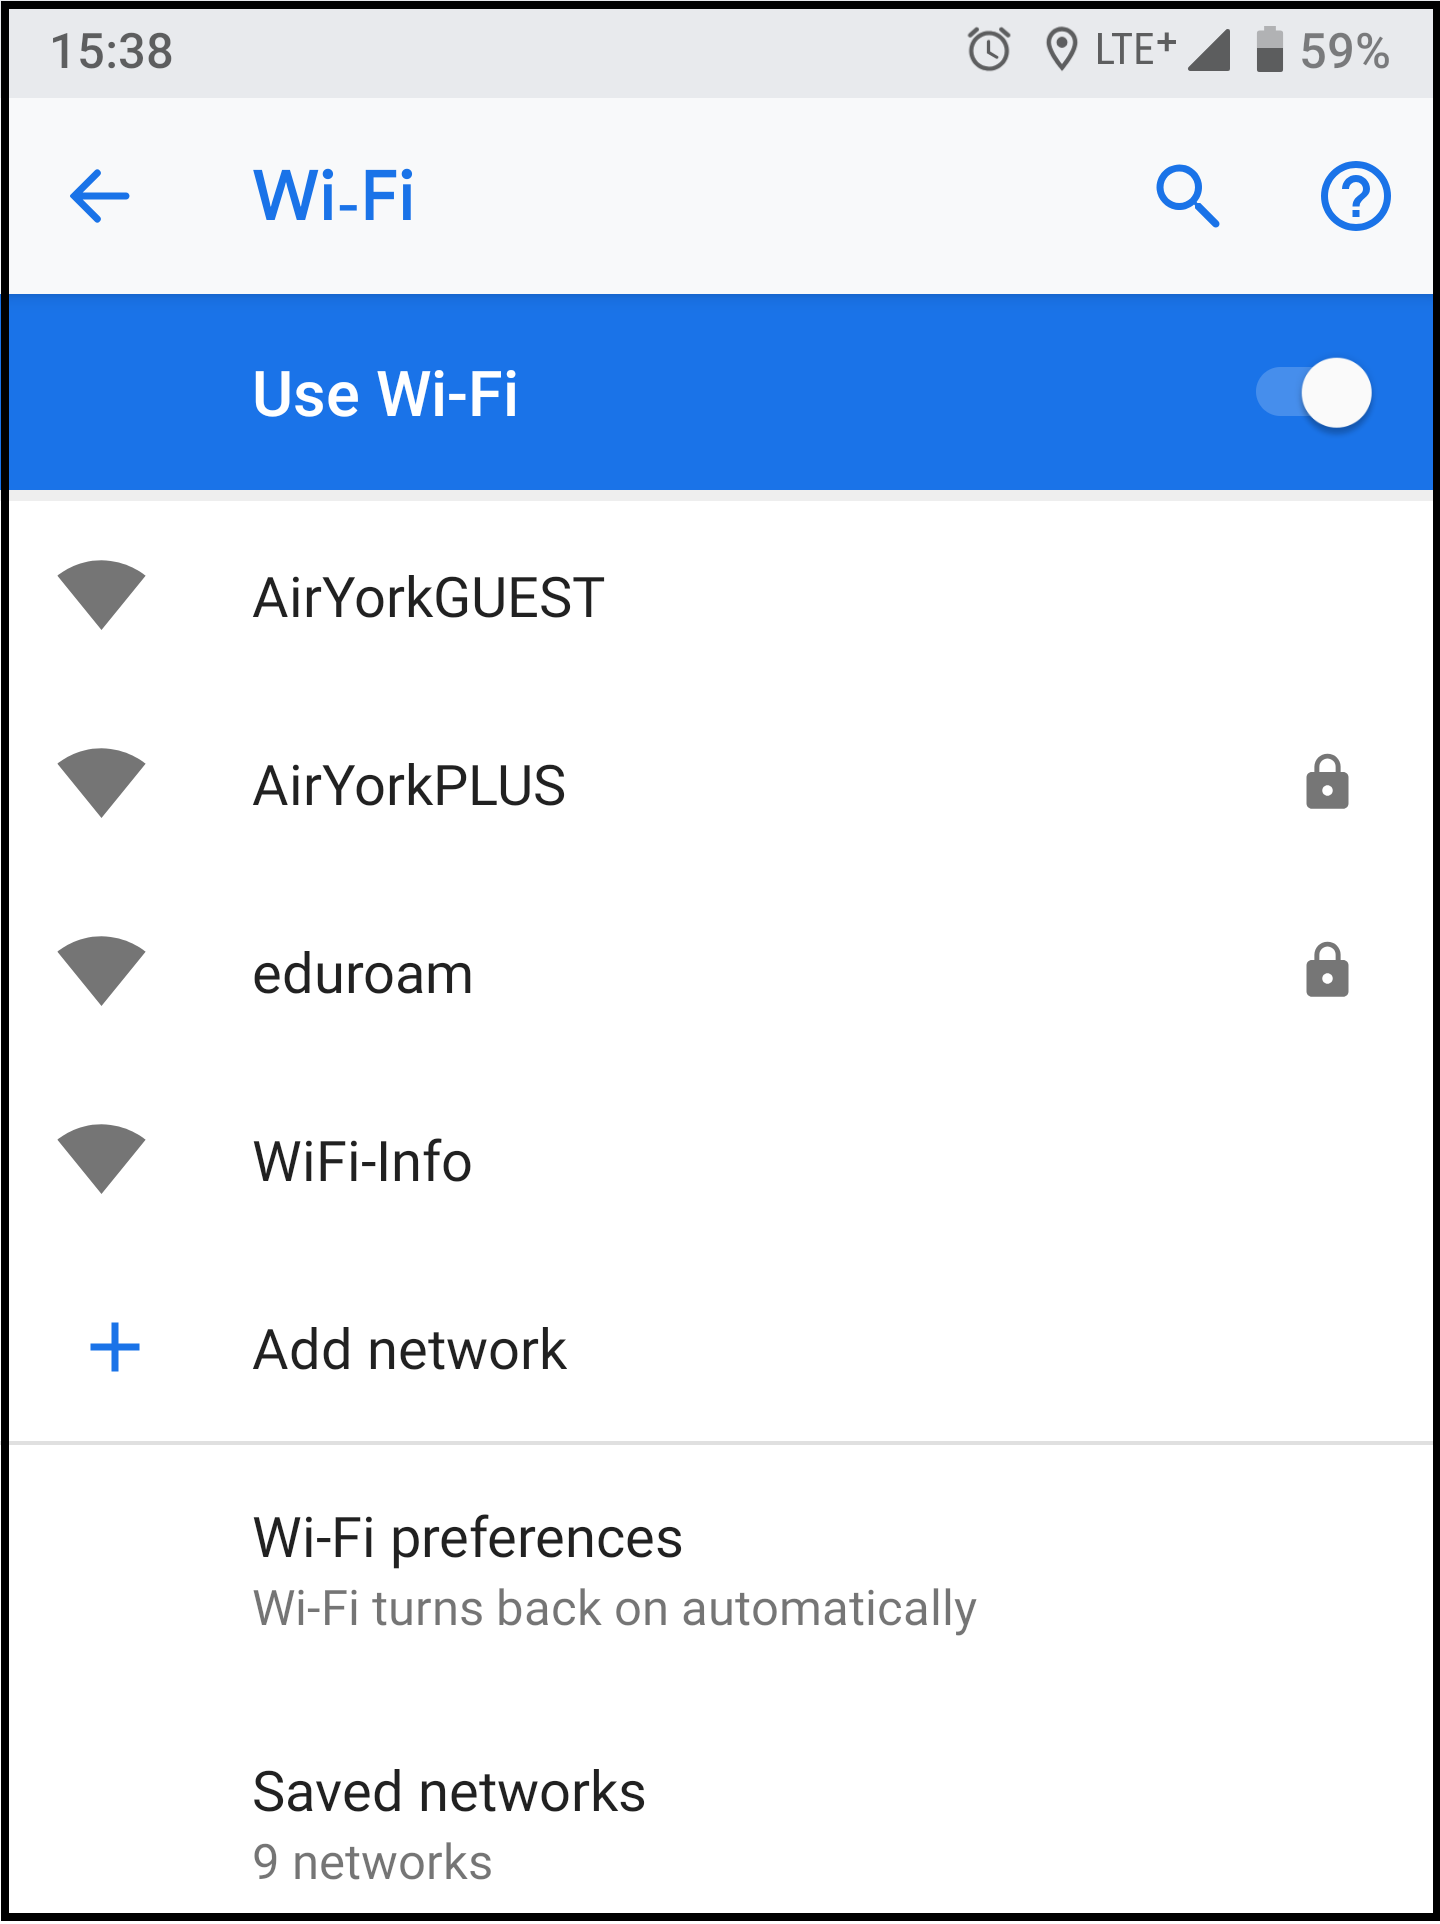
4. You may need to enter the follow information as shown below:
- EAP method: PEAP
- Phase 2 authentication: MSCHAPV2
- CA Certificate: Do not validate
- Domain: yorku.ca ( If you do not see the domain field then ignore )
- Identity: your Passport York Username
- Password: your Passport York account password
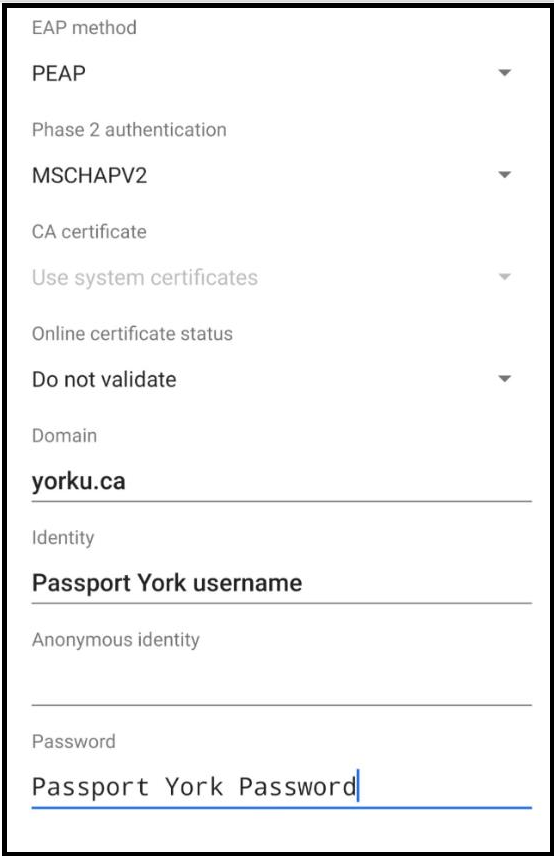
5. Click Connect to complete the process.
1. Select Settings, then Wi-Fi.
2. Select AirYorkPLUS from the list of available networks.
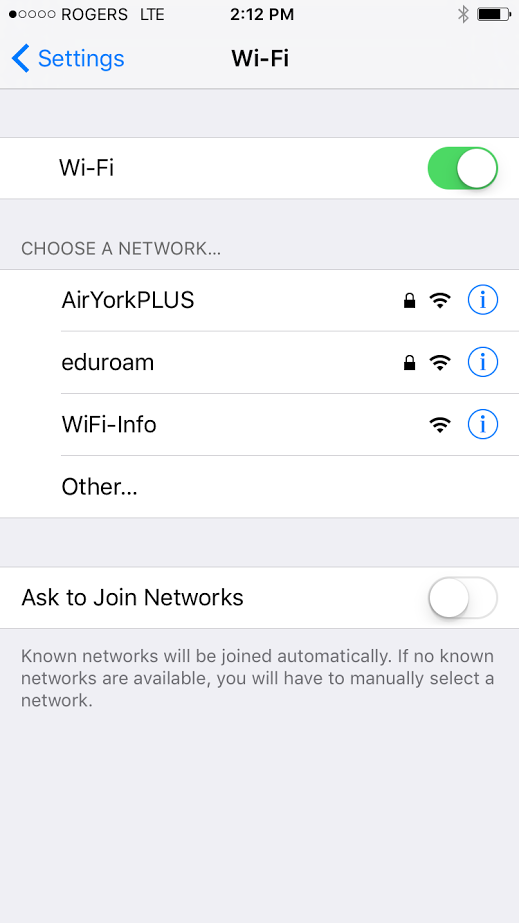
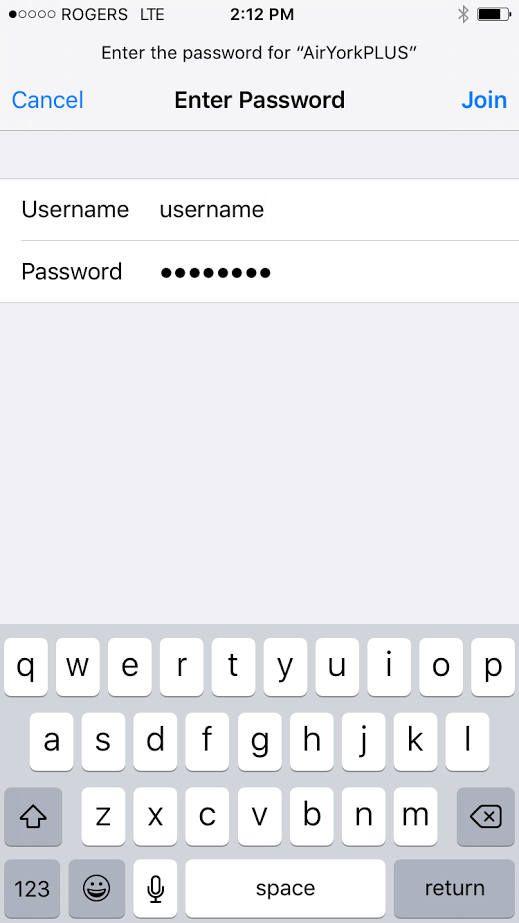
3. Enter your Passport York credentials and click Join.
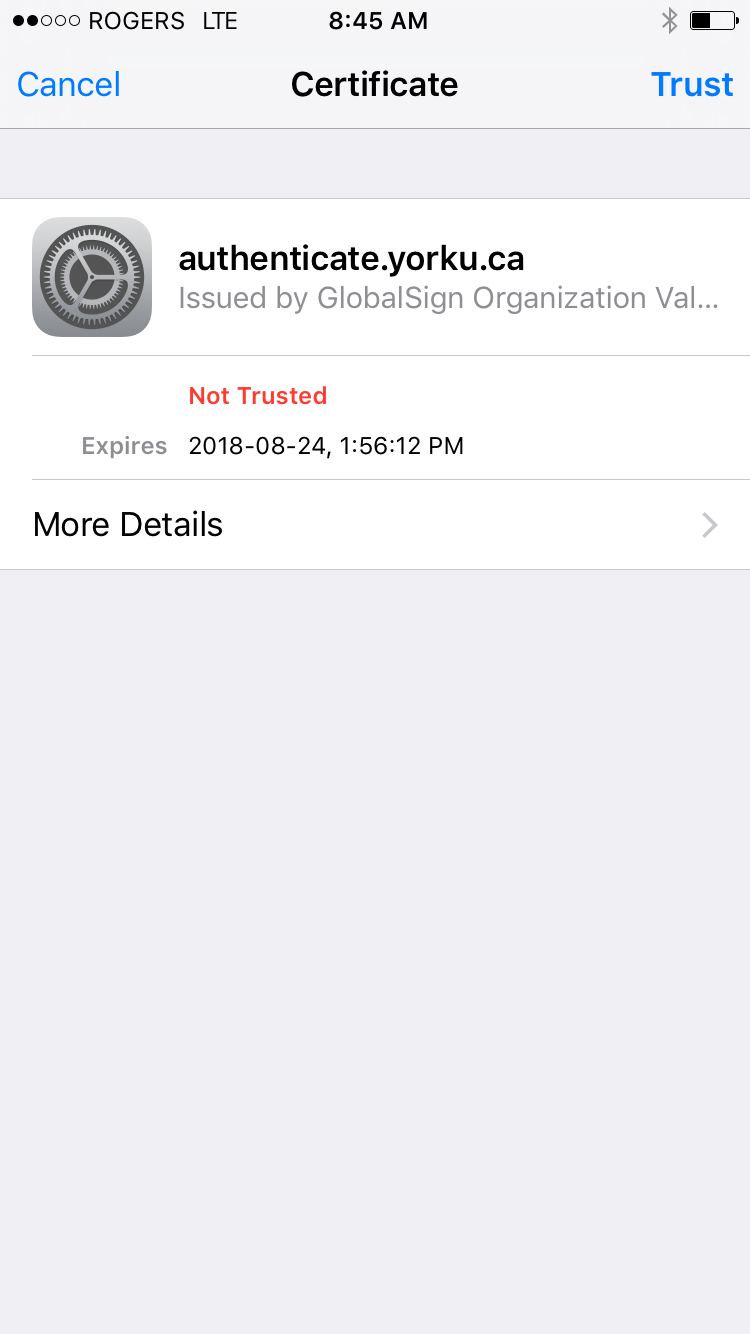
4. Verify the certificate is for authenticate.yorku.ca and is issued by GlobalSign Organization Validation CA; if so, select Accept.
Overview
eduroam provides wireless internet access to York community members and to visitors from eduroam-member institutions. eduroam provides improved security, performance, convenience and mobility. York community members connected to eduroam are provided the same service as if they were connected to AirYorkPLUS, and it is available in all the same locations as AirYorkPLUS. A Wi-Fi client device which is configured to use eduroam does not also require AirYorkPLUS.
**Please note that you will only have access to eduroam while you are an active York student. Once you leave or graduate, you will no longer be able to connect to eduroam-member institutions.
Who is it for?
At York, the eduroam service is available to visitors from an eduroam-participating institution. Current York University students may access eduroam while visiting other eduroam-participating institutions.
How do I access it?
- Check that the institution you will be visiting is an eduroam participant at eduroam institution list.
- Your login for eduroam your Passport York username followed by @yorku.ca, and your password.
- Configure your computer or wireless device & connect to eduroam wireless network:
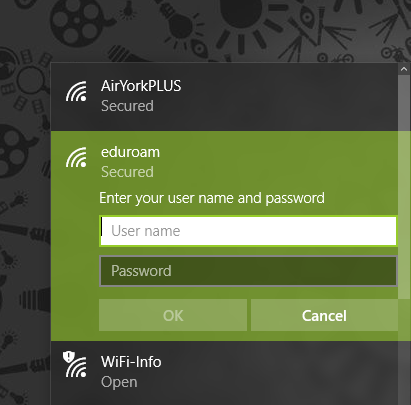
1. Click on the wireless icon in the task bar located at the bottom right of your screen.
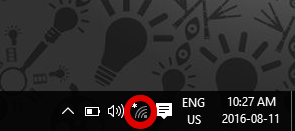
2. Select eduroam from the list of available networks and click Connect.
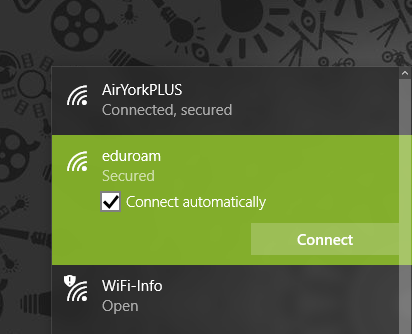
3. Enter your username in the form username@yorku.ca and your Passport York password and click OK.
1. Click on the wireless icon in the task bar located at the top right corner of your screen and select eduroam.
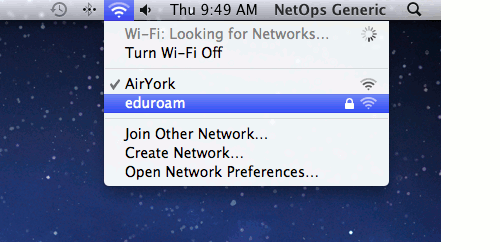
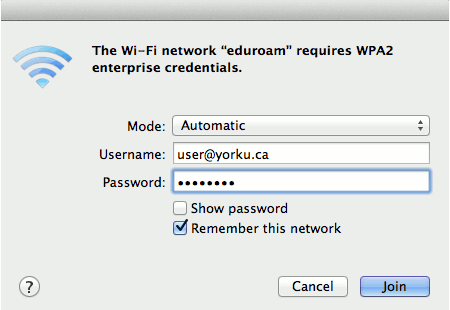
2. In the authentication window, enter the following and click Join:
- Username: PPYusername@yorku.ca
- Password: your FAS account password
3. The Verify Certificate window will pop up, asking you to verify the certificate for server eduroam.yorku.ca and issued by GlobalSign Extended Validation CA. If so, click Continue.
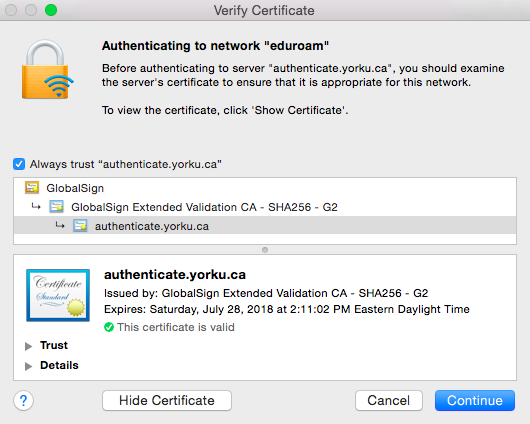
4. You will then be prompted for your machine's admin password in order to add this certificate to your Certificate Trust Settings; click Update Settings.
5. You should now be connected to the eduroam wireless network.
**Please note Android devices vary and the eduroam setup process may look slightly different depending on the device. Screen shots are dependent on the version of Android that the user has.
1. From the home screen search for Settings.
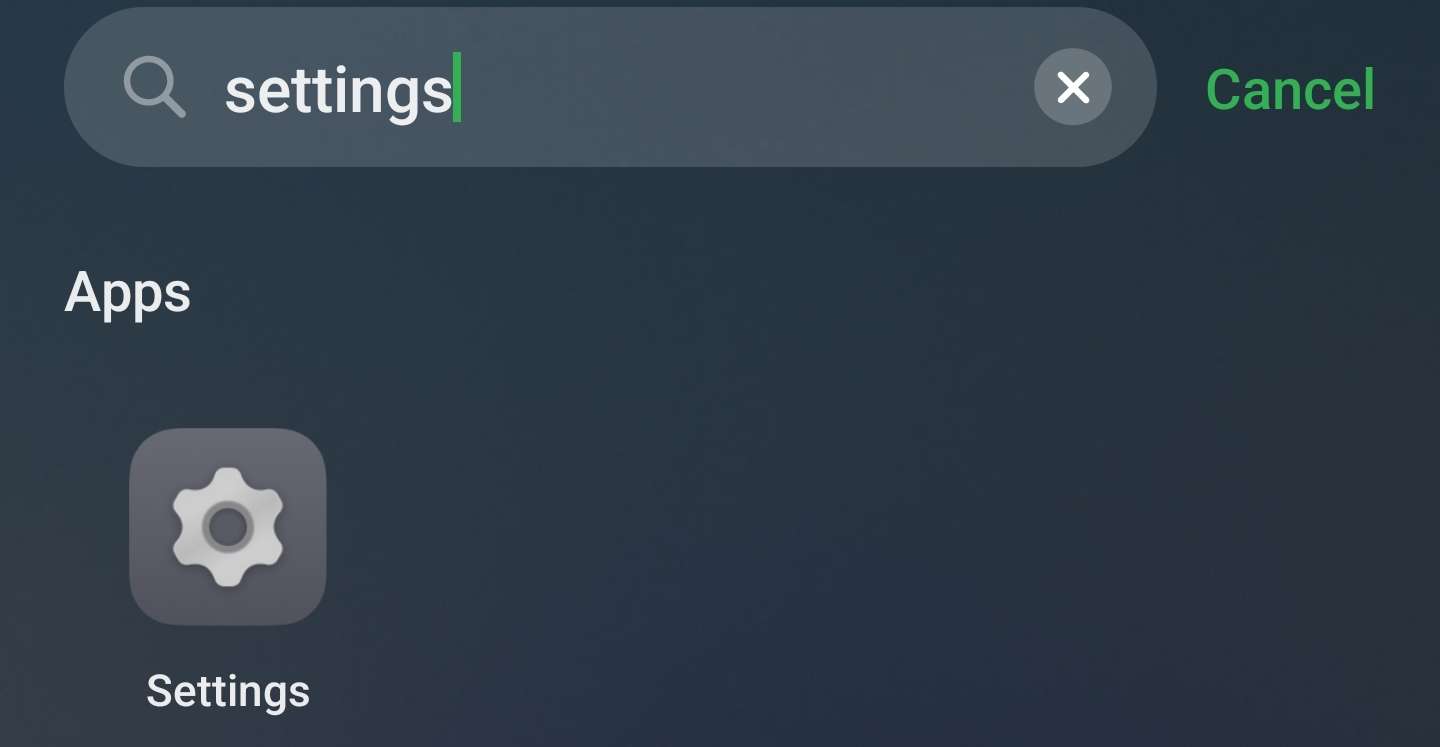
2. Find and tap on Settings (Fig.2) – you may have to swipe several screens to the right to find it.

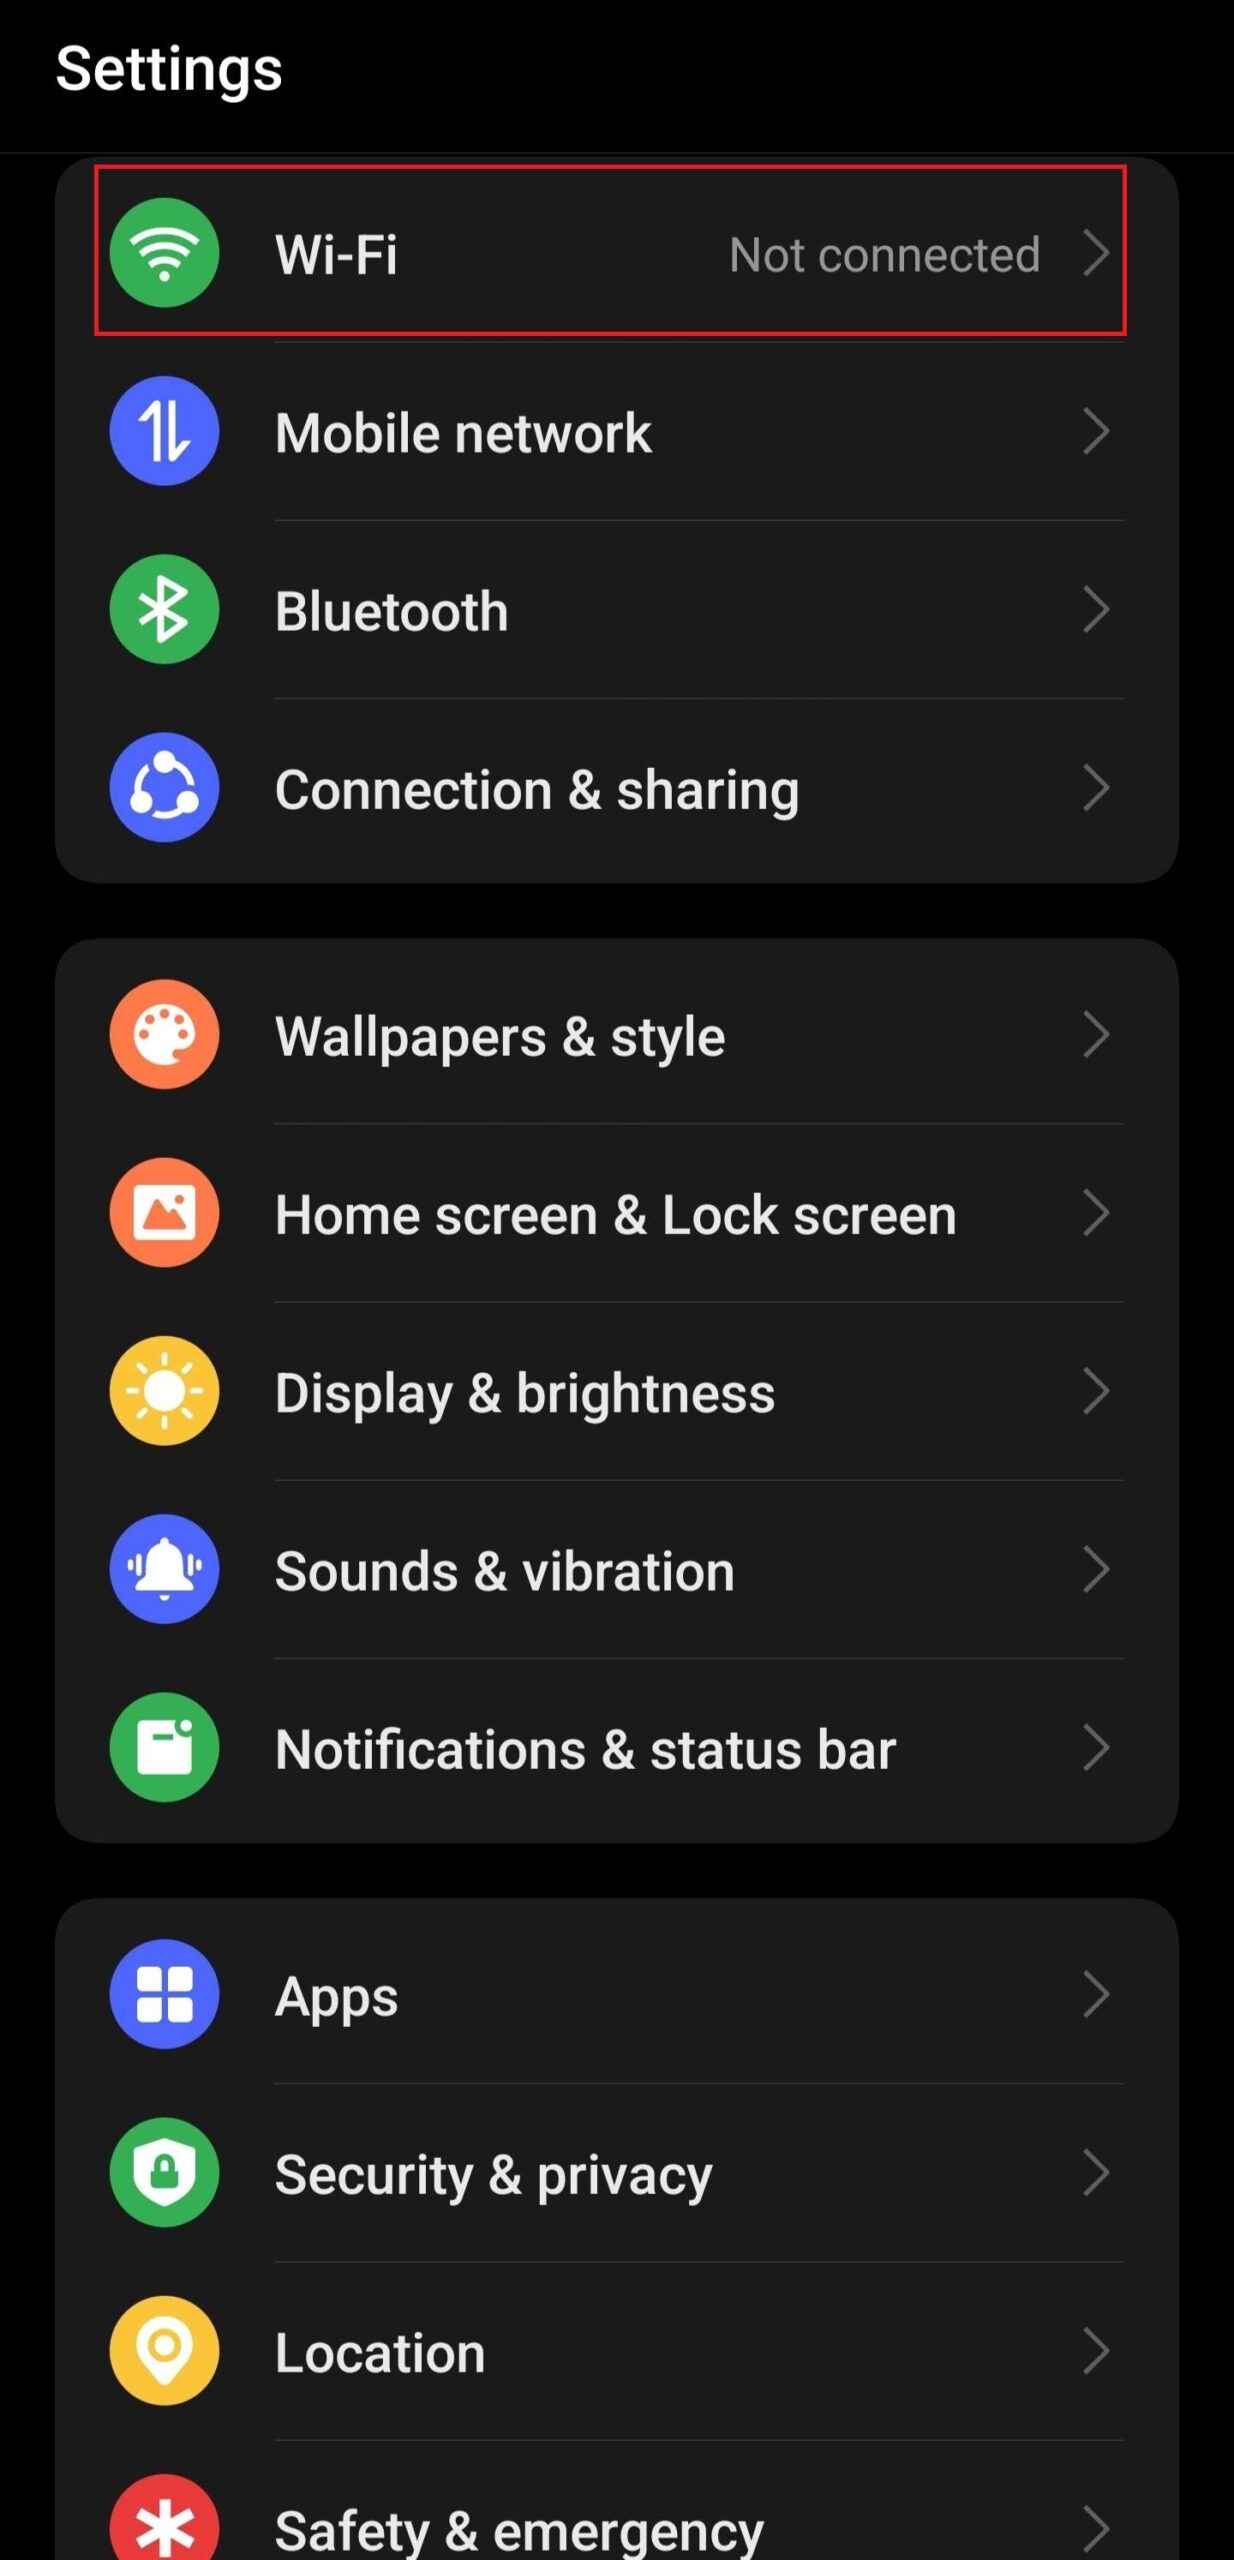
3. In the Wireless & Networks section (Fig.3) select Wi-Fi
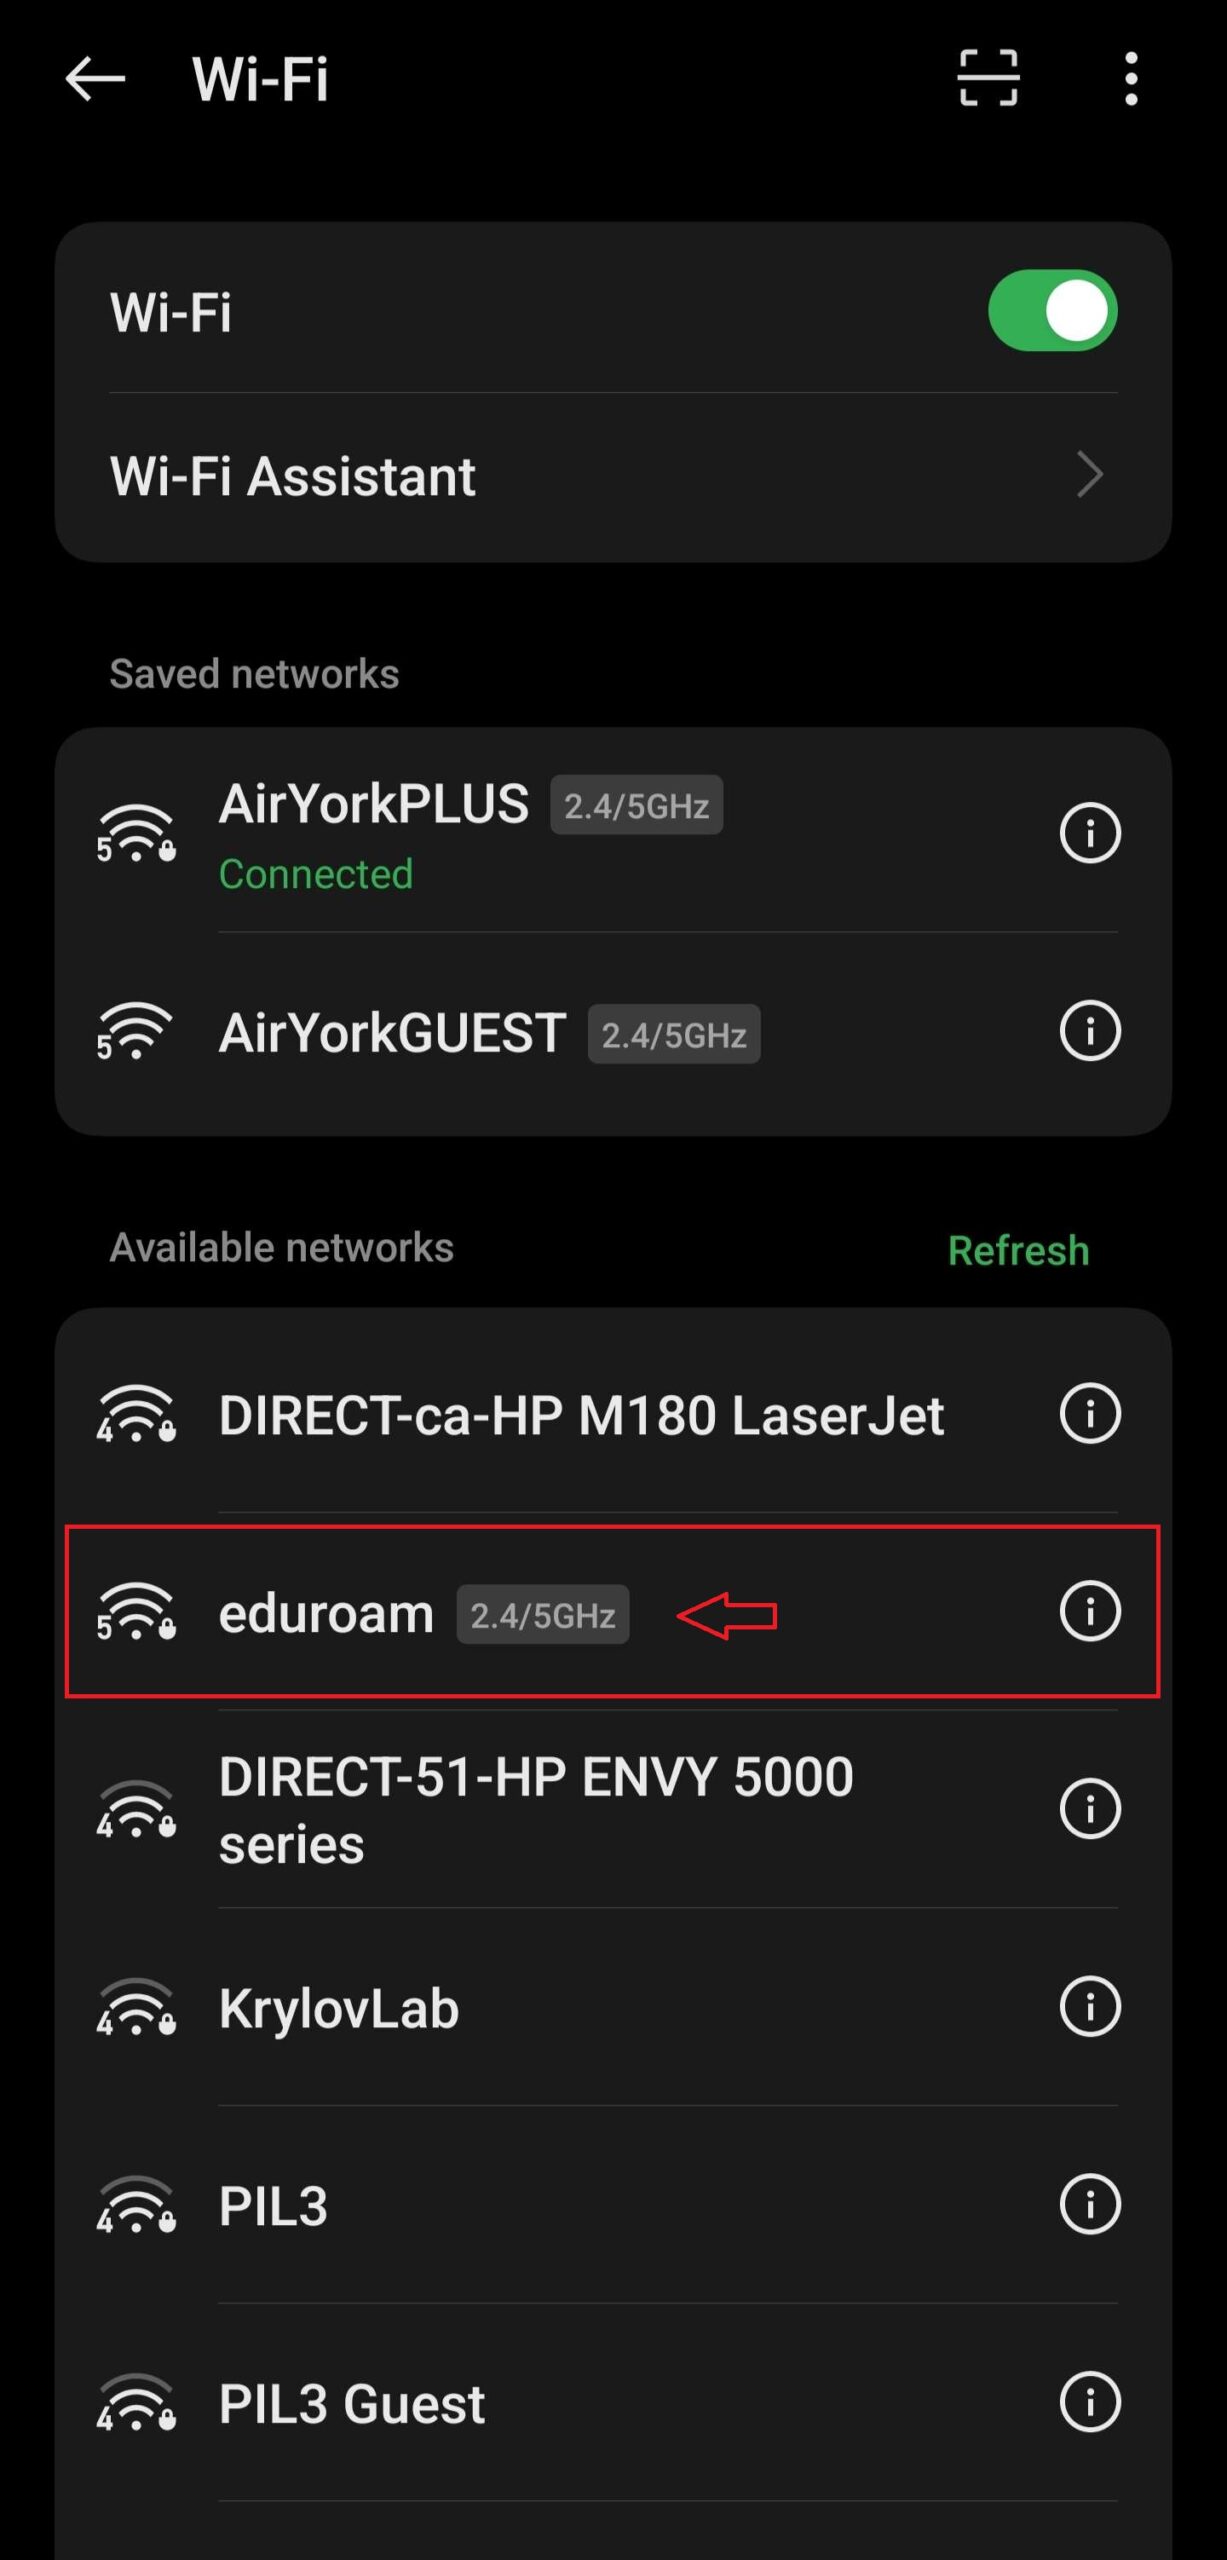
4. The Wi-Fi screen will open and display a list of available networks. Select eduroam
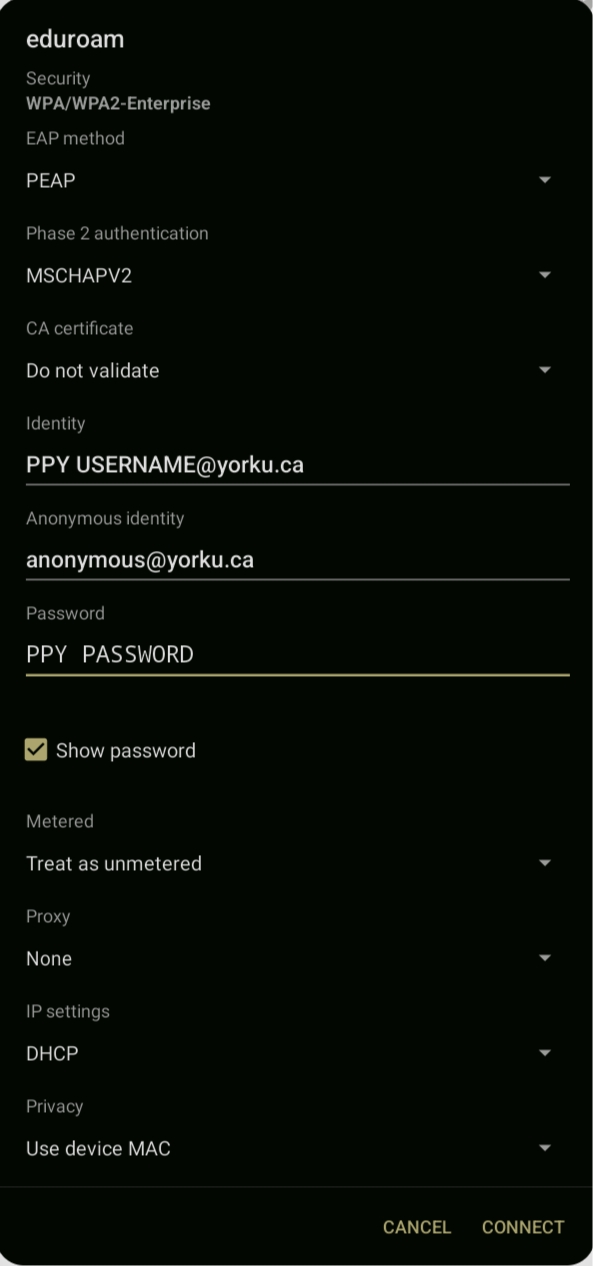
5. You will be prompted to sign in to the wireless network. Enter the following details in the settings menu (Fig.5):
EAP method: PEAP
Phase-2 authentication: MSCHAPV2
CA certificate: None
Domain: yorku.ca
Identity: Your Passport York username@yorku.ca
Anonymous identity: anonymous@yorku.ca
Password: your Passport York password
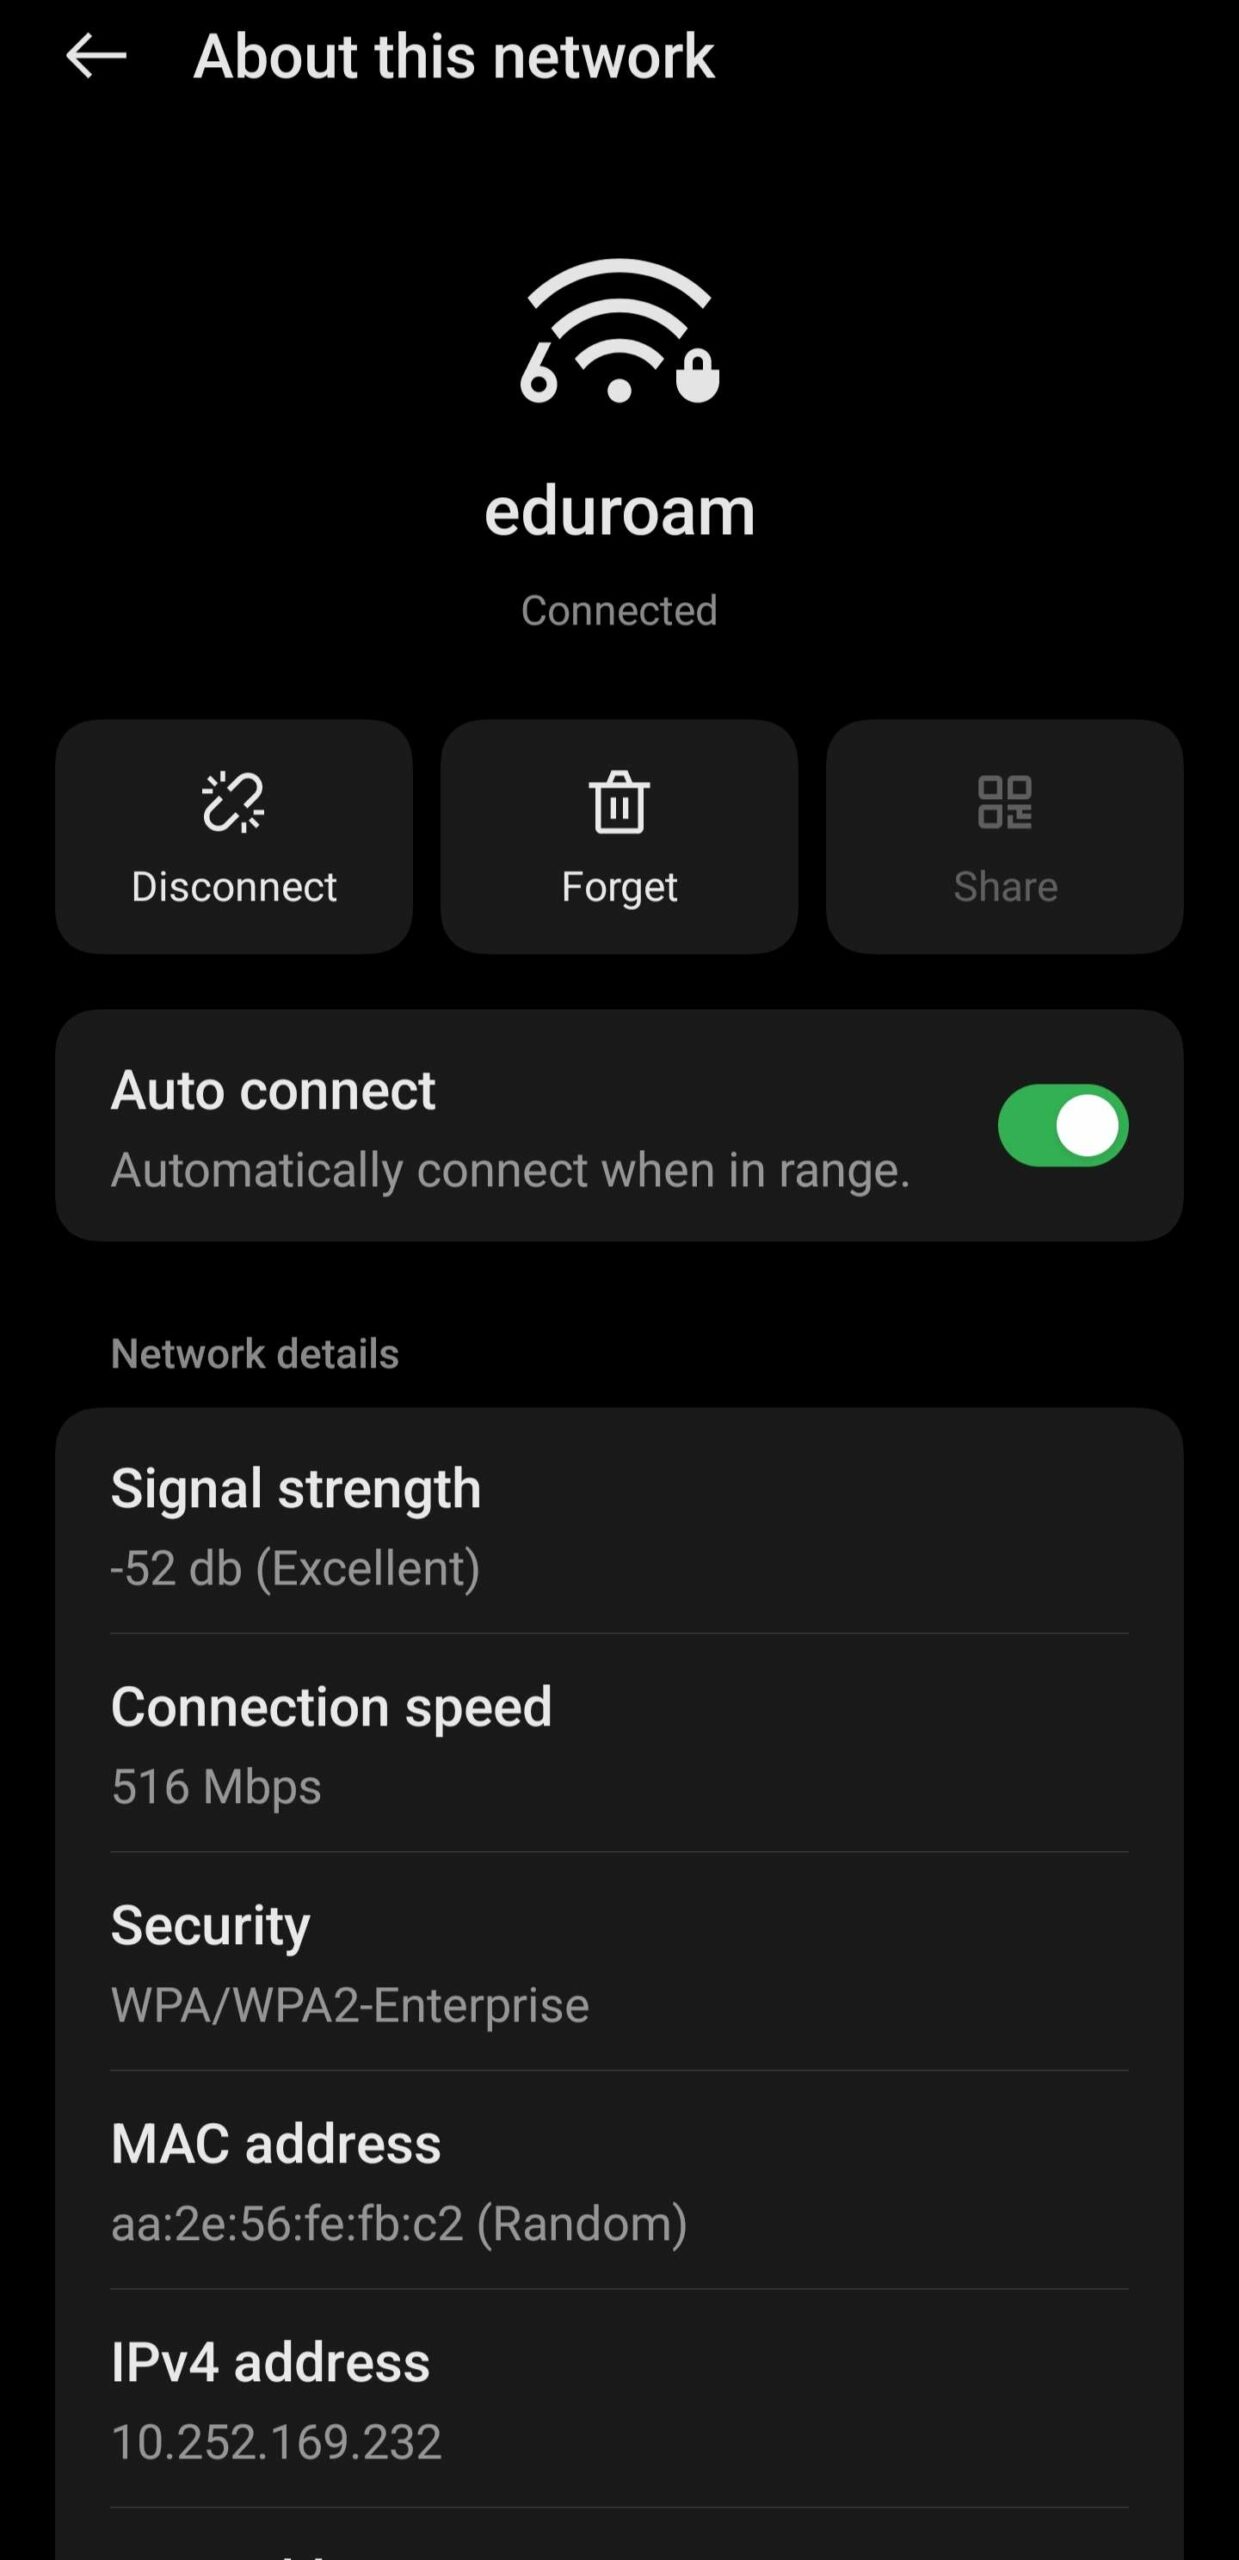
6. You should now be connected to the eduroam network.
7. Press the Home key underneath the screen to exit Settings and return the main screen.
**Please note for a more stable connection users can change the field under Privacy heading to 'Use device MAC'. This setting may be available under Advanced Options.
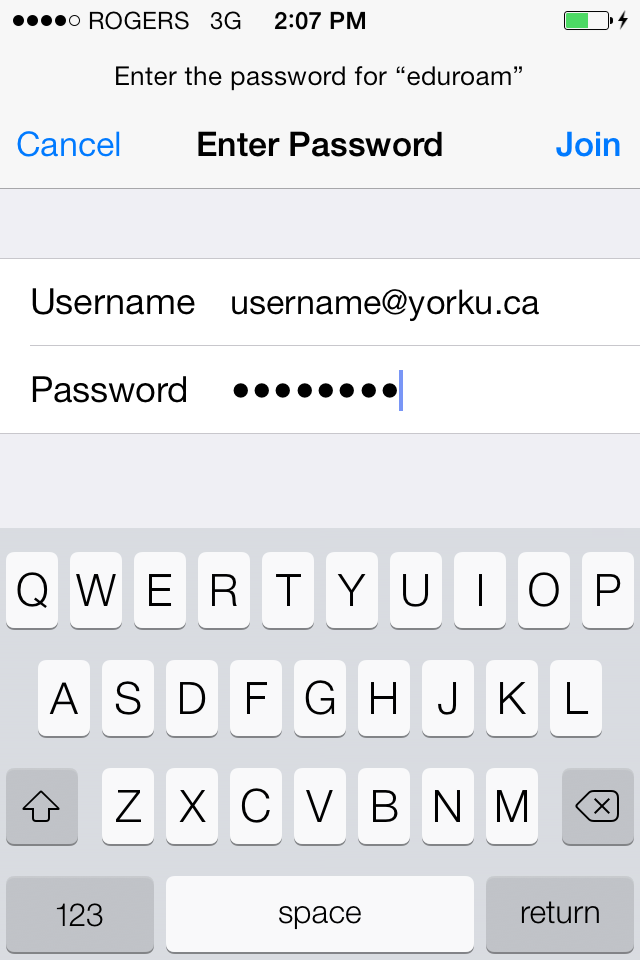
1. Select Settings, then Wi-Fi.
2. Select eduroam.
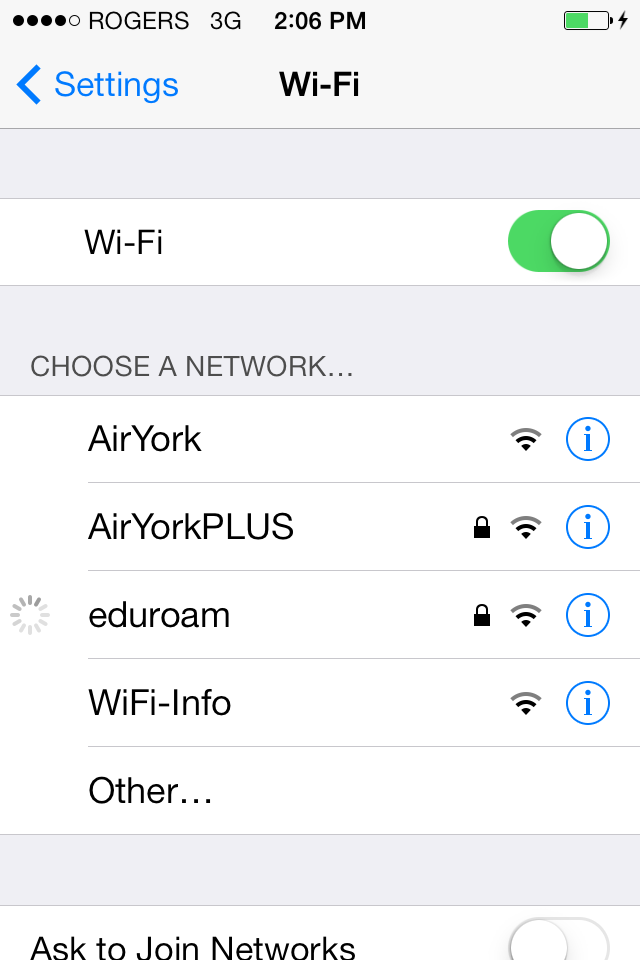
3. Enter the following, and click Join:
- Username: PPYUsername@yorku.ca
- Password: your Passport York password
4. Verify the certificate is for eduroam.yorku.ca and is issued by GlobalSign Organization Validation CA. If so, select Accept.
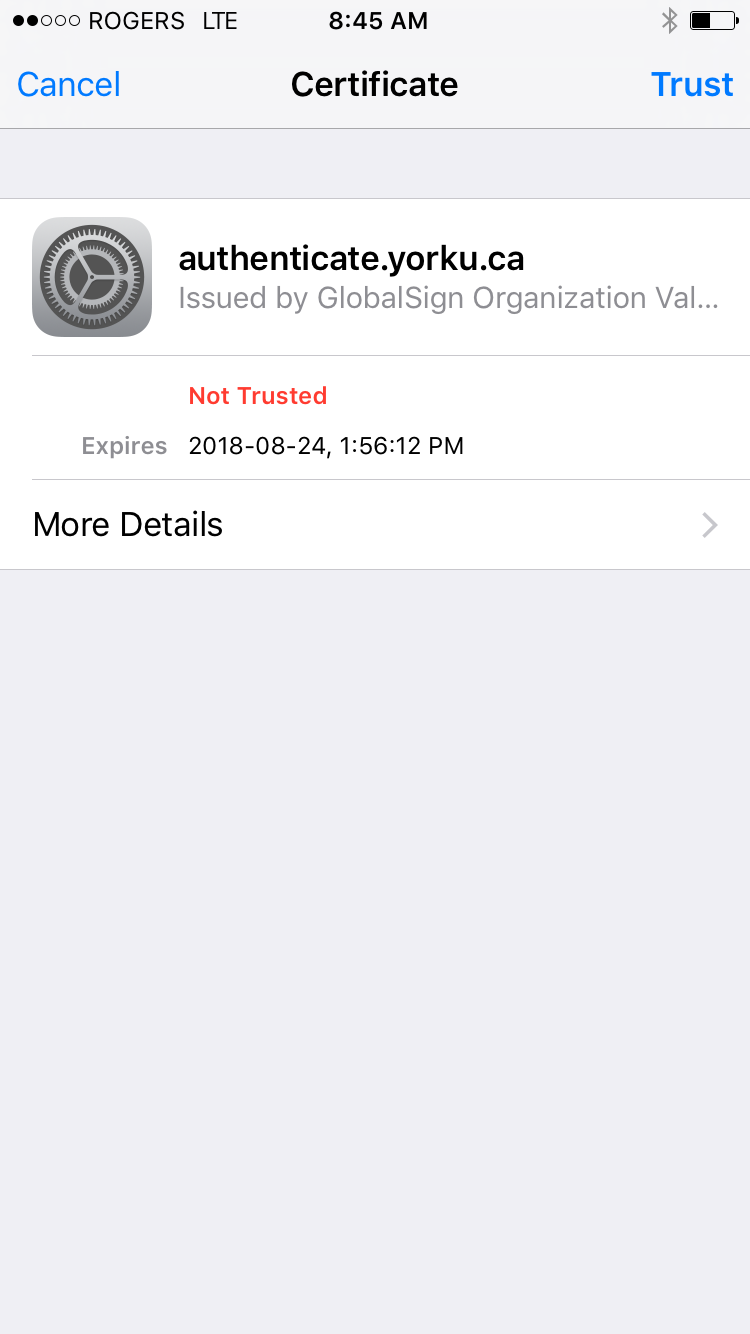
5. You should now be connected to the eduroam wireless network.
Overview
AirYorkGUEST provides visitors to the University with Wi-Fi internet access. AirYorkGUEST also provides Wi-Fi network access to devices which do not have a web browser such as barcode scanners, and mobile printers. AirYorkGUEST is available in all the same locations as AirYorkPLUS.
- Maximum duration of a login session is 8 hours. Upon reaching this session time limit, the connection to the AirYorkGUEST network will be terminated without warning. However, you can register again for another 8 hour session.
- **Please note AirYorkGUEST cannot be used by the community that normally uses either eduroam or AirYorkPLUS.
How do I access it?
1. In the list of available wireless networks, select AirYorkGUEST.
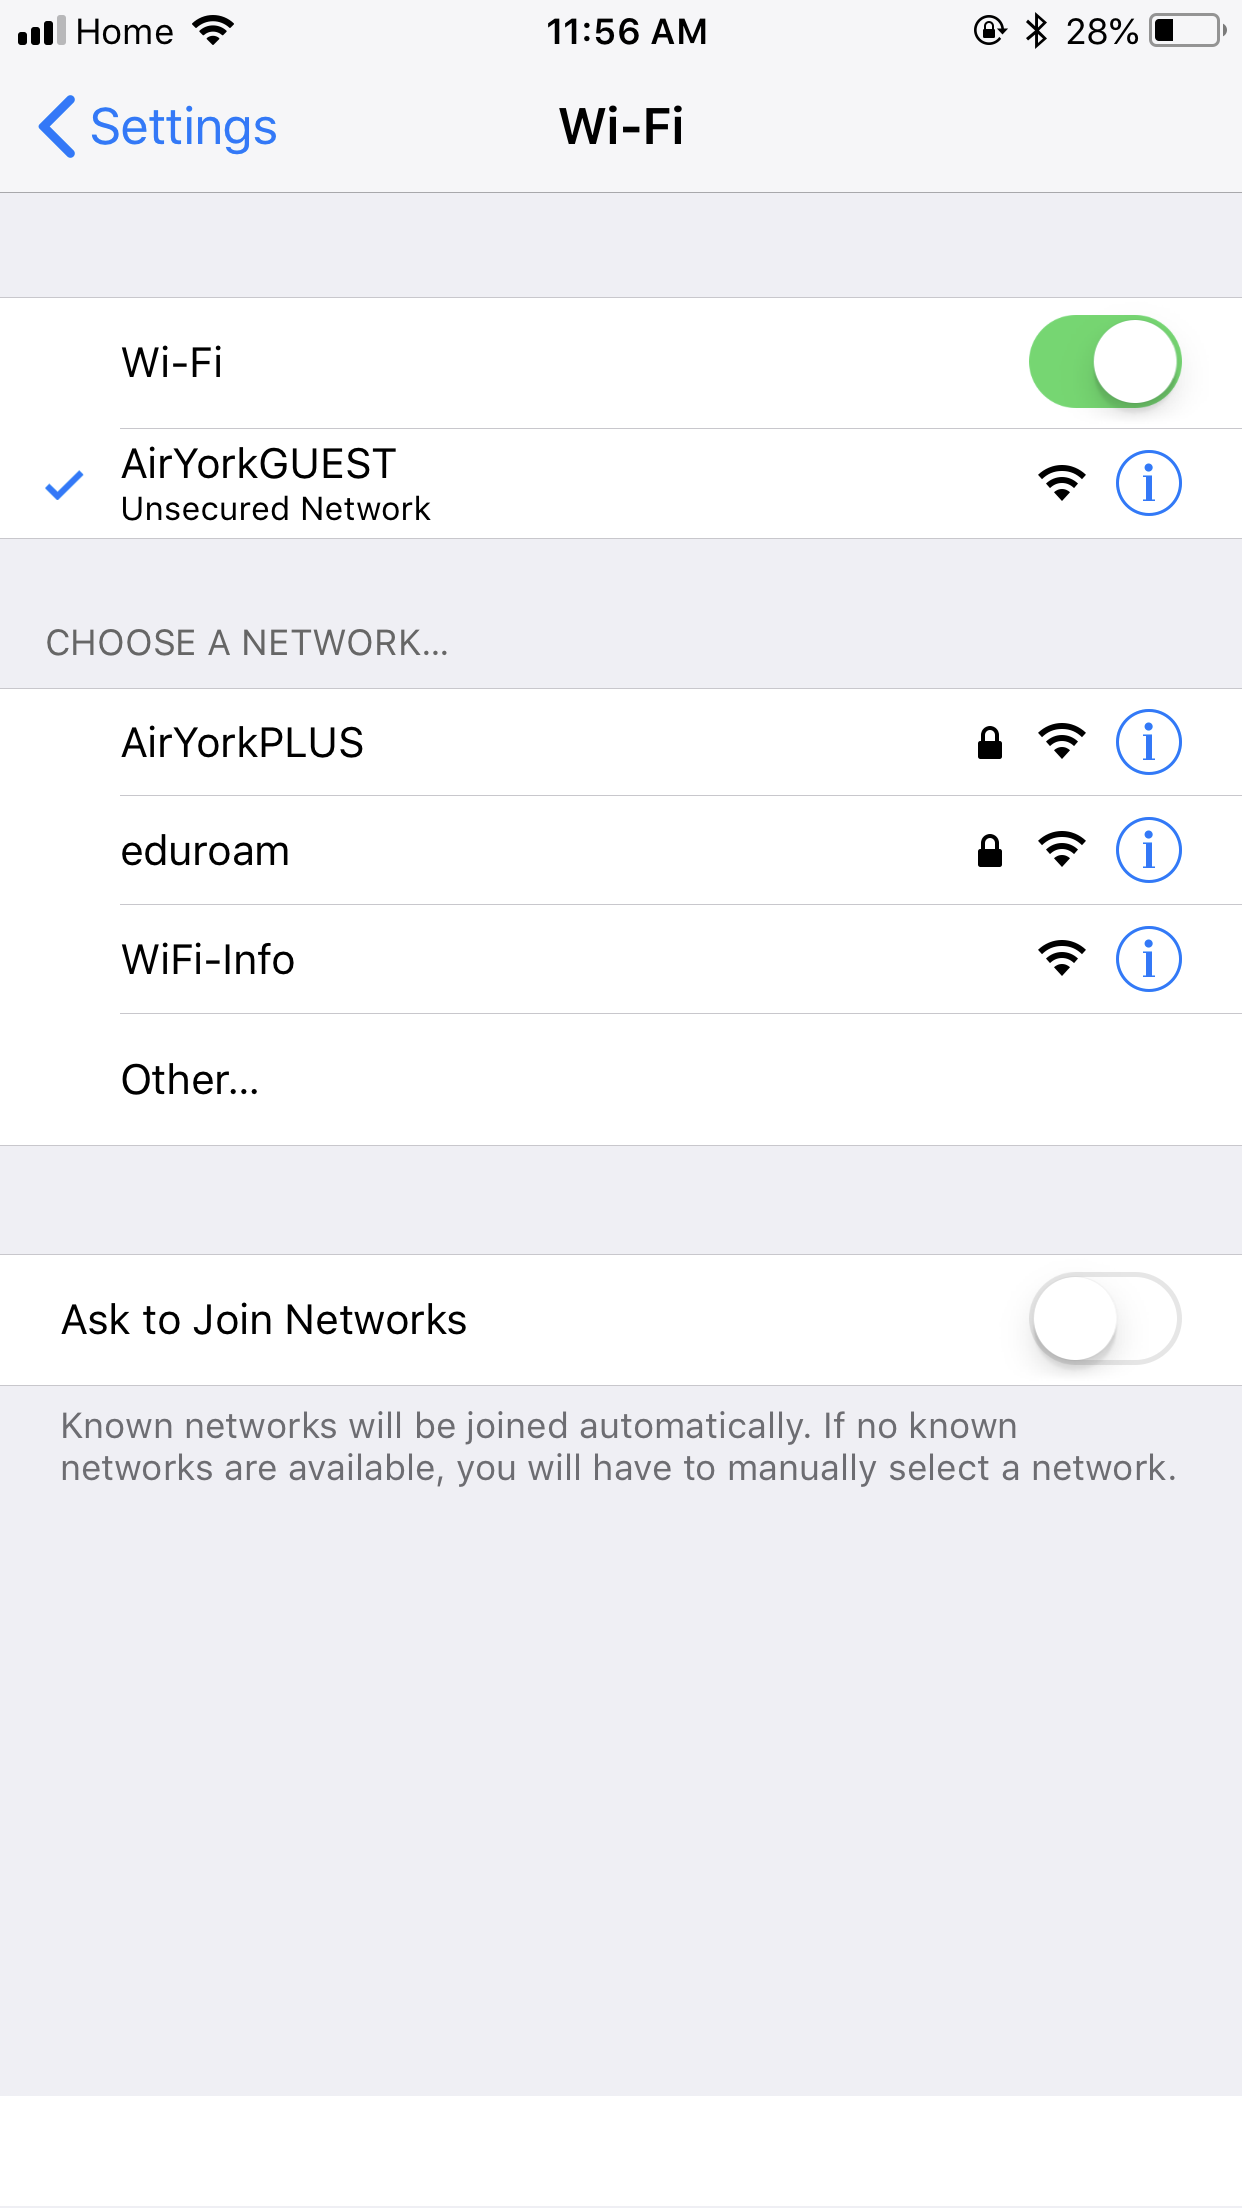
2. Once you get redirected to the AirYorkGUEST splash screen, enter your information.
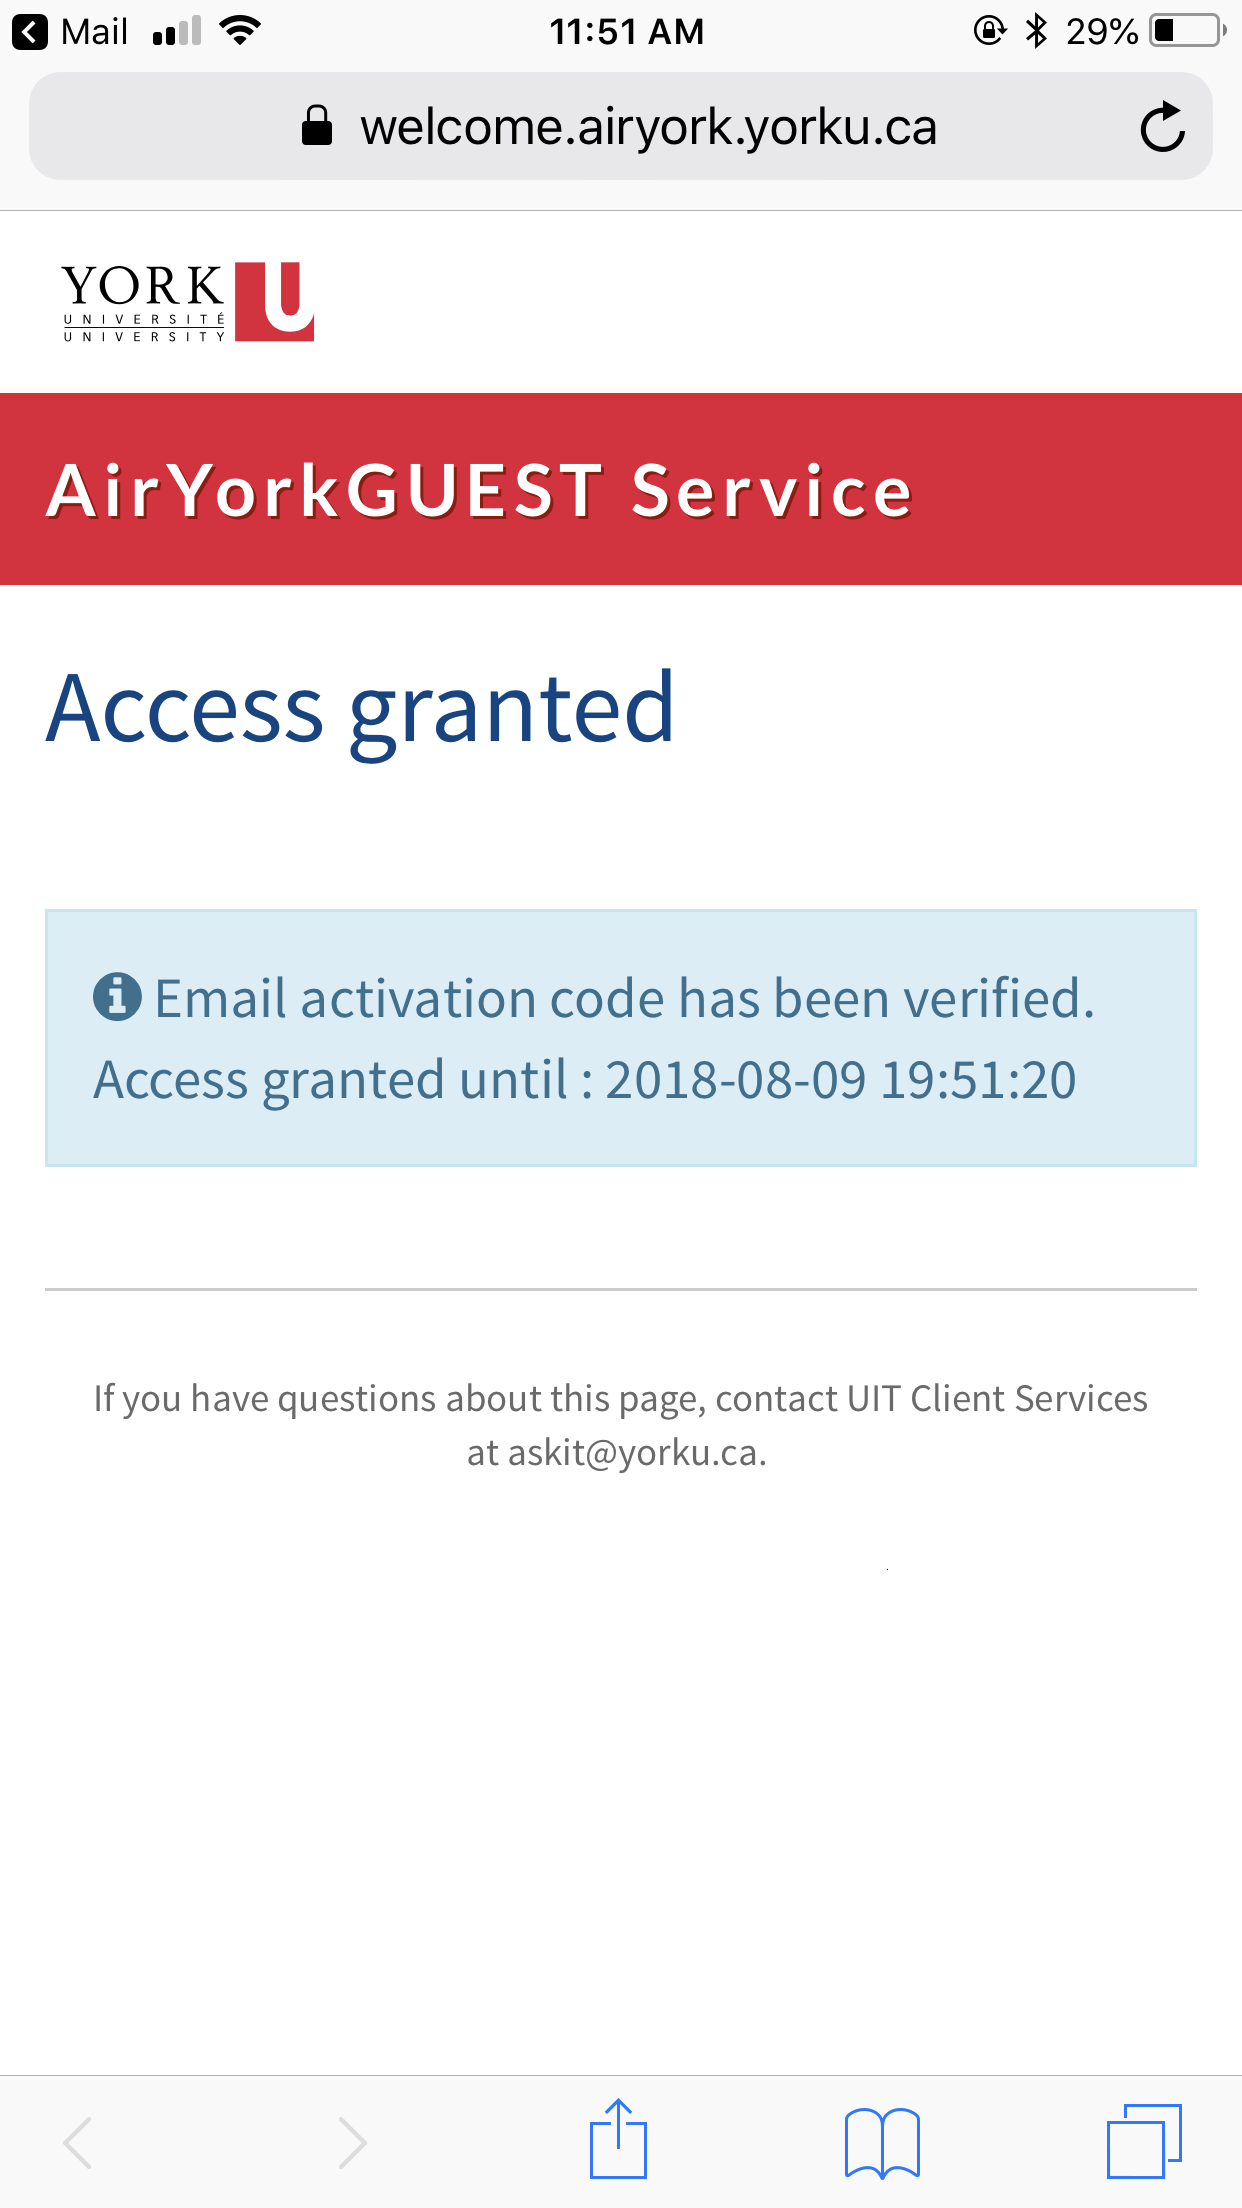
3. You will be redirected to the AirYorkGUEST Service Registration Page. Select an authentication method - email or sms and accept the terms and conditions.
**Please note that if you provide your email address then you will get 10 mins of internet access to check your mail and click on the validation link.
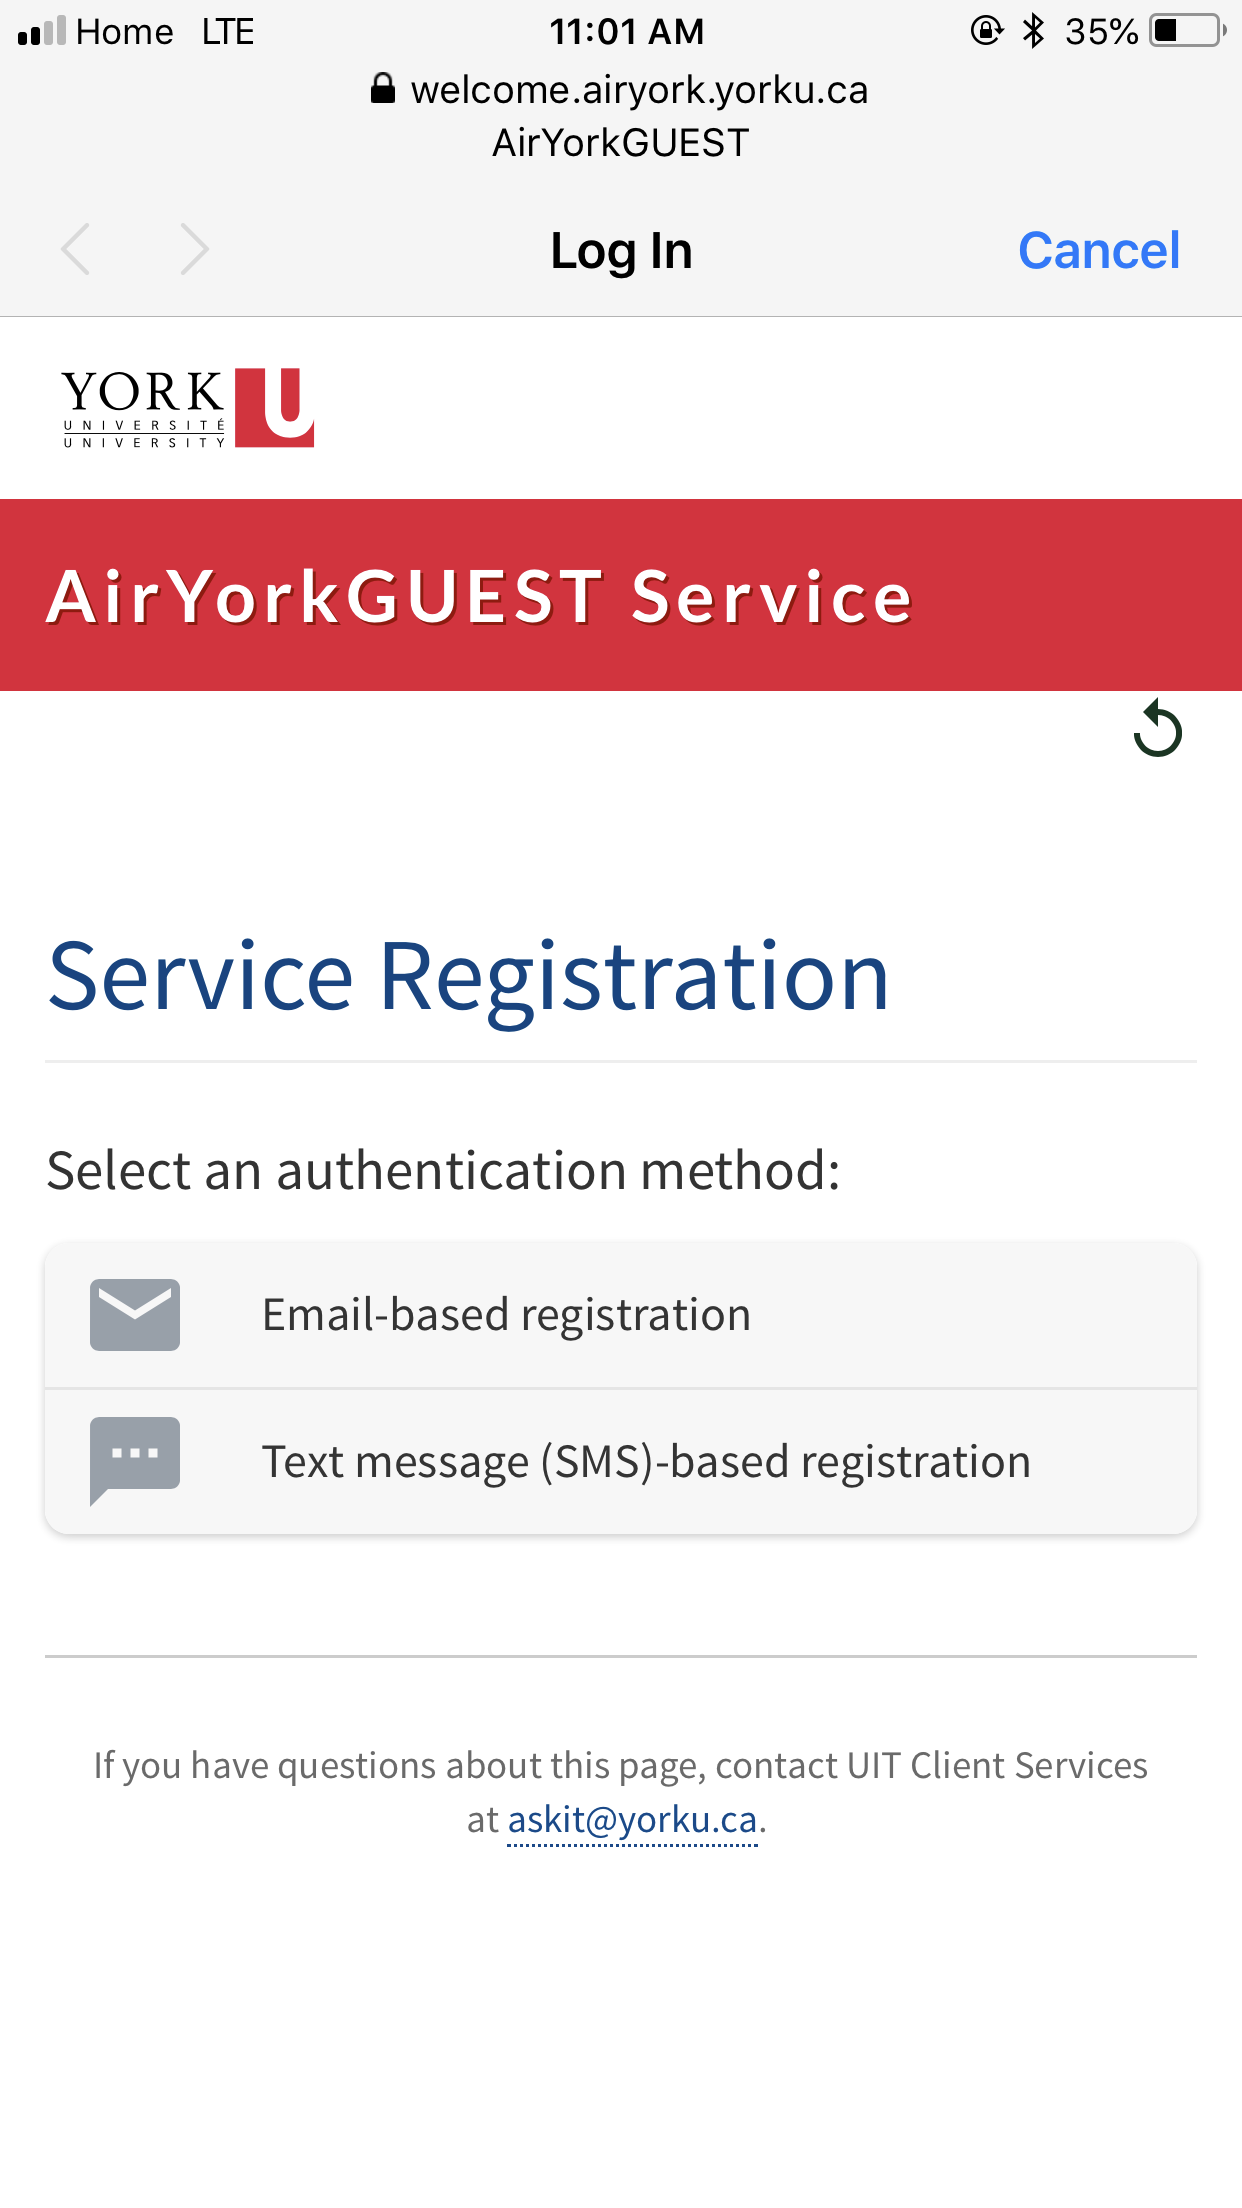
4. Receive and confirm the the verification message and start using the Internet.
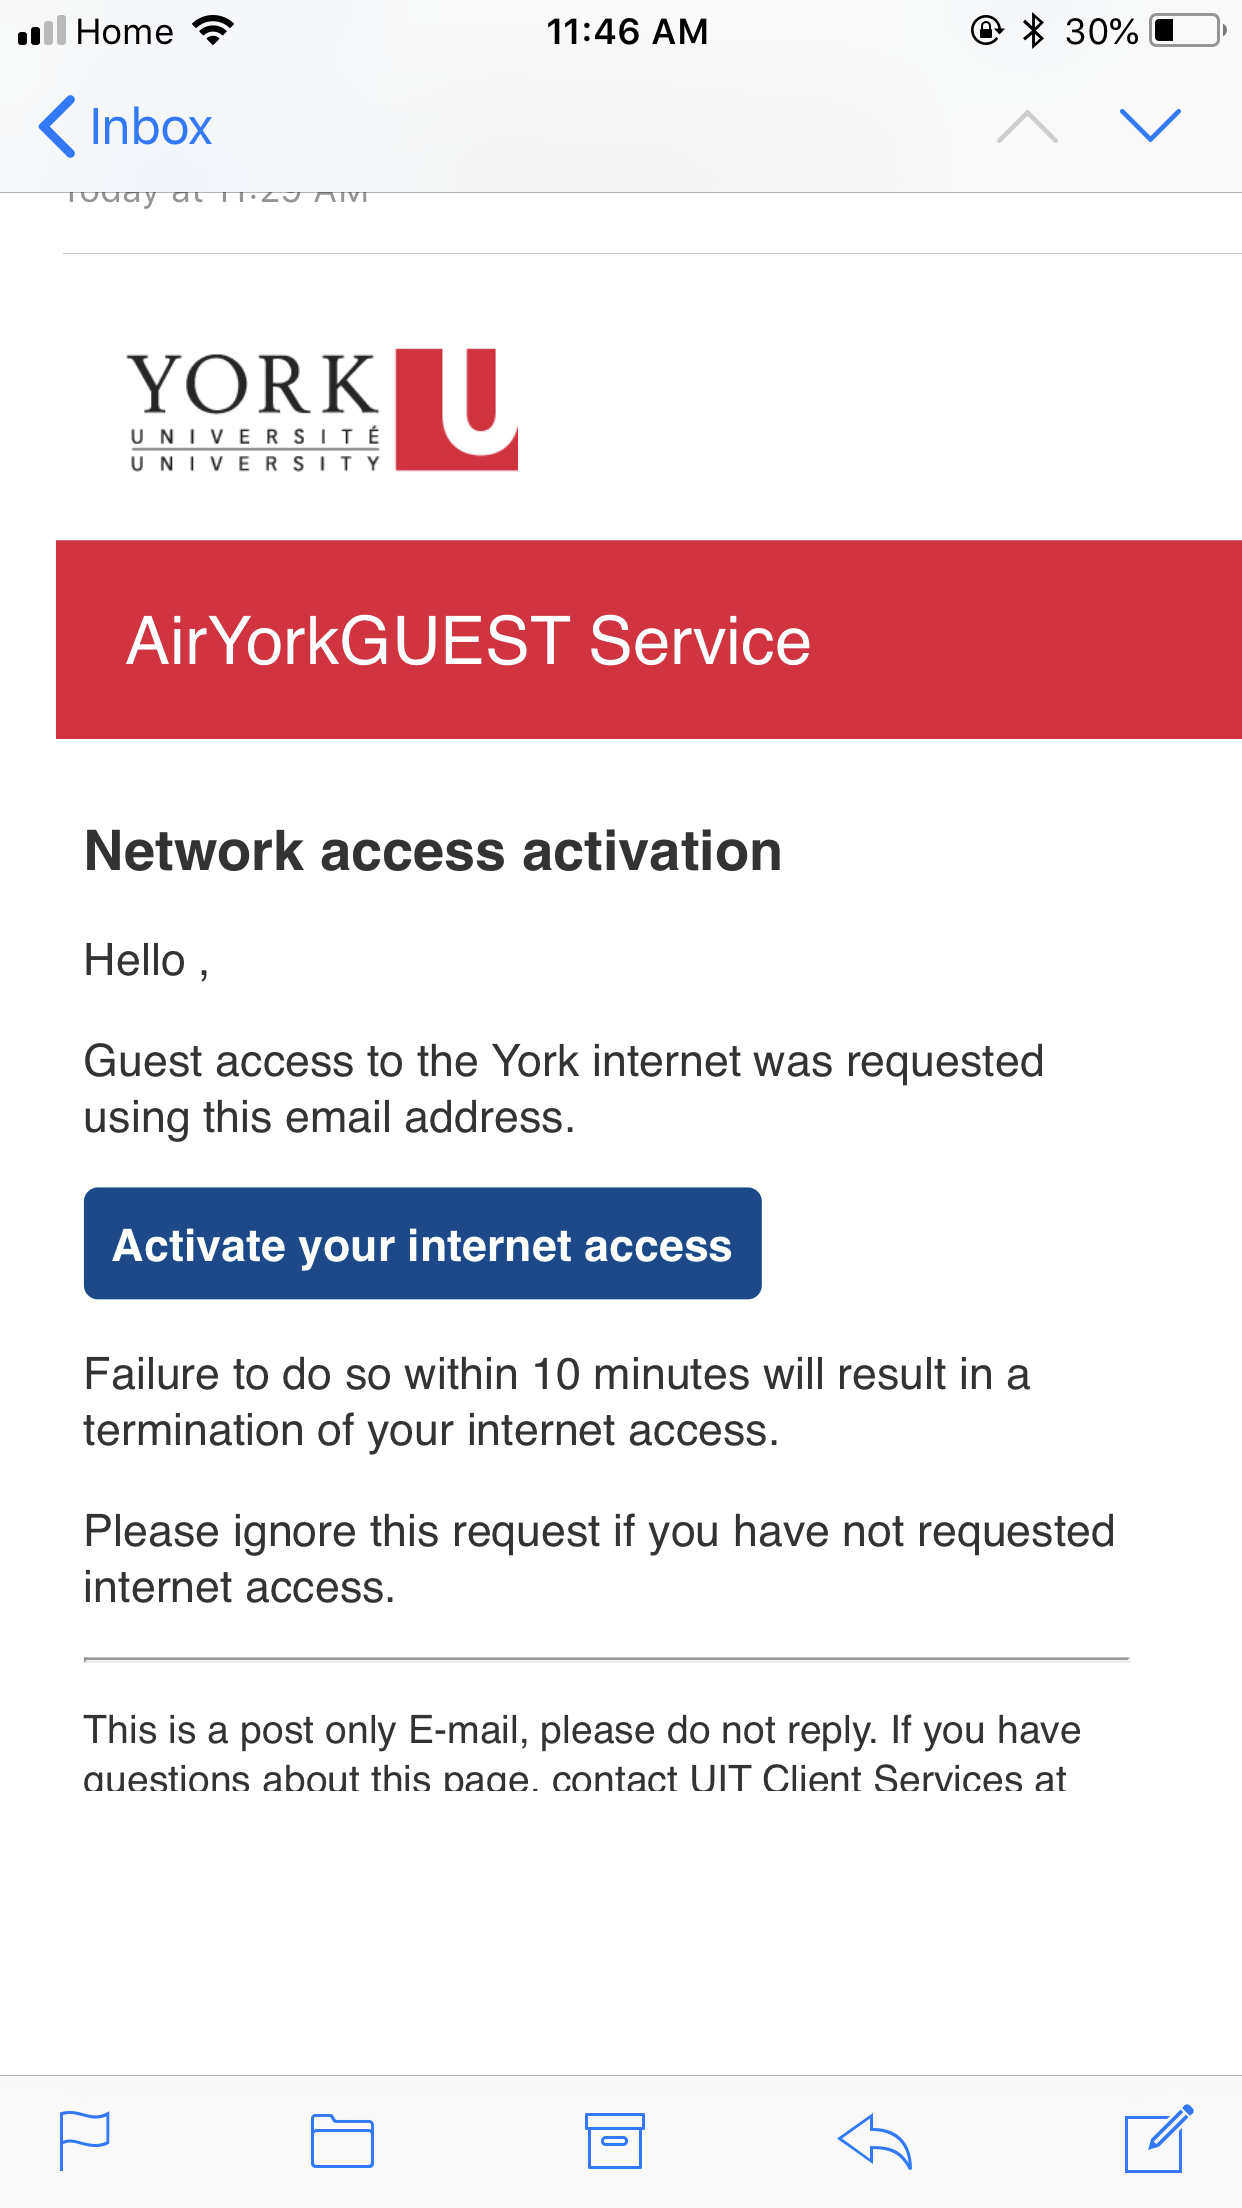
5. Click on the validation link on the email you received to start accessing the internet or enter the verification code you received via SMS in the Service Registration Website.
Overview
Wireless and wired internet service is available in all residences at York University Keele and Glendon Campuses. Please see the Residence Internet Subscriber Agreement below:
Undergraduate residences
(Bethune, Calumet, Stong, Vanier, Founders, Winters, Tatham Hall, Pond, Hilliard, and Wood Residences)
- Students living in the residences have access to wired internet
- No registration is required
- No configuration is required - it works with normal default settings of DHCP, auto negotiate speed and duplex.
**Please note this Internet service functions with typical default automatic settings, which is similar to what your regular Internet service provider offers (i.e. your ISP at home). If our technician confirms the service is working, we can only make best efforts to assist with personal device settings but there is no promise of a solution if your device issues persist despite our attempts at making setting changes/adjustments (or if there's a virus, malware, driver, software/driver update problem, etc. with your device).
How Do I Connect?
Please follow instructions below that pertain to your residence:
- Wired connectivity is available by plugging into any Port (LAN2 & LAN3) using a network cable
- Depending on which white box you have in your residence, see below pictures for details
- The Green Port LAN4 or LAN1 ( depending on the white box in your residence ) is used for VoIP Phone


- These Data Jacks are used with a Ethernet Cable for wired access connectivity.

- The black arrow indicates the phone jack and the blue jack indicates the data jack used for wired access using a Ethernet Cable

**Please note personal routers are not permitted
Use of routers (WiFi/Wireless or Wired) is NOT PERMITTED. Being caught using a Router within the residences will result with your in-room Ethernet port being disabled. Please see the Residence Internet Subscriber Agreement for more details.
Wi-Fi MAC address registration for your Wi-Fi device (smart device) in residence:
- Wi-Fi devices such as Smart TVs, gaming consoles, and other smart home media devices (e.g. Amazon Echo, Google Home, Nest, smart speakers, smart thermostats, etc.) can receive wireless access by completing the MAC Address Registration process (see below)
Who can use this Wi-Fi MAC address registration service?
- Students residing in AirYorkGUEST Wi-Fi supported residences are permitted to use this service
What type of devices can use this service?
- For any Wi-Fi device that does not support Passport York login (devices such as Gaming Consoles, Set-top TV boxes and Smart TVs)
- Please note that the use of personal Wi-Fi devices in residence is allowed, but any issues or problems that may arise from the use of these devices will not be supported
What type of devices cannot use this service?
- Any device that is capable of using Passport York login cannot use this service (smartphone, tablet, laptops or desktop computers)
- **Please note routers, hubs, Wi-Fi Extenders or network switches are not permitted. Registered devices not meeting the above criteria may be removed from the service by IT staff at any time
Requirements:
- A device's wireless MAC address is used for connecting to the network. In order to register the device you will need to locate the wireless MAC address or wireless physical address. This address is typically located physically on the device near the serial number or can be found in the menu system (i.e system information, about menu, etc.). The wireless MAC address is formatted in six groups of two hexadecimal digits. The address may be formatted like aa:bb:cc:11:22:33 or aa-bb-cc-11-22-33
Yearly device MAC address removal(s) and renewal(s):
- Personal device registration expires annually (August 1st) and registration must be renewed to continue service. Devices are automatically removed from the registration database unless they are renewed
Limitations to the devices we can support:
- Please be advised that personal Wi-Fi devices, such as smart speakers, smart thermostats, and other similar devices are not supported. This includes devices such as Amazon Echo, Google Home, Nest, and others. These devices are considered personal items and are not part of the university's technology infrastructure. We recommend that you seek assistance from the device's manufacturer or retailer if you experience any technical difficulties with your personal Wi-Fi device.
How do I get a device registered?
- After you've read the above information of this section, if you do need to register a smart device please complete the Service Request Form
York apartments
(Assiniboine, Atkinson, & Passy Crescent buildings)
- Students living in the residences have access to wired internet.
- No registration is required.
- No configuration is required - it works with normal default settings of DHCP, auto negotiate speed and duplex.
**Please note that this Internet service functions with typical default automatic settings, which is similar to what your regular Internet service provider offers (i.e. your ISP at home). If our technician confirms the service is working, we can only make best efforts to assist with personal device settings but there is no promise of a solution if your device issues persist despite our attempts at making setting changes/adjustments (or if there's a virus, malware, driver, software/driver update problem, etc. with your device).
How do I connect?
- Wired connectivity is available by plugging into any Port (LAN2 & LAN3) using a network cable.
- Depending on which white box you have in your residence, see below pictures for details.
IMPORTANT: PERSONAL ROUTERS NOT PERMITTED
Use of ROUTERS (WiFi/Wireless or Wired) is NOT PERMITTED. Being caught using a Router within the residences will result in your in-room Ethernet port being Disabled. Please see the Residence Internet Subscriber Agreement for more details.
Wi-Fi MAC address registration for your Wi-Fi device (smart device) in residence:
- Wi-Fi devices such as Smart TVs, gaming consoles, and other smart home media devices (e.g. Amazon Echo, Google Home, Nest, smart speakers, smart thermostats, etc.) can receive wireless access by completing the MAC Address Registration process (see below).
Who can use this Wi-Fi MAC address registration service?
- Students residing in AirYorkGUEST Wi-Fi supported residences are permitted to use this service.
What type of devices can use this service?
- For any Wi-Fi device that does not support Passport York login: devices such as Gaming Consoles, Set-top TV boxes and Smart TVs.
- Please note that the use of personal Wi-Fi devices in residence is allowed, but any issues or problems that may arise from the use of these devices will not be supported.
What type of devices cannot use this service?
- Any device that is capable of using Passport York login cannot use this service: smartphones, tablets, laptops or desktop computers.
- IMPORTANT: Routers, hubs, Wi-Fi Extenders or network switches are not permitted. Registered devices not meeting the above criteria may be removed from the service by IT staff at any time.
Requirements:
- A device's wireless MAC address is used for connecting to the network. In order to register the device you will need to locate the wireless MAC address or wireless physical address. This address is typically located physically on the device near the serial number or can be found in the menu system (i.e system information, about menu, etc.). The wireless MAC address is formatted in six groups of two hexadecimal digits. The address may be formatted like aa:bb:cc:11:22:33 or aa-bb-cc-11-22-33.
Yearly device MAC address removal(s) and renewal(s):
- Personal device registration expires annually (August 1st) and registration must be renewed to continue service. Devices are automatically removed from the registration database unless they are renewed.
Limitations to the devices we can support:
- Please be advised that personal Wi-Fi devices, such as smart speakers, smart thermostats, and other similar devices are not supported. This includes devices such as Amazon Echo, Google Home, Nest, and others. These devices are considered personal items and are not part of the university's technology infrastructure. We recommend that you seek assistance from the device's manufacturer or retailer if you experience any technical difficulties with your personal Wi-Fi device. We understand that these devices are becoming increasingly popular and useful, but due to their unique technical requirements and complexities, we do not provide technical support for them.
How do I get a device registered?
- After you've read the above information in this section, if you do need to register a smart device, please complete the Service Request Form.
Need Cable TV Service? Cable TV service is provided directly by Rogers Communications to Assiniboine and Passy Crescent suites. Please call 1-800-784-6678 or email Rogers at gta.directsales@rci.rogers.com to order service. You must reach out to Rogers Communications first, and they should have an internal process to contact UIT at York University so their technicians can schedule a site visit to arrange access to the necessary network conduits and establish their service connections.
If you reside in York Apartments such as Assiniboine and Passy Crescent, you have the option to obtain the services of an external service provider such as Rogers or Bell. To begin the process, you need to contact the chosen service provider to determine whether they offer service to your location. Once confirmed, the service provider will contact askIT@yorku.ca to arrange for their technicians to schedule a site visit. During the visit, the technicians will access the necessary network conduits and establish the required service connections.
Click here for FAQs regarding internet access on residence>>
Overview
Wired network at York is accessed by direct connection, typically using a dynamic IP address service known as Dynamic Host Configuration Protocol (DHCP).
How do I access it?
- Direct connection to the York network intended for specific hardware; no login required.
- Request LAN Drops from your local IT Support Group.
- If you do not have an IT Support Group, submit a request.
- LAN Drop ethernet jacks are usually blue.
- To apply for an IP address please submit the online IP address request form.
**Please note that wired access at York typically just works. If you need help, submit a Service Request.
Connect to York VPN
Use Ivanti Secure Access to securely connect your device to York’s network. Choose your device and we’ll show you the steps you need
York VPN is currently unavailable on iPhone and iPad
Choose another device to install or connect to York VPN
VPN instructions by device
Choose your device below for download and setup, or go to the connection instructions
Get connected
Install Ivanti, check the York connection settings, then connect with Passport York and Duo
Have these ready
- Have your Passport York username and password and your Duo authentication method ready
- Sign in to York Microsoft 365 in this browser before downloading an installer. Download and setup are needed only the first time
- Students Sign in with pyusername@yorku.ca, replacing pyusername with your Passport York username. Do not use your @my.yorku.ca address
VPN is strongly recommended on unsecured wireless networks such as AirYorkGUEST or public hotspots
Install Ivanti on Windows
Complete these steps once on this device, then continue to the connection instructions
Download the installer
Sign in to York Microsoft 365 in this browser, then choose your download below. If York University Computing Downloads prompts you, sign in with Passport YorkChoose the installer for your processor. If you are unsure, check Settings → System → About → System type before downloading
Download for Windows x64Current · Ivanti 22.8r7-b48847 · 64 bitDownload for Windows ARM64Current · Ivanti 22.8r7-b48847 · ARM 64 bit
Run the installer
Choose Run, or save the MSI file and open it from your Downloads folder. In the InstallShield Wizard, select Next → Install, approve the installation if prompted, then select FinishOpen Ivanti Secure Access
The Ivanti icon is now in your system tray. Sign out of York University Computing Downloads if you opened it, then select the Ivanti icon to open the client
Add a connection
Select the + button. Enter VPNYork as the name and use the server URL in York connection details. Choose the Connect Secure VPN connection type if requested, then select Add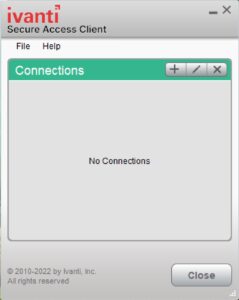
Install Ivanti on macOS
Install Ivanti once, allow its background activity and add the York VPN connection. Each screen is shown with the step it explains
Choose the current macOS installer
Select Download for macOS below. Previous versions are available in the same download area if your IT team needs you to use oneDownload for macOSCurrent · Ivanti 22.8r7-b48847Sign in to the download page
If prompted, sign in with your York Microsoft 365 account and password. Students use pyusername@yorku.ca, replacing pyusername with their Passport York username, rather than an @my.yorku.ca address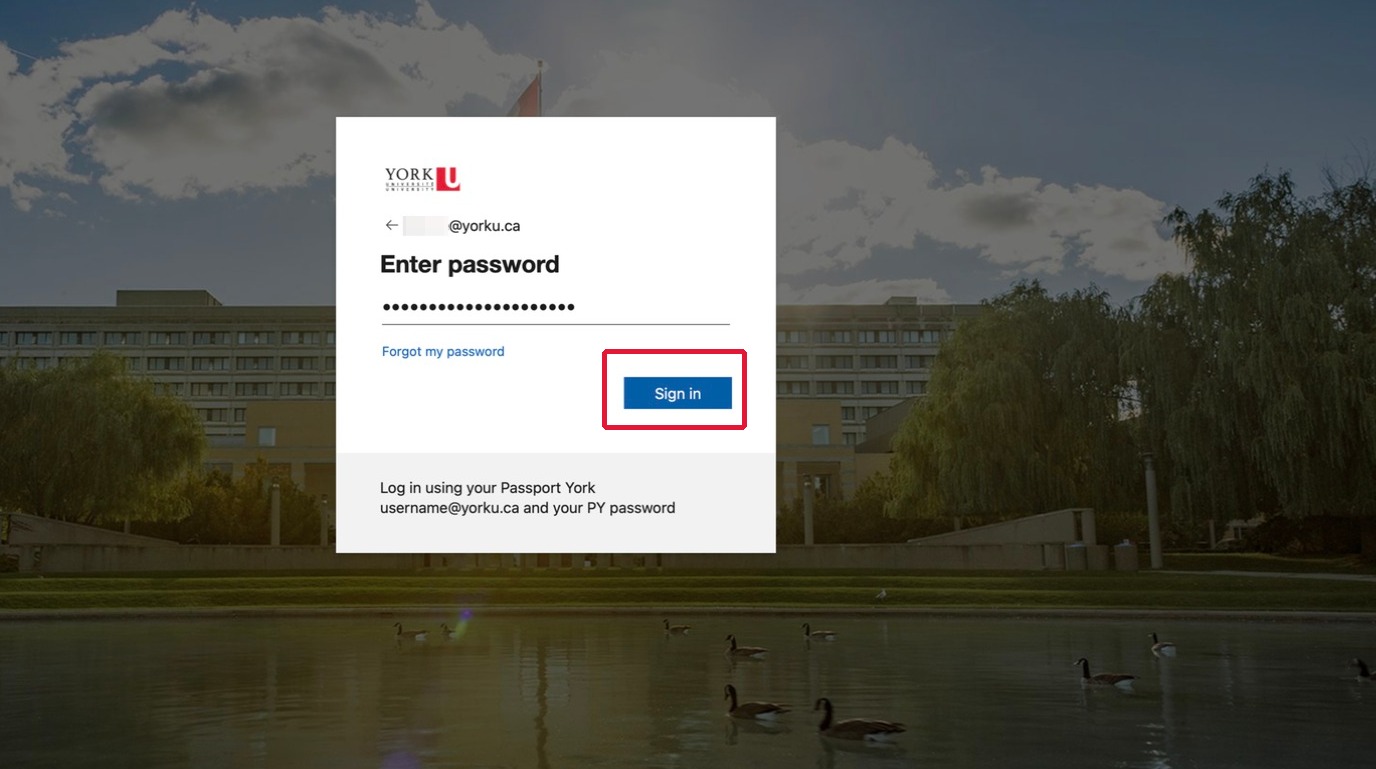
Download the installer file
Select Download on the file page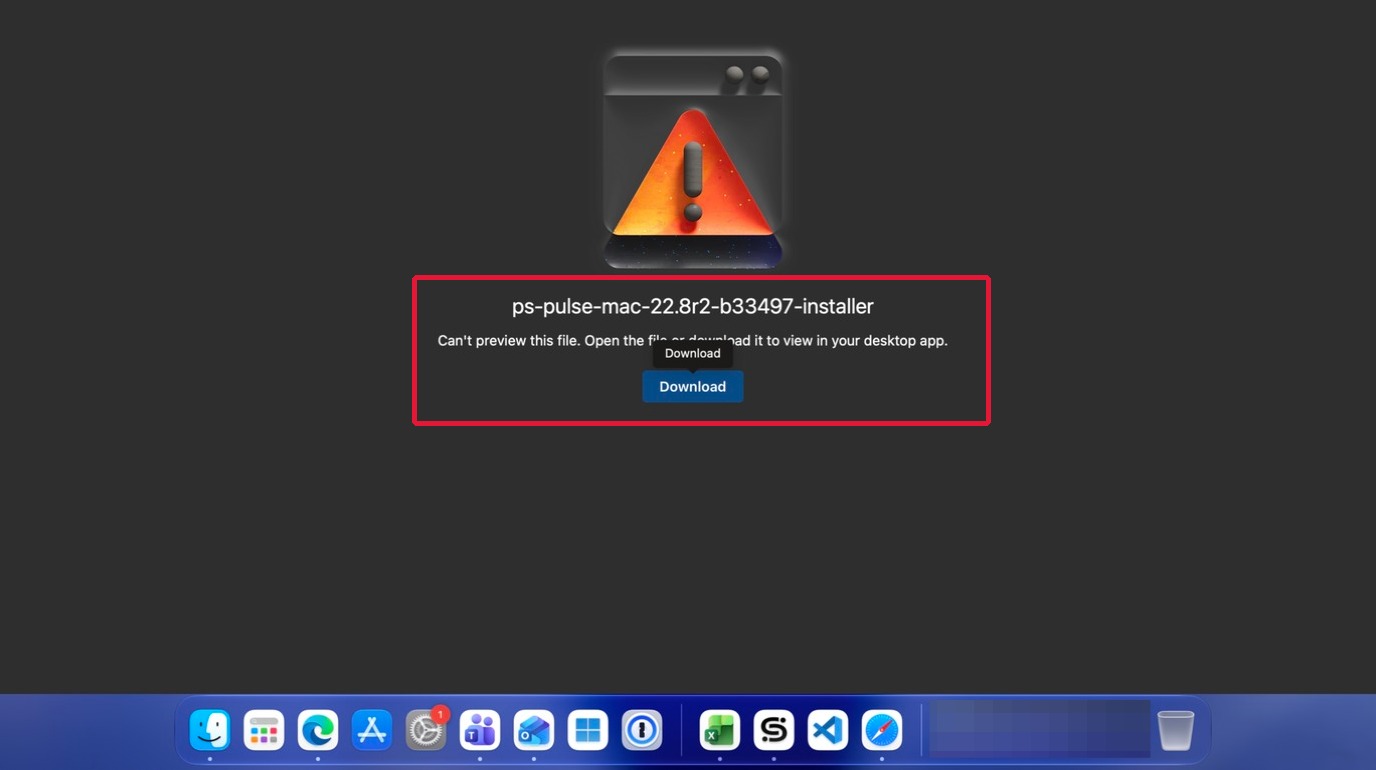
Allow the download
If your browser asks for permission to download from the website, select Allow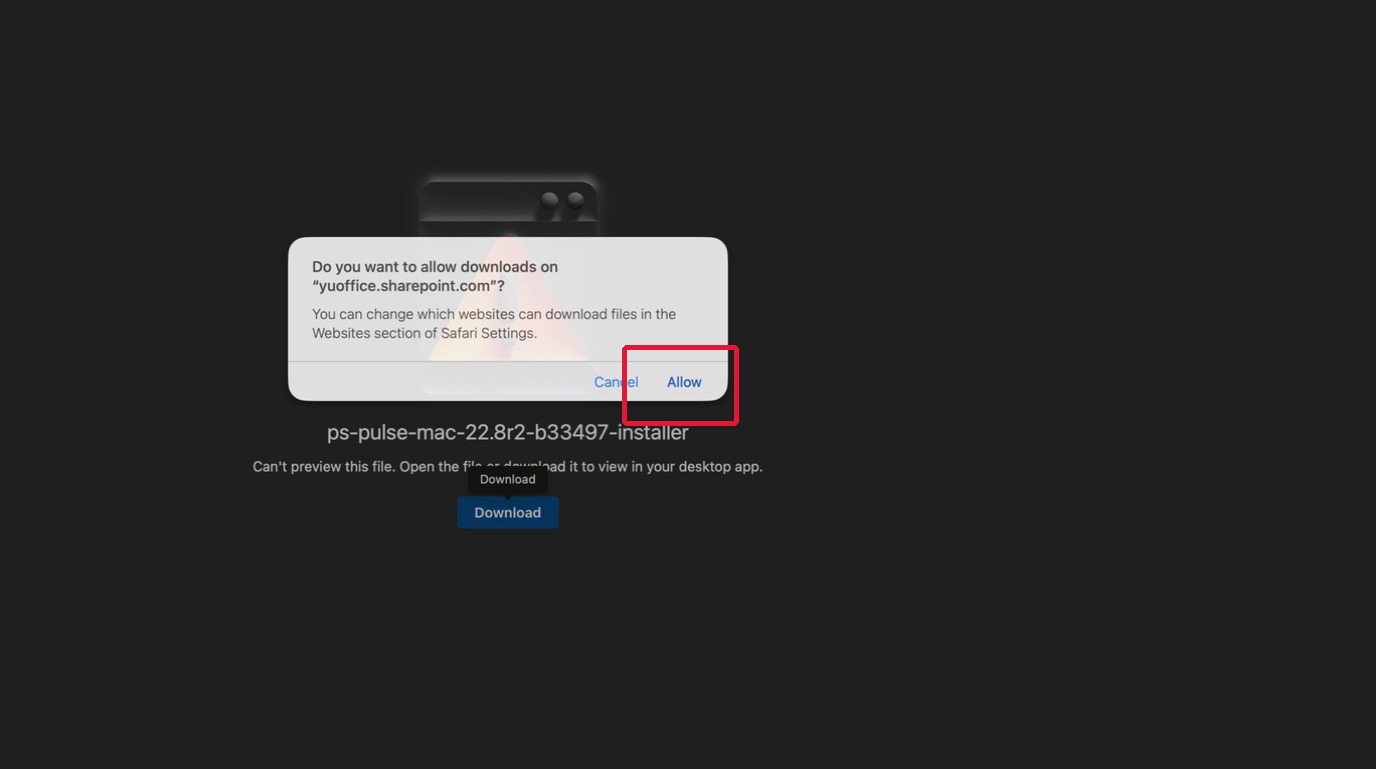
Open Finder
Open Finder from the Dock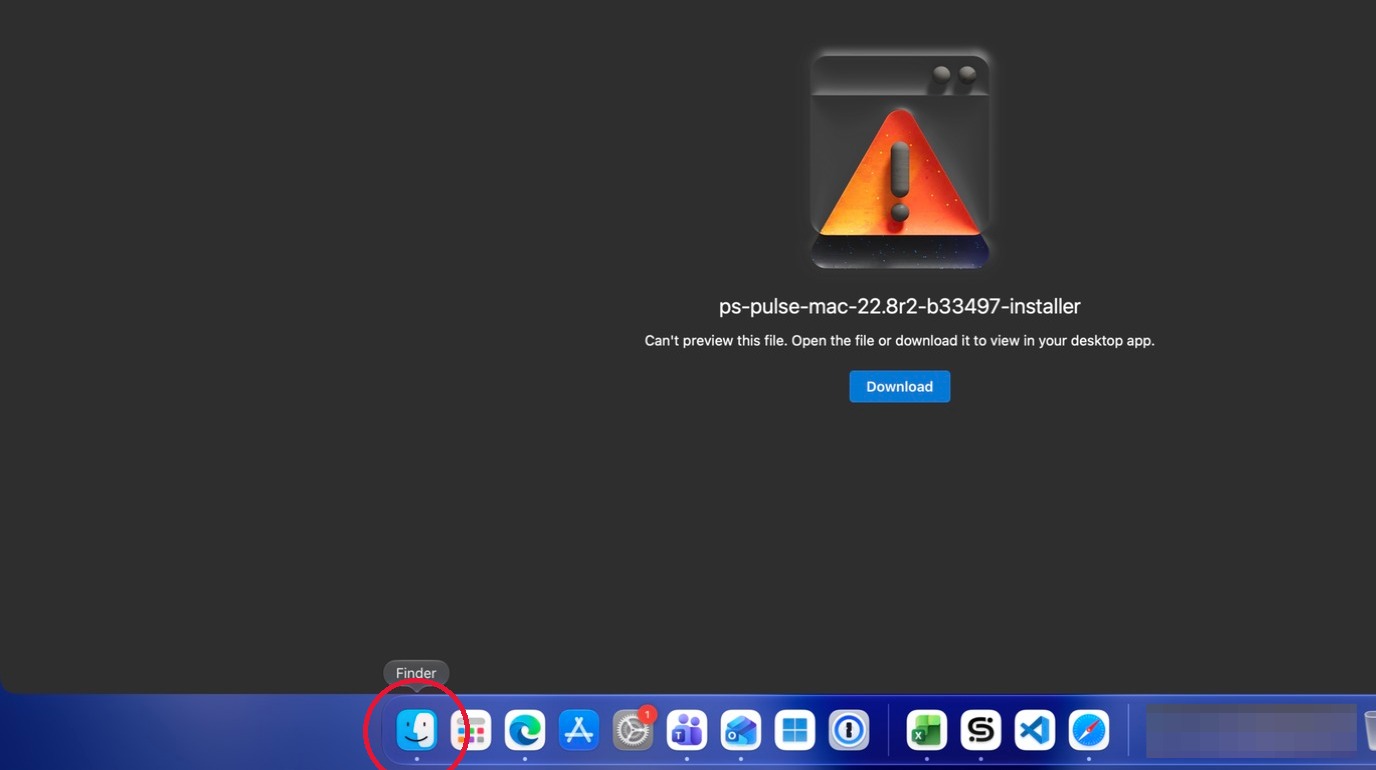
Open Downloads
Select the Downloads folder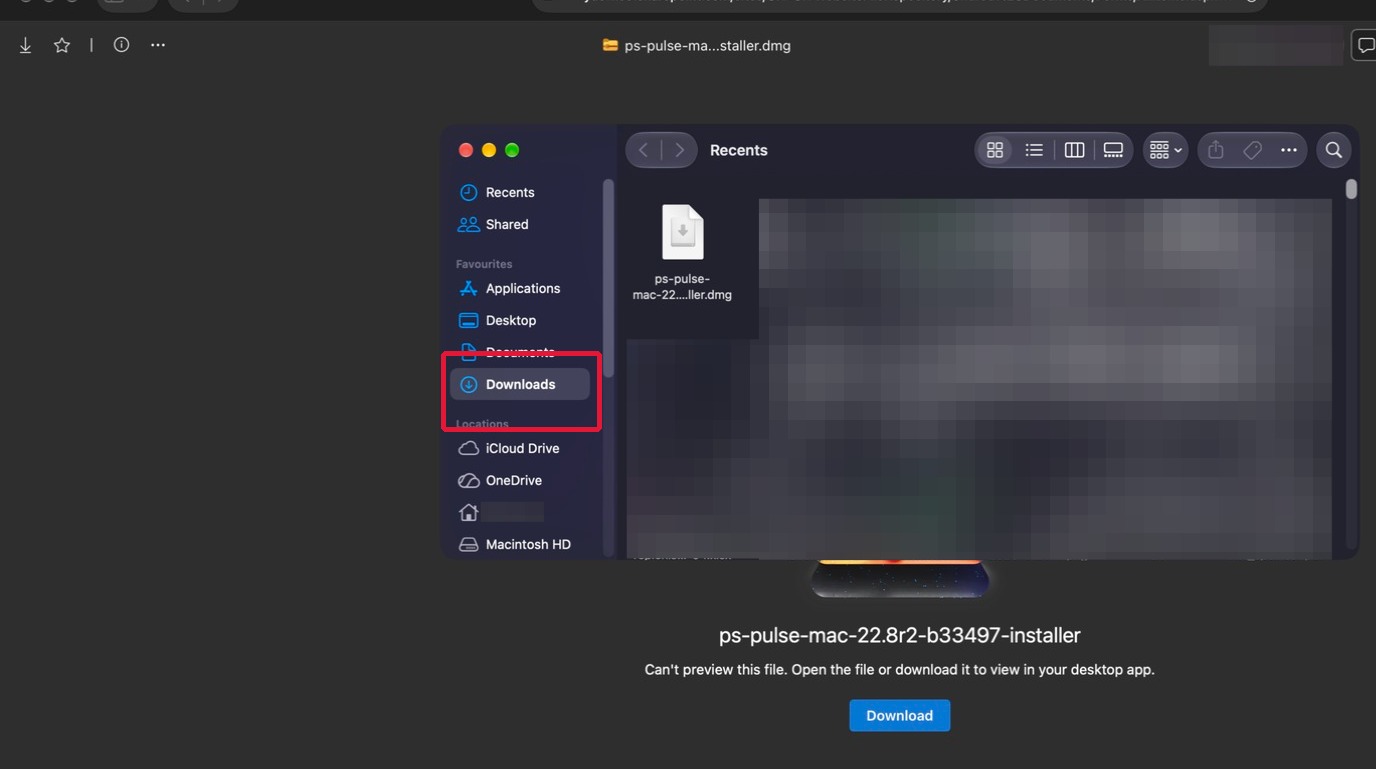
Open the downloaded disk image
Double-click the downloaded Ivanti installer disk image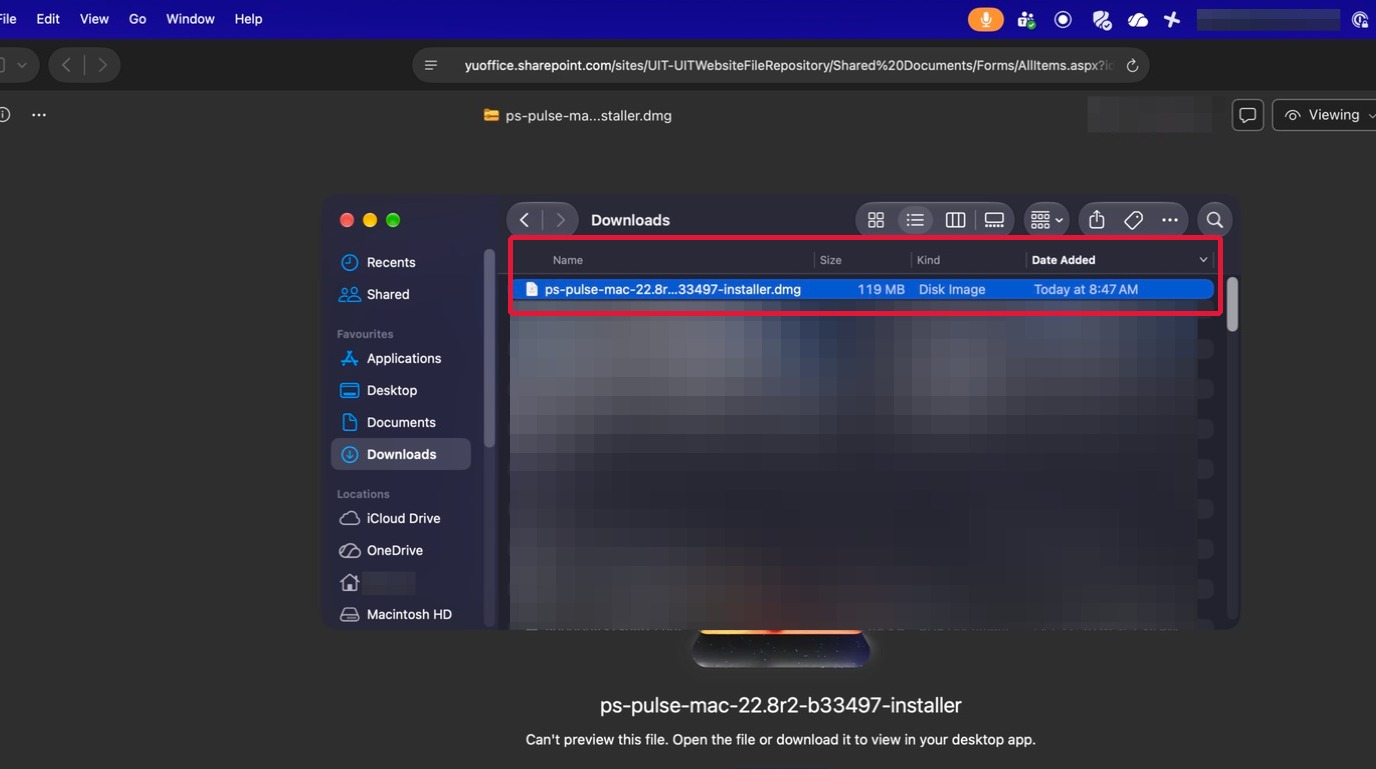
Open the installation package
Double-click PulseSecure.pkg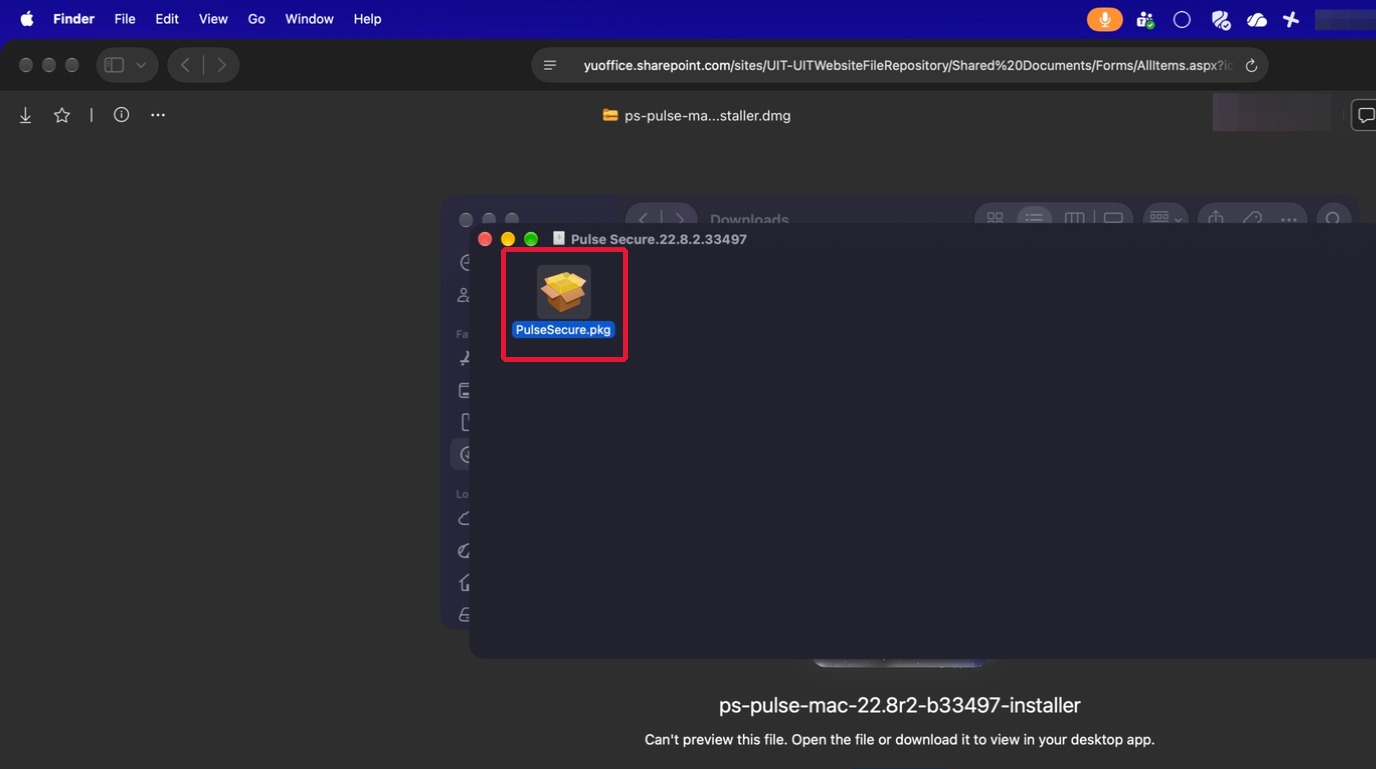
Continue the installation
Select Continue in the Ivanti Secure Access installer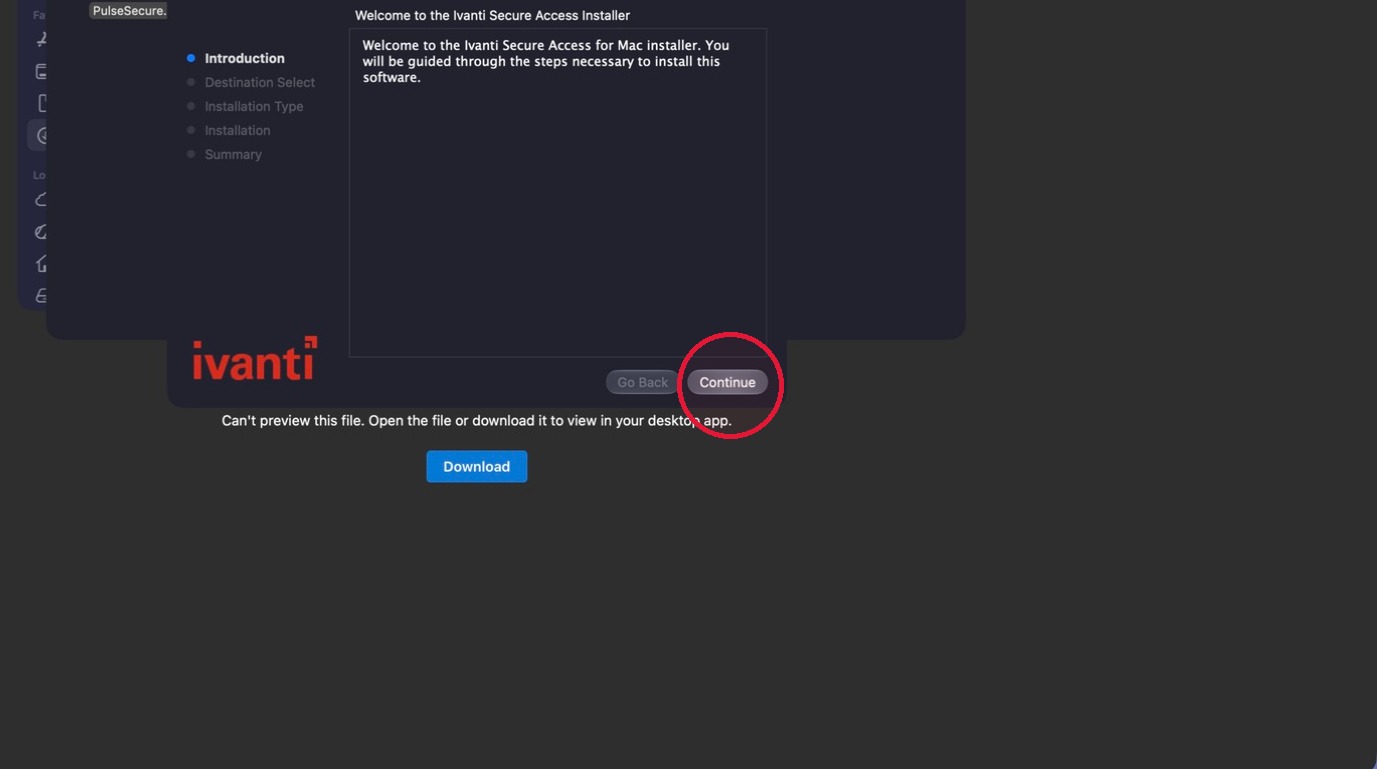
Install Ivanti Secure Access
Select Install for the standard installation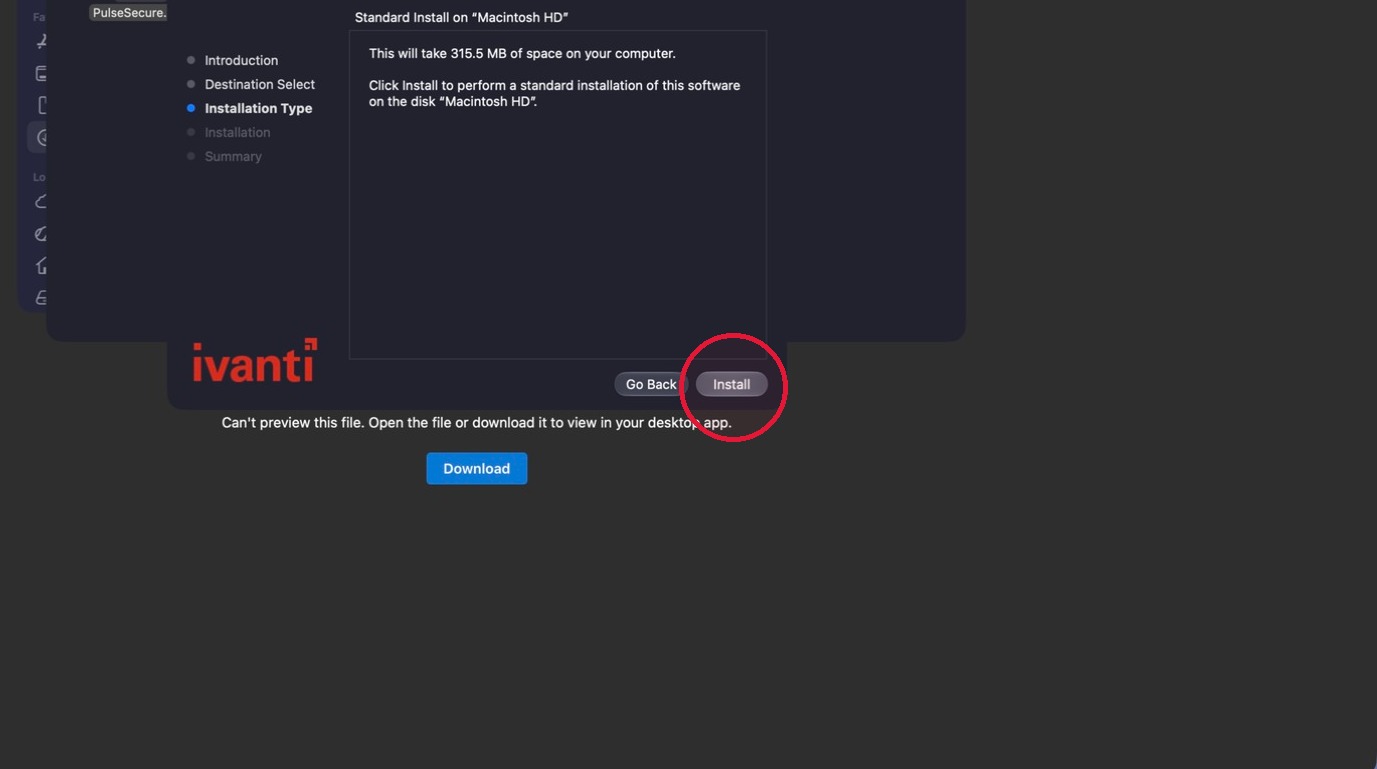
Enable system access
Select Enable in the Ivanti Secure Access warning dialog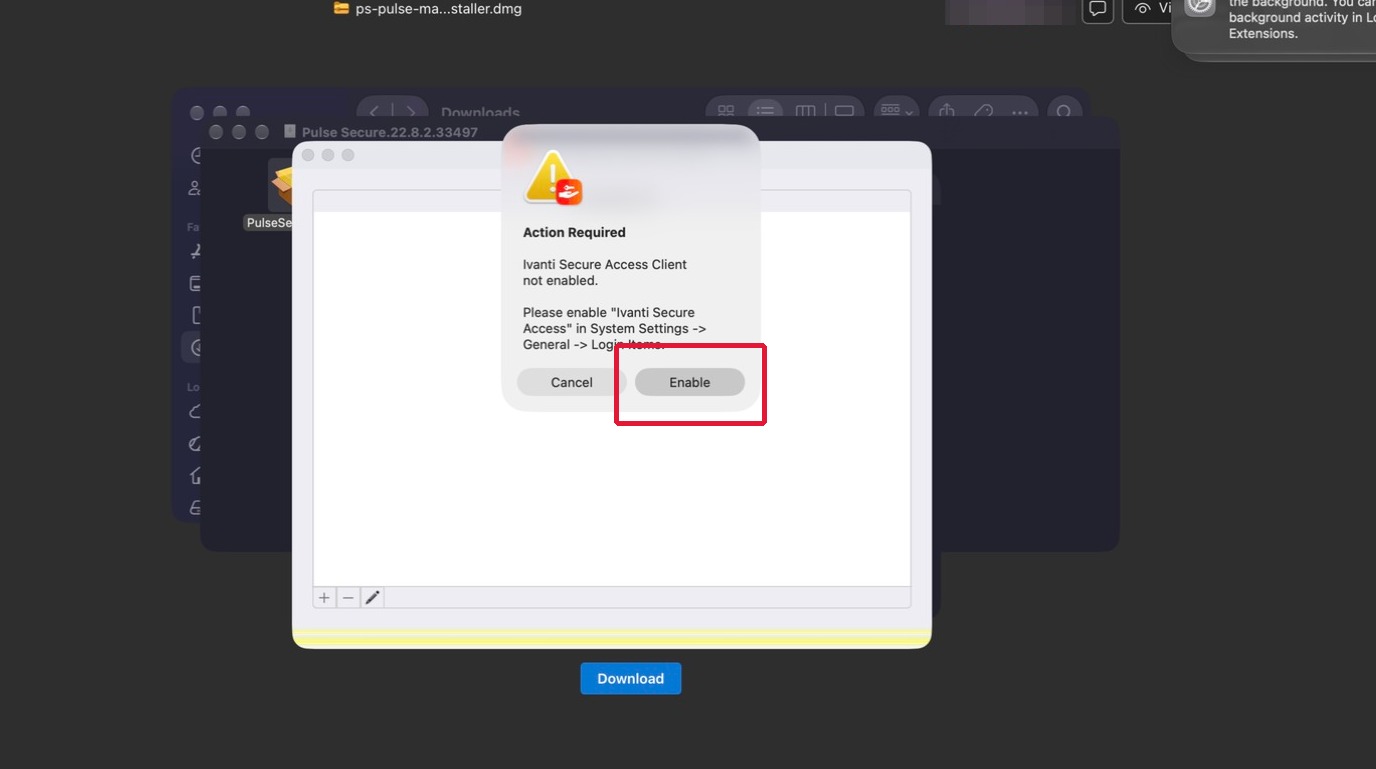
Allow background activity
Turn on the Ivanti Secure Access background activity switch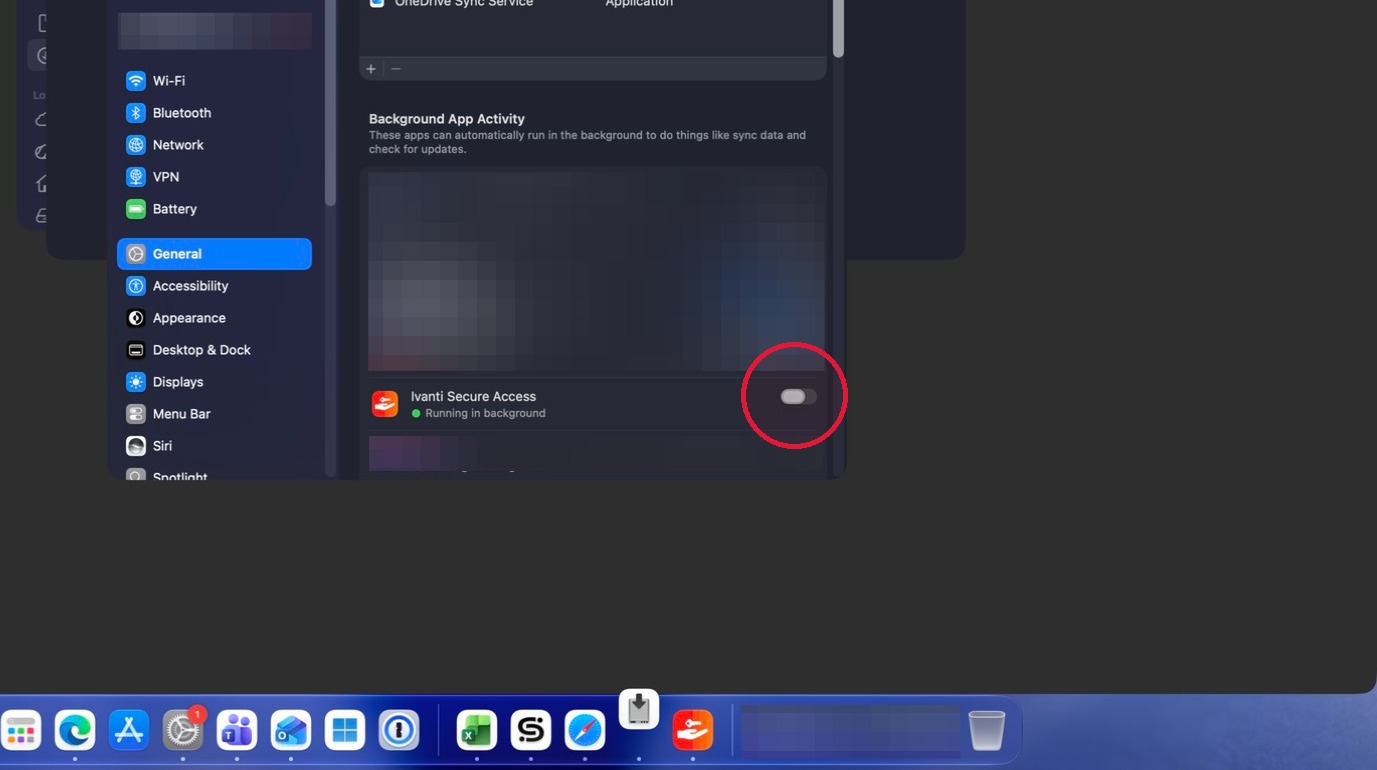
Select Ivanti in Login Items
Select Ivanti Secure Access in Login Items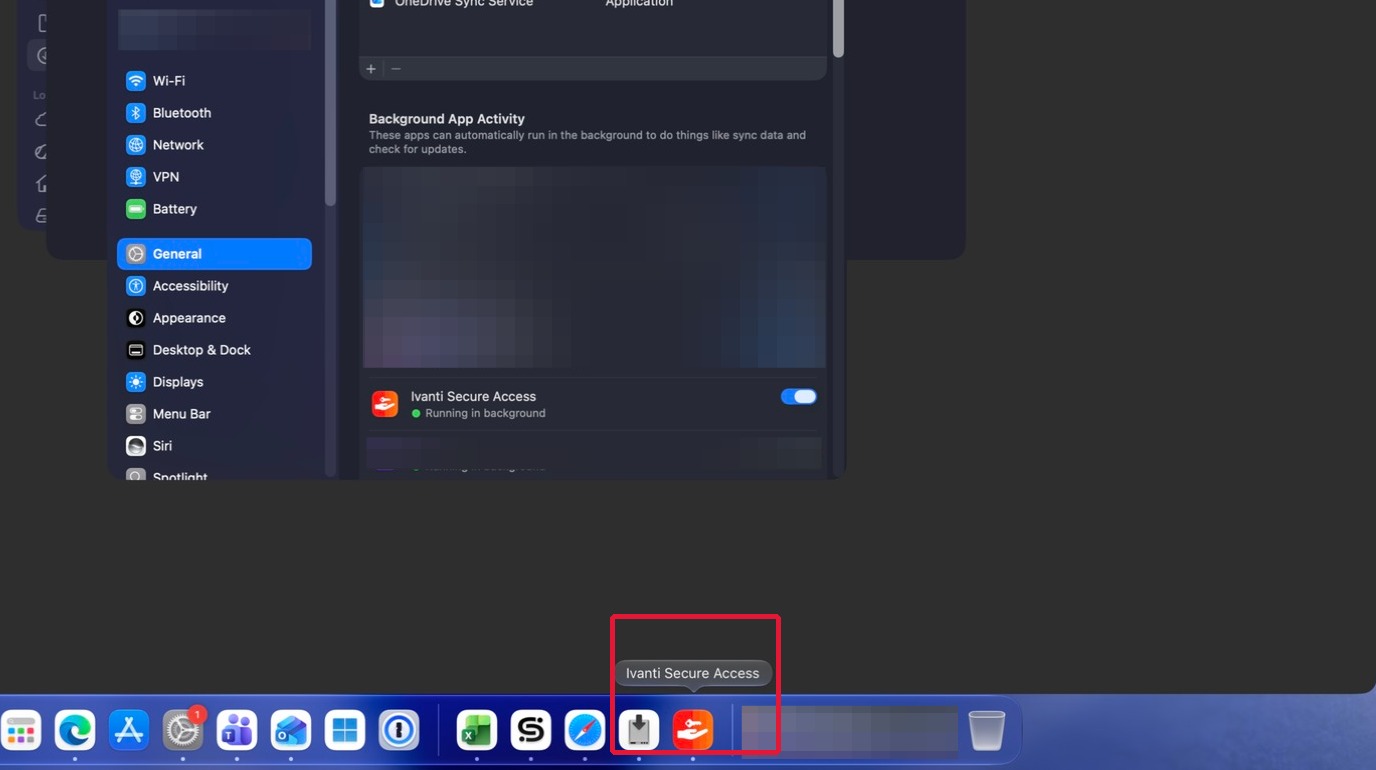
Add your York VPN connection
Select Add to create a VPN connection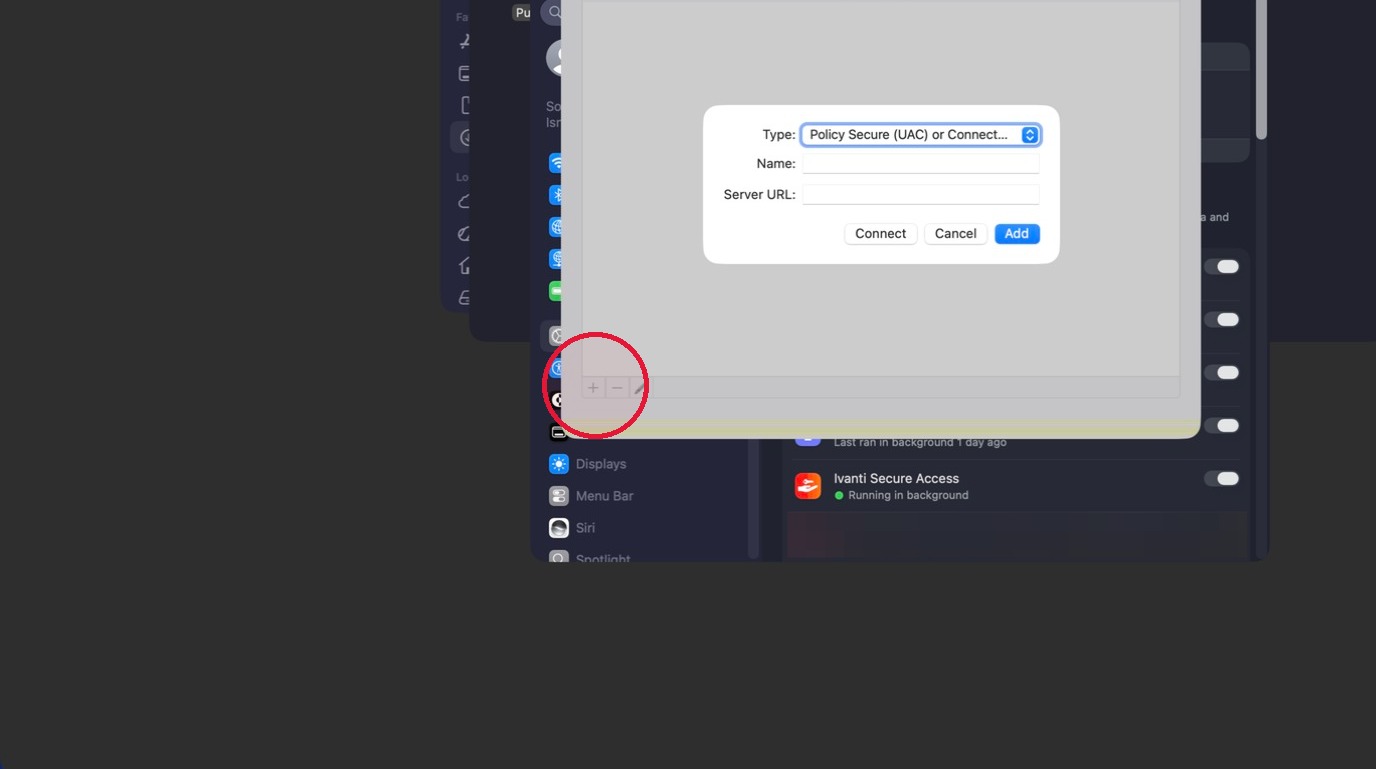
Enter the York server address
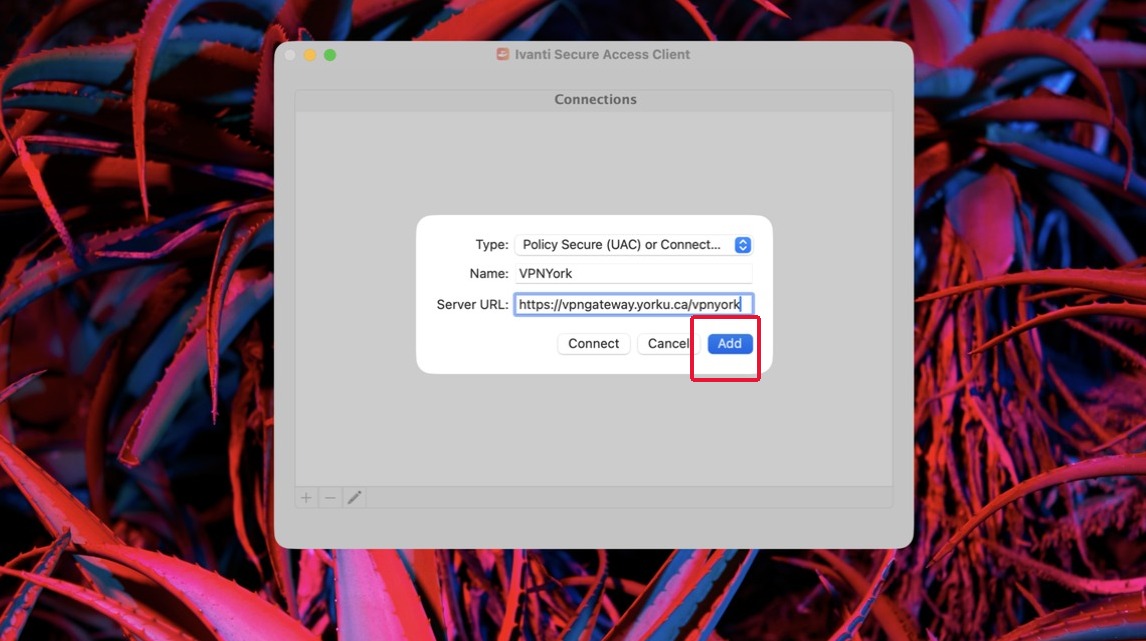
Enter https://vpngateway.yorku.ca/vpnyork in the Server URL field for the regular VPNYork profile. If your IT team supplied another profile, use its address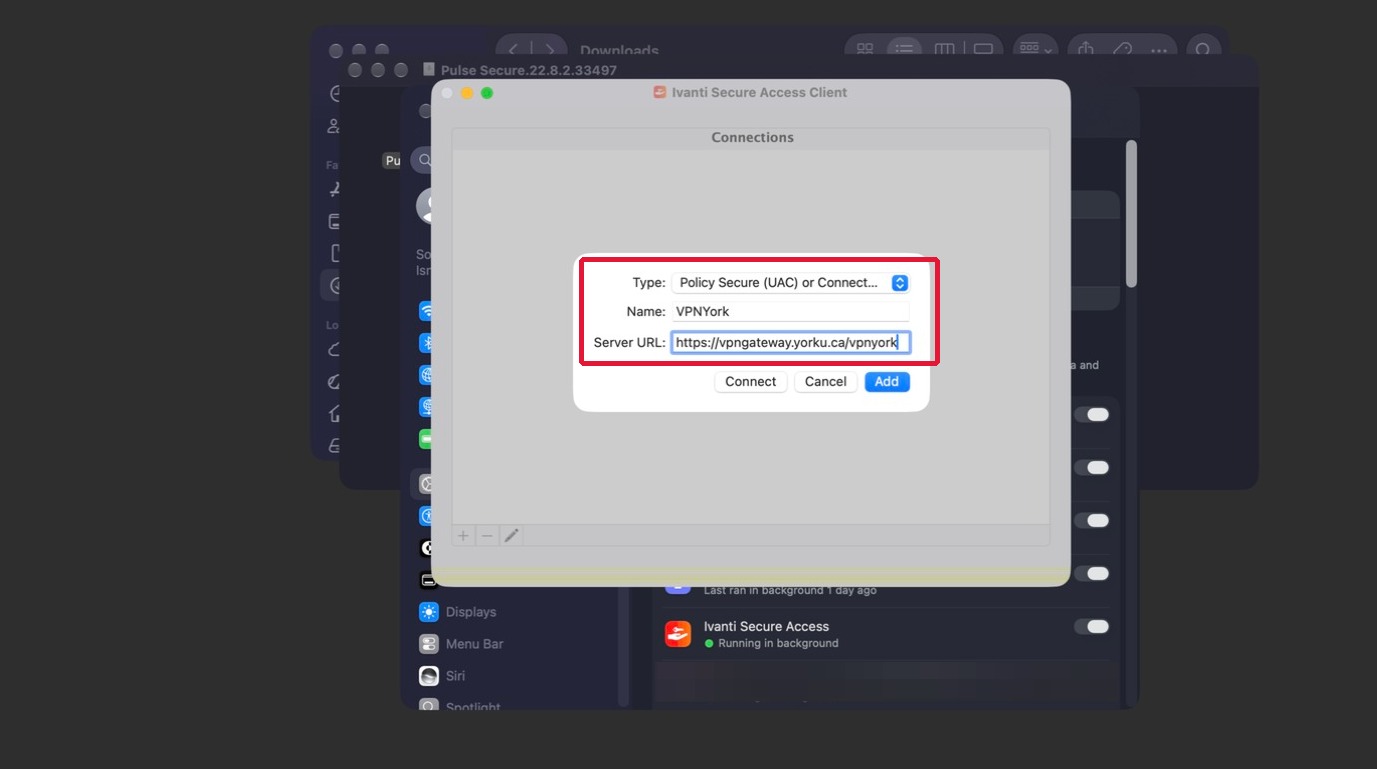
Save the connection
Select Add to save the VPN connection. Then follow the connection steps below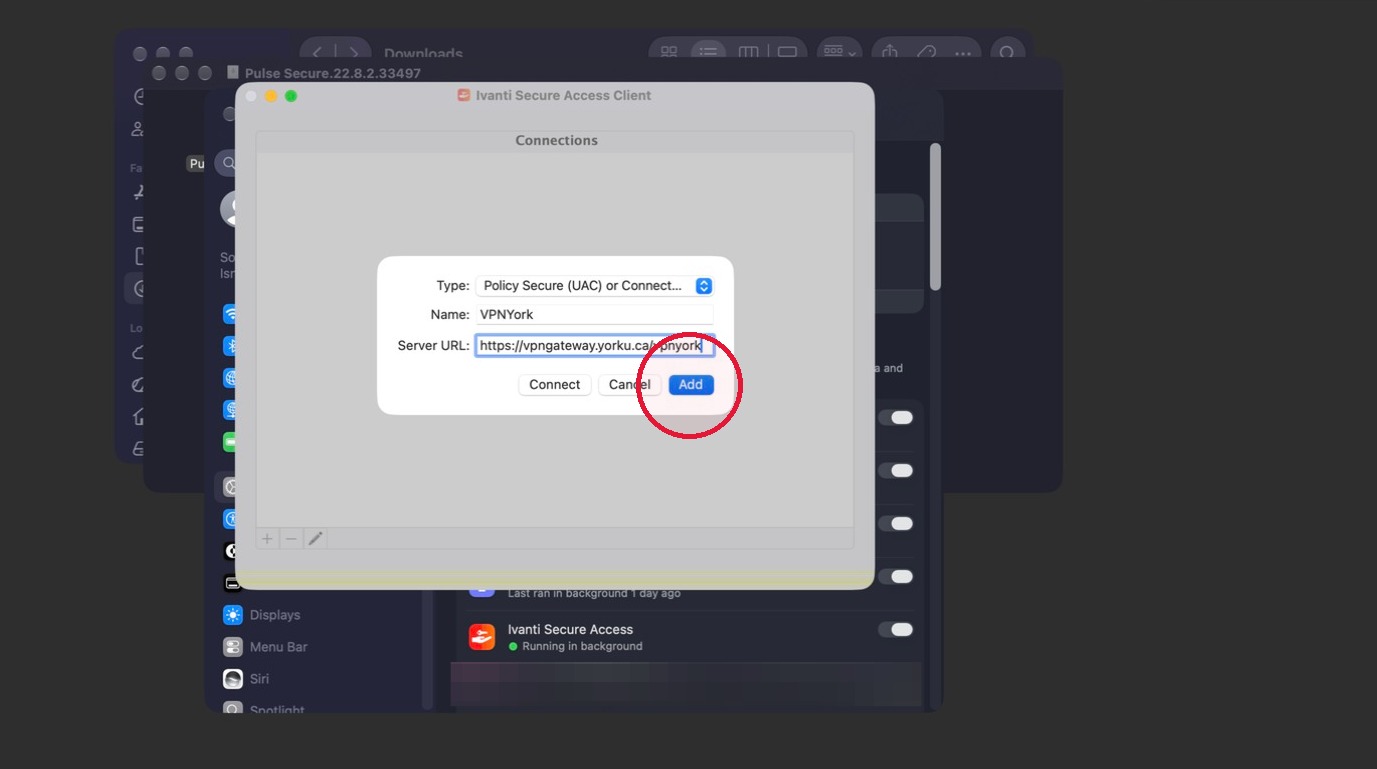
Install Ivanti on Linux
Complete these steps once on this device, then continue to the connection instructions
The Linux client uses command line installation. Replace the example filenames below with your downloaded package name
Download the Linux client
Sign in to York Microsoft 365 in this browser, then choose the current package for your Linux distribution belowDownload for Ubuntu or DebianCurrent · Ivanti 22.8r7 · DEB 64 bitDownload the RPM packageCurrent · Ivanti 22.8r7 · RPM 64 bitPrevious versions
- Ivanti 22.8r2-b33497 · RPM 64 bit
- Ivanti 22.8r2-b33497 · DEB 64 bit
- Ivanti 22.8r1-b31437 · RPM 64 bit
- Ivanti 22.8r1-b31437 · DEB 64 bit
- Ivanti 22.7r4-b30859 · DEB 64 bit
- Ivanti 22.7r4-b30859 · RPM 64 bit
- Pulse Secure 9.1r15.4-b17585 · DEB 64 bit
- Pulse Secure 9.1r15.4-b17585 · RPM 64 bit
- Pulse Secure 9.1r15.4-b17585 · CentOS or RHEL 64 bit
Prepare the dependencies
The client requiresnss3-toolsandnet-tools. Install the appropriate packages for your distribution. The supplied instructions useapt-get install <dependency-tool-name>for Ubuntu or Debian andyum install <dependency-tool-name>for FedoraInstall the downloaded package
For a DEB package usesudo dpkg -i <downloaded-file.deb>
For an RPM package usesudo rpm -ivh <downloaded-file.rpm>Configure your York connection
Use the server URL in York connection details and your Passport York credentials, then follow Connect to VPN below
Replacing an older Pulse client The supplied Linux instructions do not support an in-place upgrade. Remove the old client before installing the replacement. For DEB use sudo dpkg -r <package-name>; for RPM use sudo rpm -e <package-name>
Install Ivanti on Android
Complete these steps once on this device, then continue to the connection instructions
If the old Junos Pulse app is installed, uninstall it before installing Ivanti
Install and open Ivanti
Search Google Play for Ivanti Secure, or use the link above. Select the app, tap Install, accept any installation prompt and tap Open. Accept the End User License Agreement on first useGet Ivanti from Google PlayIvanti Secure Access ClientAdd a connection
Tap Add Connection. Enter a name such as My VPNYork, use the URL in York connection details and enter your Passport York username. Keep Authentication Type set to Password. Leave Realm and Role blankSave the connection
Tap Create Connection. Your profile appears in the Connections list
York connection settings
Use these settings for the regular VPNYork profile. If your IT team has given you a different profile, follow their instructions
- Connection name
- VPNYork
- Server URL
https://vpngateway.yorku.ca/vpnyork- Username and password
- Your Passport York credentials
- Mobile settings
- Authentication: Password · Realm: leave blank · Role: leave blank
Connect on Windows
Follow these steps each time you connect. Finish when Ivanti shows Connected
Find Ivanti in the system tray
In the Windows system tray at the bottom right of your screen, select the up arrow if needed and locate the Ivanti or Pulse Secure icon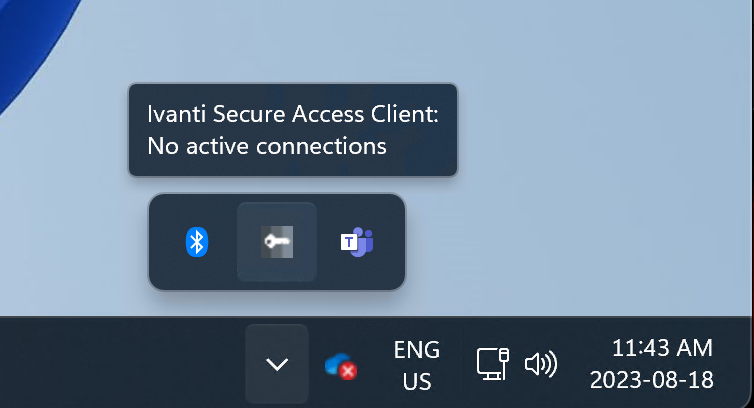
Open Ivanti Secure Access
Right-click the Ivanti or Pulse Secure icon and select Open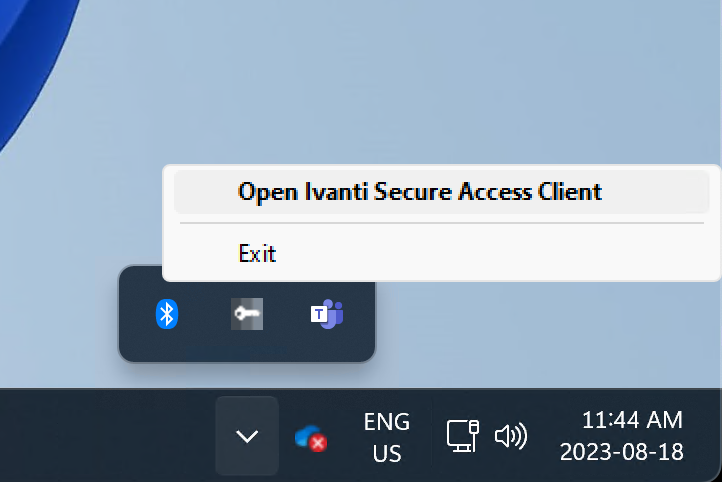
Select your VPN connection
Select Connect beside VPNYork or the profile provided by your IT team. If no profile is listed, select +, enter the connection details above and select Add or Connect. Choose the Connect Secure VPN connection type if requested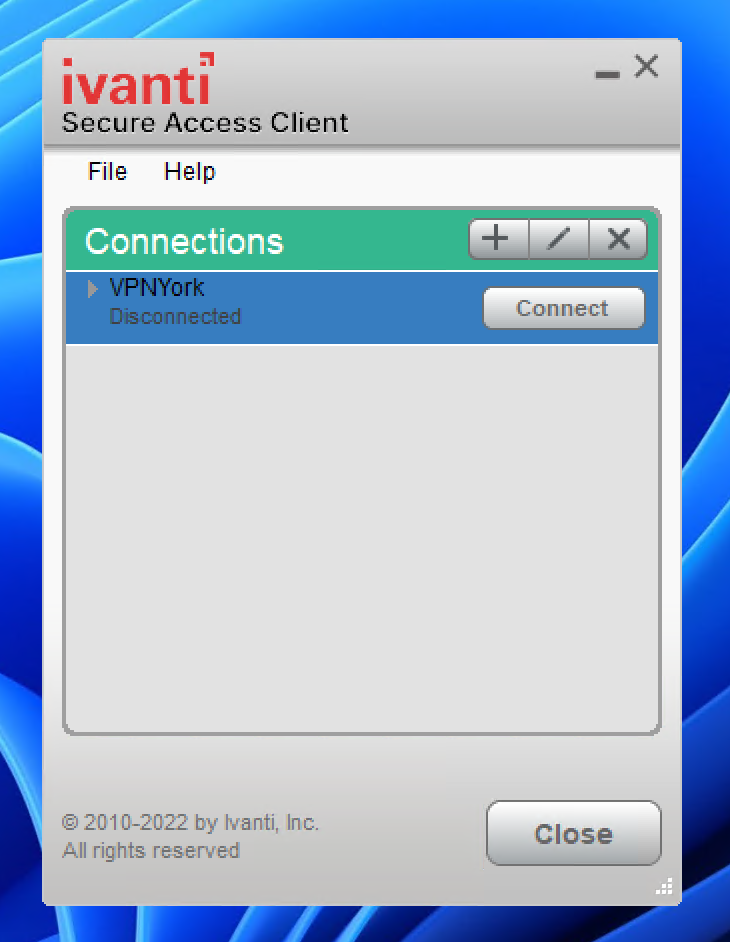
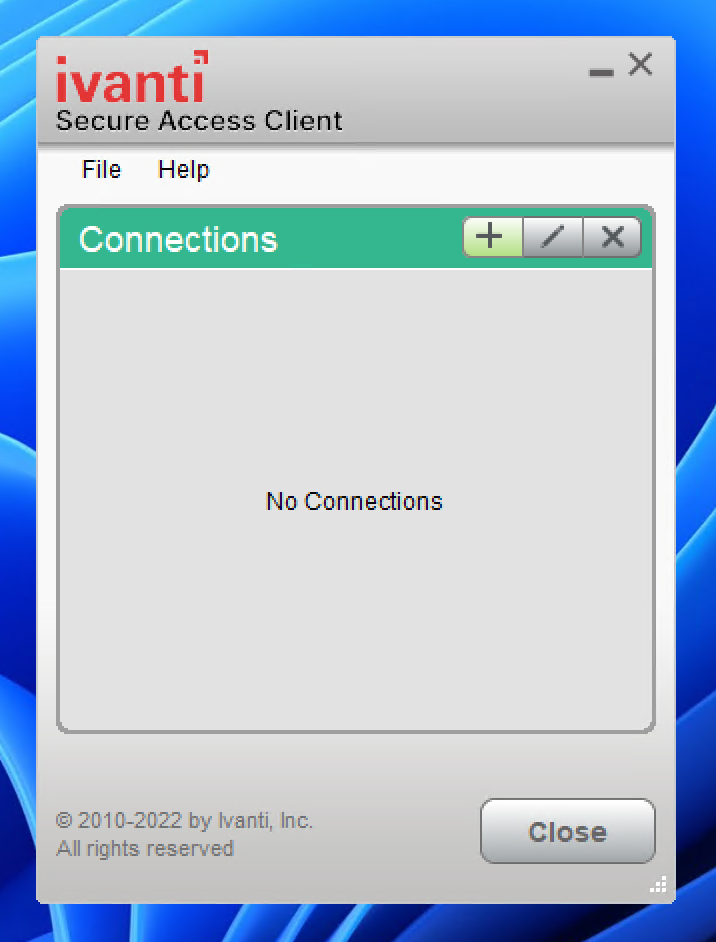
Sign in with Passport York
Enter your Passport York username and password and select Connect. The client may offer to save your credentials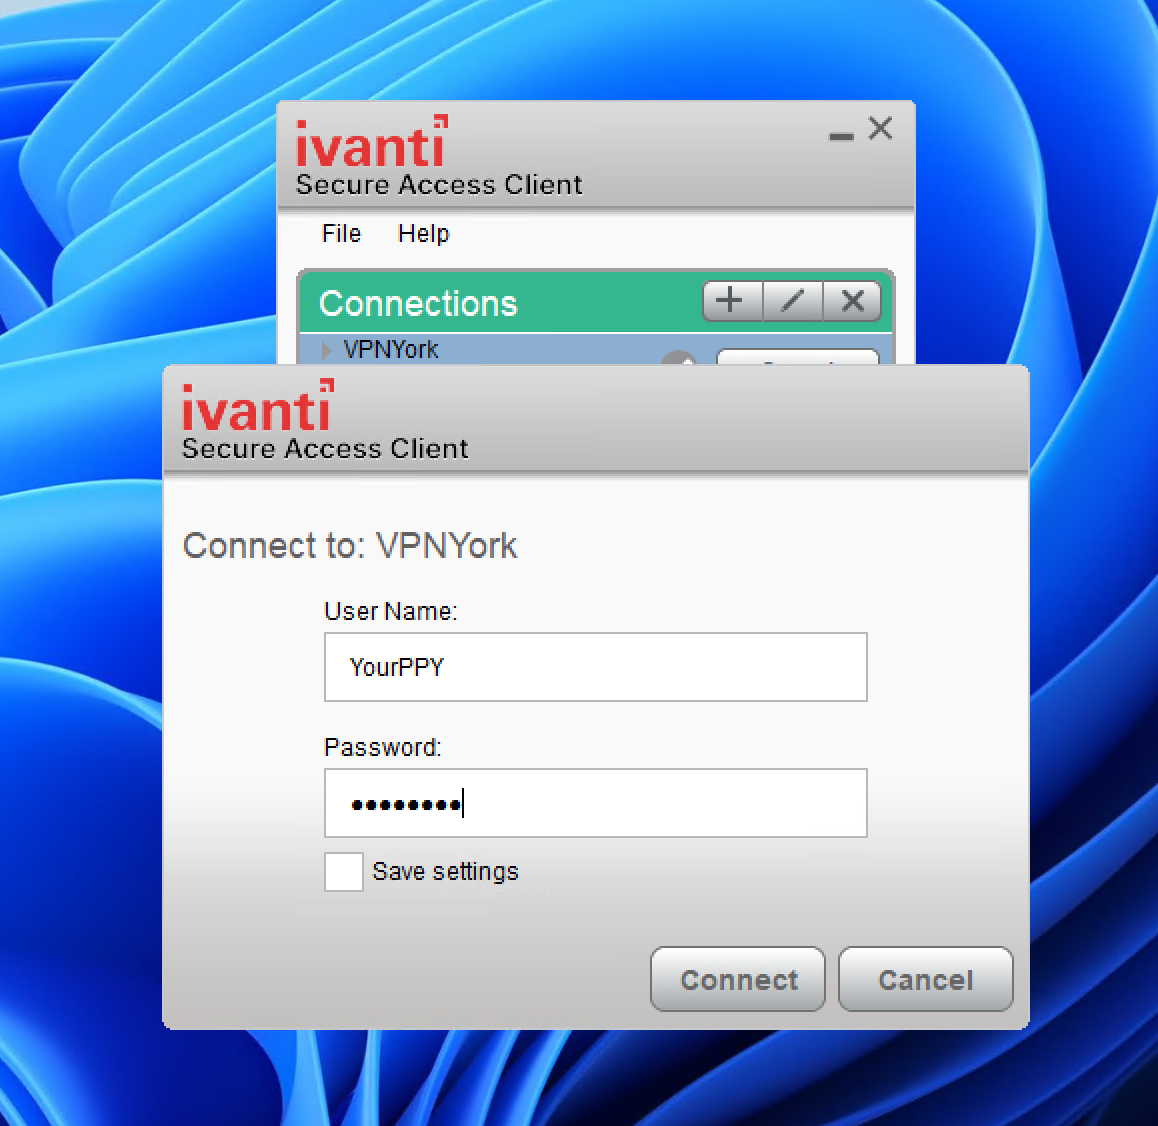
Complete Duo authentication
Approve the Duo Push in the Duo app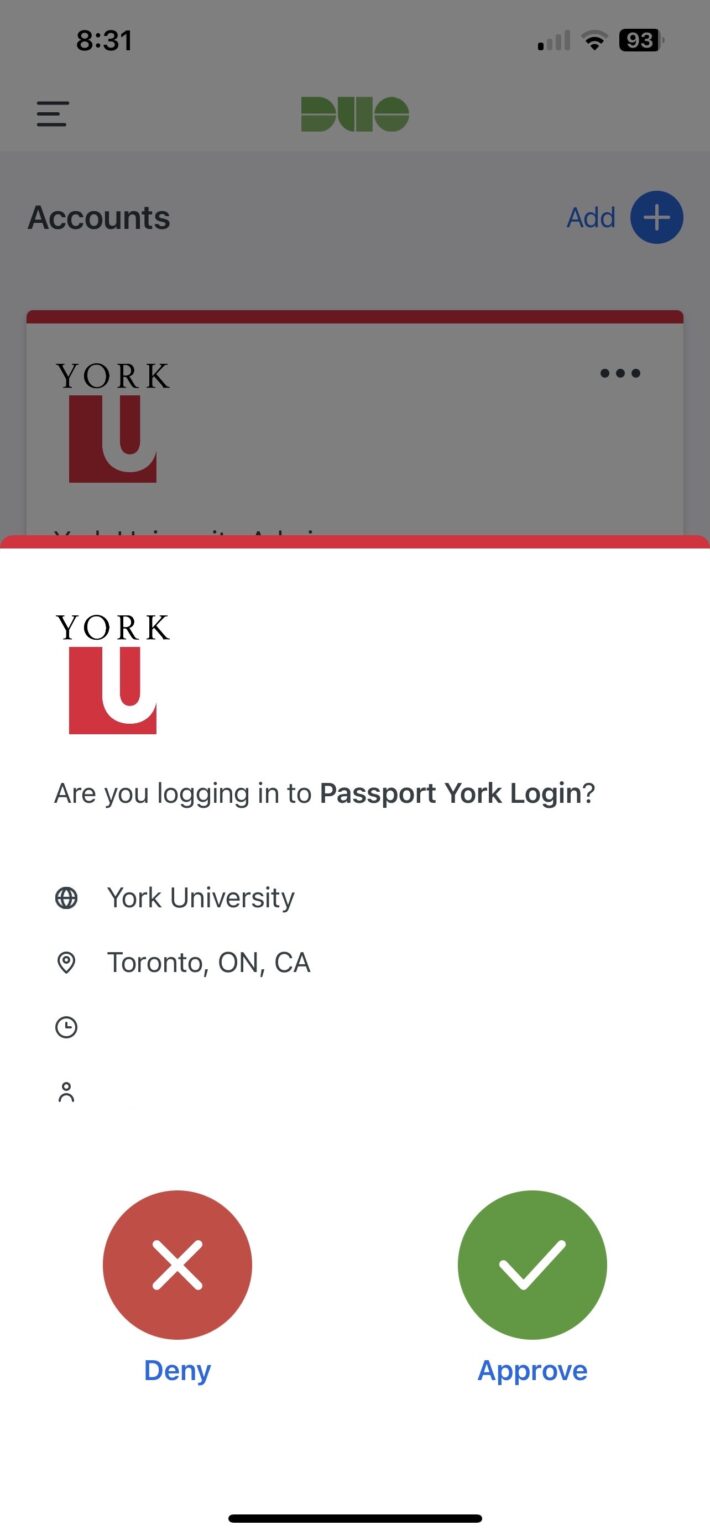
Check that you are connected
Wait for Connected or Status Connected, then open the York resource you need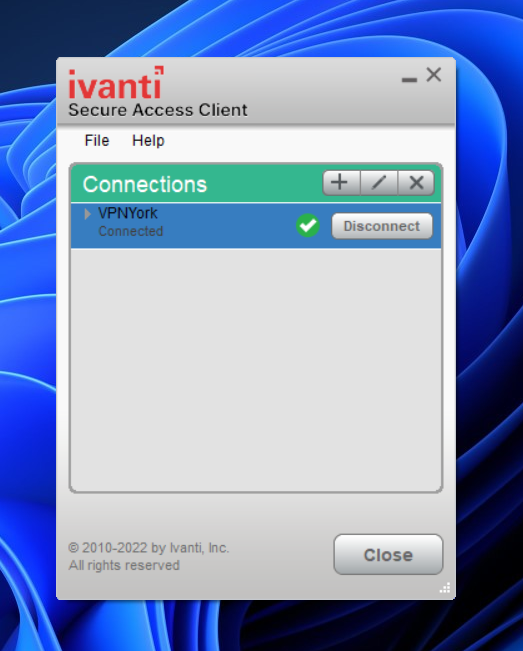
Disconnect when finished
Select Disconnect or Signout to end the VPN session
Connect on macOS
Follow these steps each time you connect. Finish when Ivanti shows Connected
Open Applications
Open Apps or open your Applications folder in Finder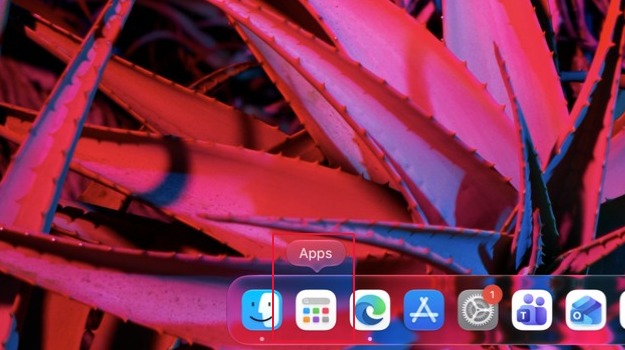
Open Ivanti Secure Access
Open Ivanti Secure Access Client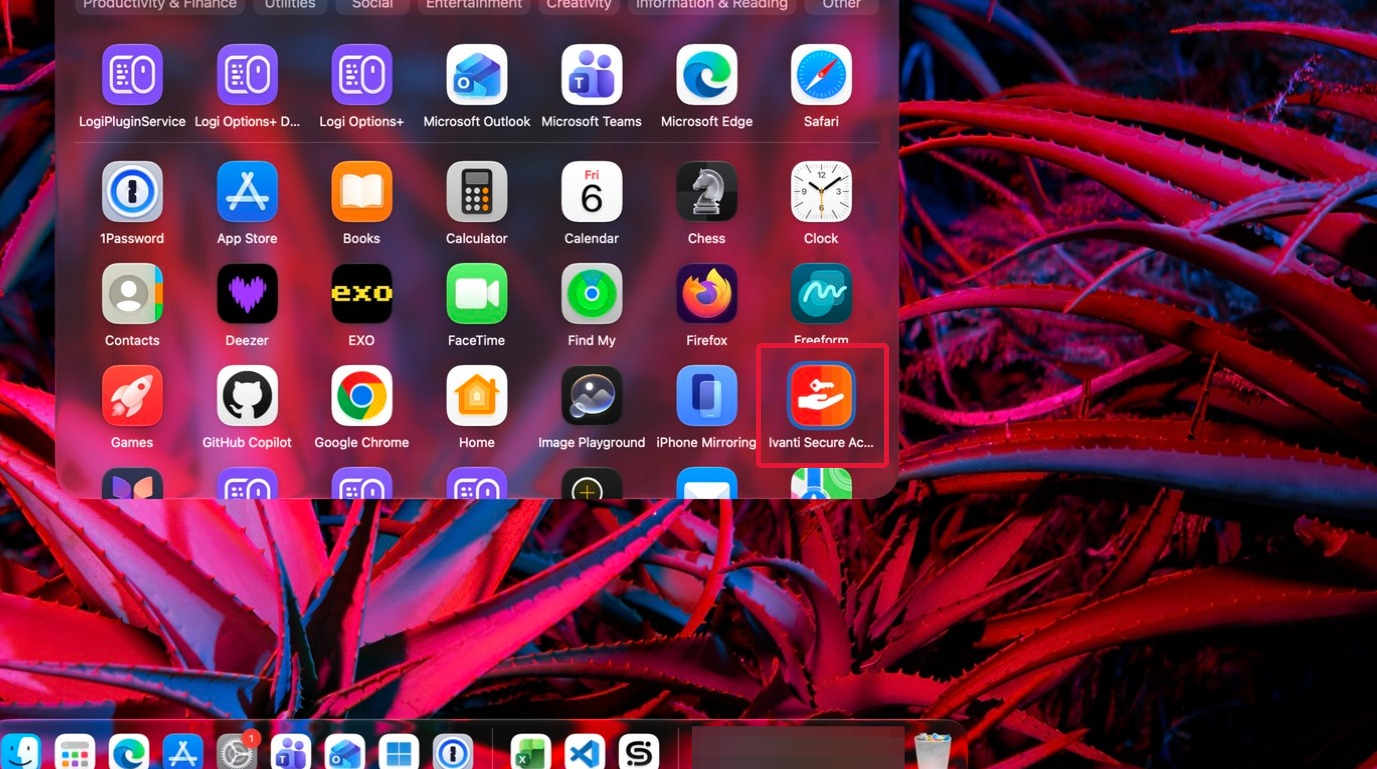
Add a connection if your profile is missing
If VPNYork or your assigned profile is already listed, continue to Connect to VPN below. Otherwise, select + and add the profile. The supplied Mac guide uses Type: Policy Secure (UAC), Name: VPNYork and Server URL: https://vpngateway.yorku.ca/vpnyork. Select Add to save it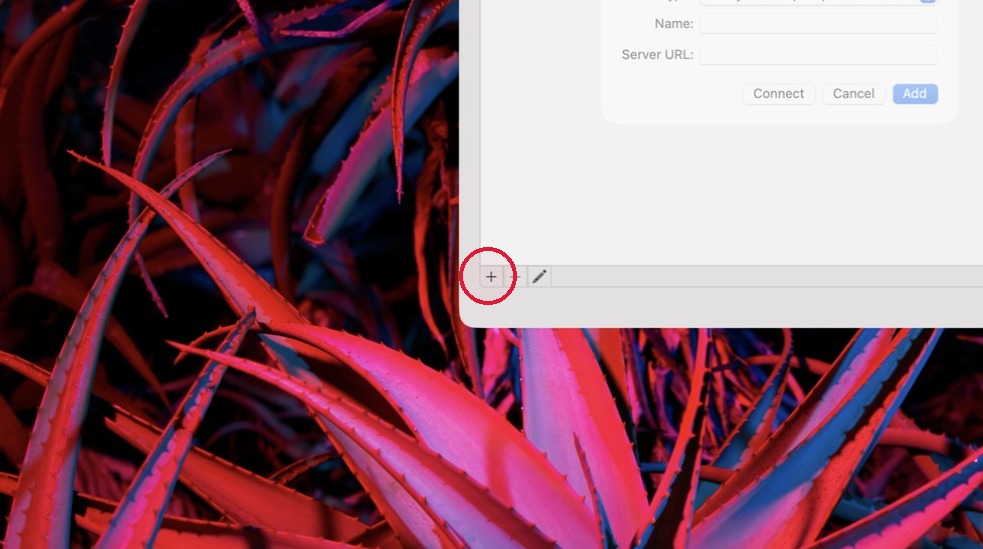
Connect to VPN
Select Connect beside your VPN profile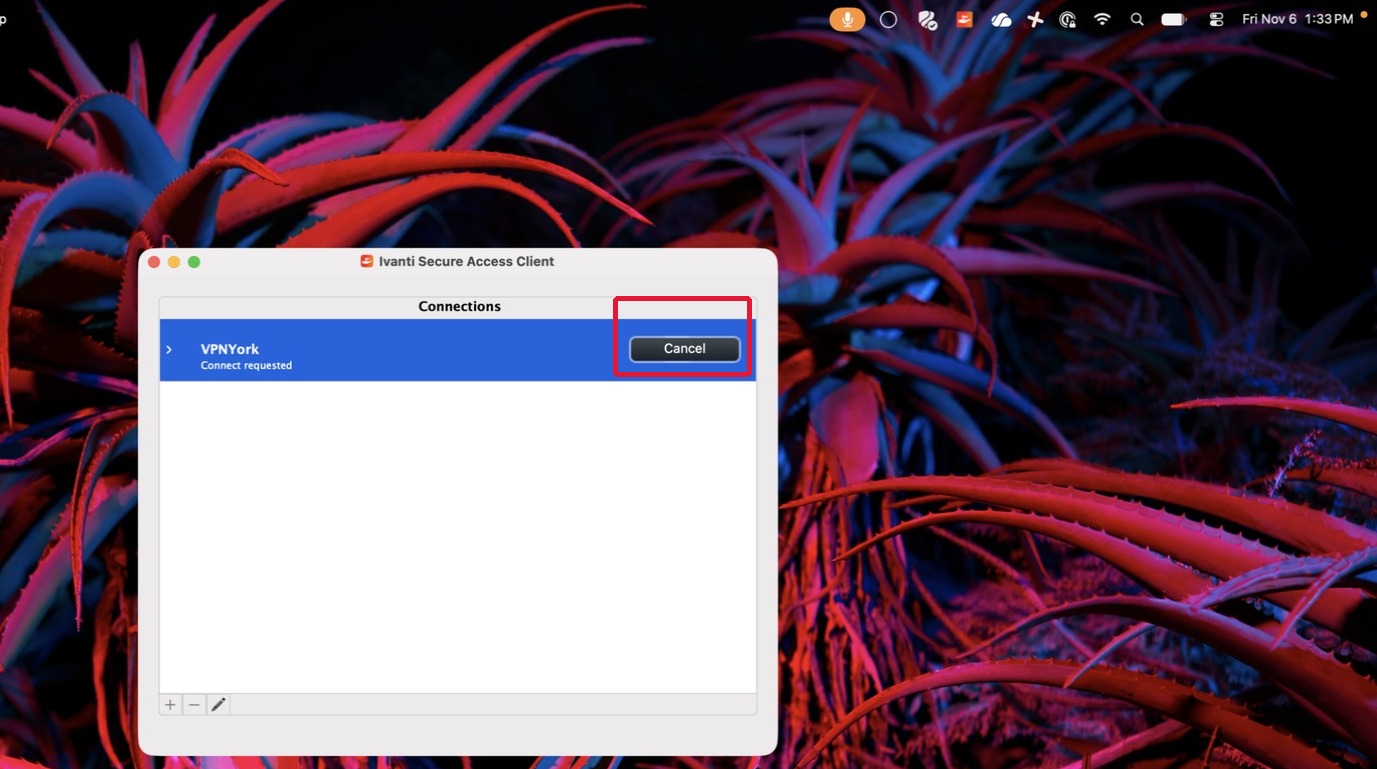
Sign in and approve Duo
Enter your Passport York username and password, then select Connect. Approve the Duo Push on your phone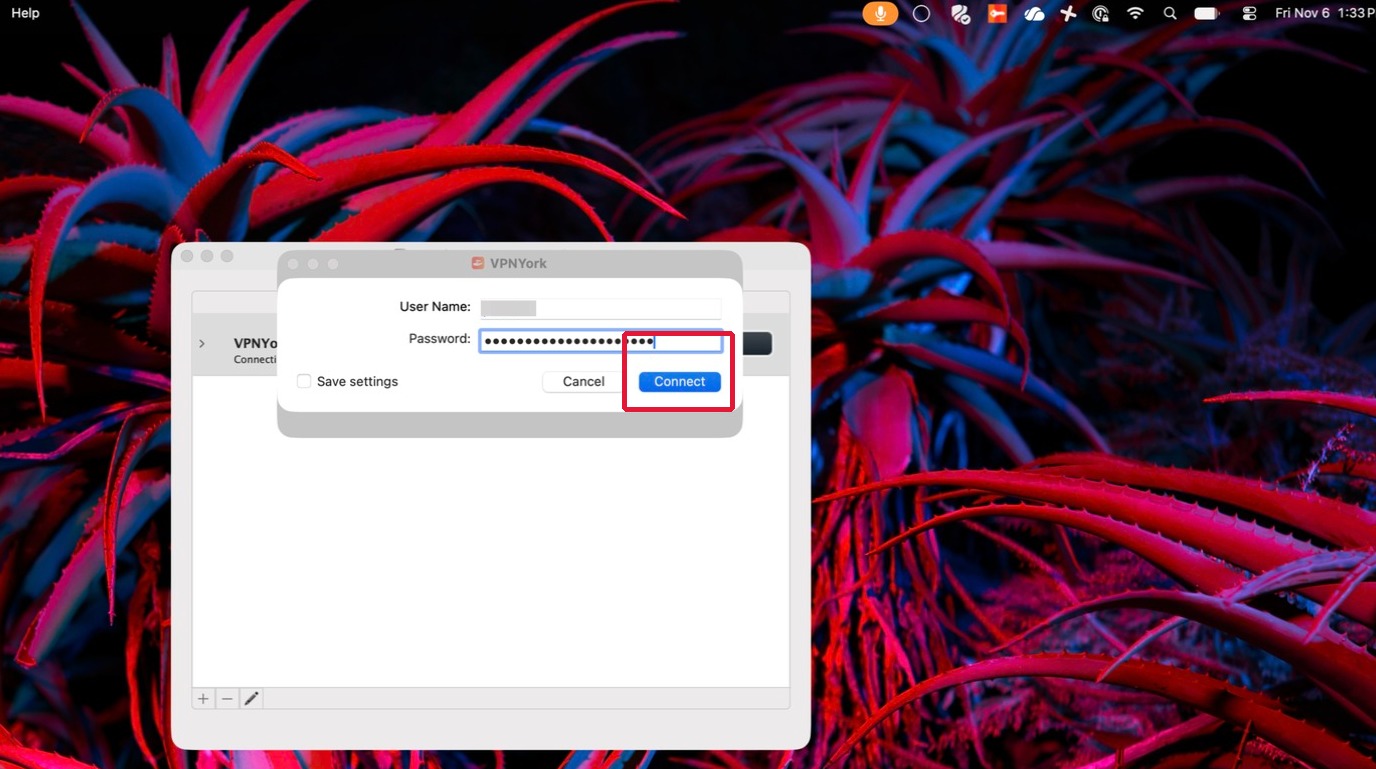
Confirm you are connected
Wait for Ivanti to show Connected or Status Connected before opening the York resource you needDisconnect when finished
Select Disconnect to end your VPN session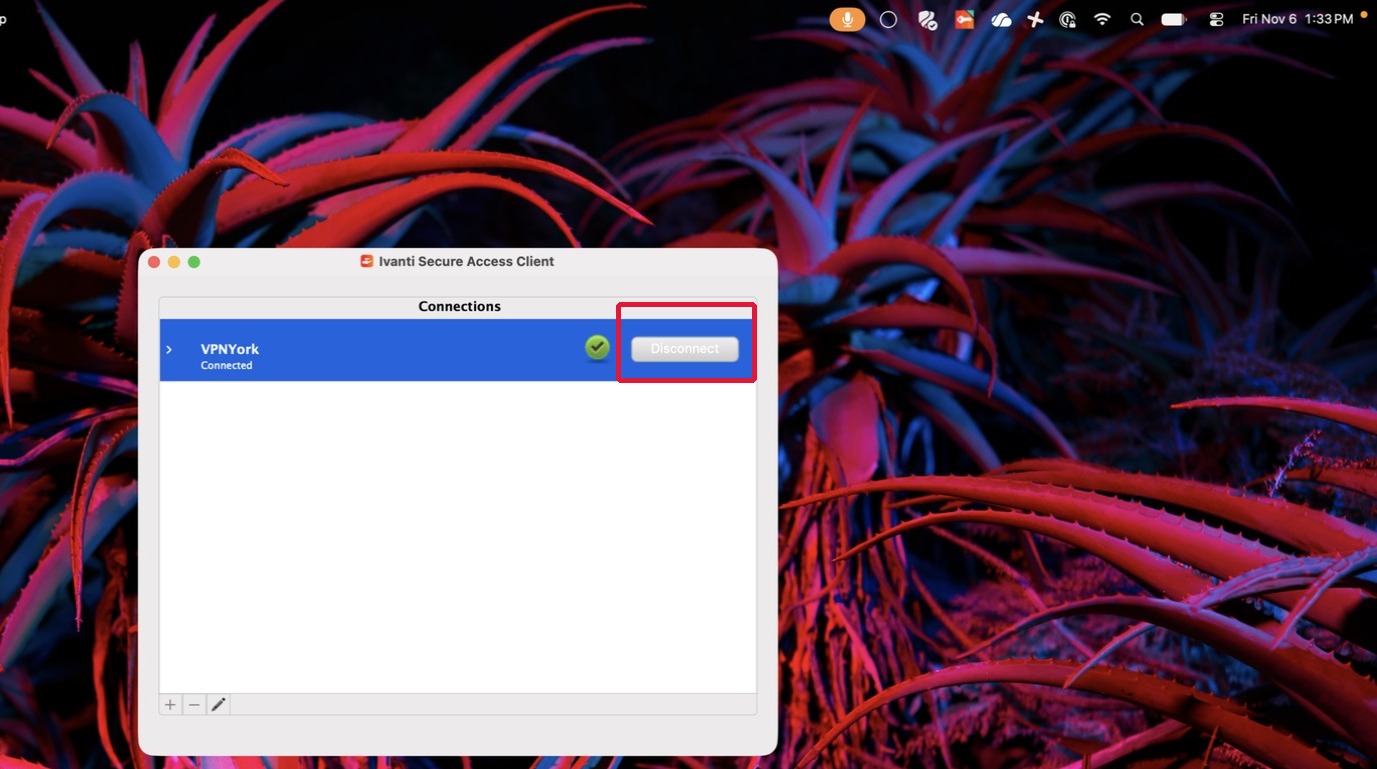
Connect on Linux
Follow these steps each time you connect. Finish when Ivanti shows Connected
Use your York profile
Use the VPNYork server URL above, or the profile supplied by your IT team, in your installed clientAuthenticate with Passport York and Duo
Connect with your Passport York username and password and complete Duo authenticationCheck your connection
Confirm that the VPN session is connected before opening the York resource you need. End the session when you finish
Connect on Android
Follow these steps each time you connect. Finish when Ivanti shows Connected
Open Ivanti Secure Access
Open the app and select your saved connection. If there is no saved connection, tap Add Connection, enter a name such as My VPNYork and use the settings above. Enter the server URL above and your Passport York username. Set authentication to Password and leave Realm and Role blank. Tap Create ConnectionConnect and sign in
Tap Connect. Enter your Passport York username and password on the Secure Remote Access login page and tap Sign InComplete Duo and allow the connection
Complete Duo authentication. Tap OK on the first connection requestConfirm your connection
Check for Status Connected and the key icon in the Android status bar. Select Status for your assigned York VPN IP address and connection details. Use Back to return to the main screen if neededDisconnect when finished
Tap Signout
Uninstall Ivanti on macOS
Remove the application and its associated files, then empty the Trash when you are ready to delete its contents permanently
Open Finder
Open Finder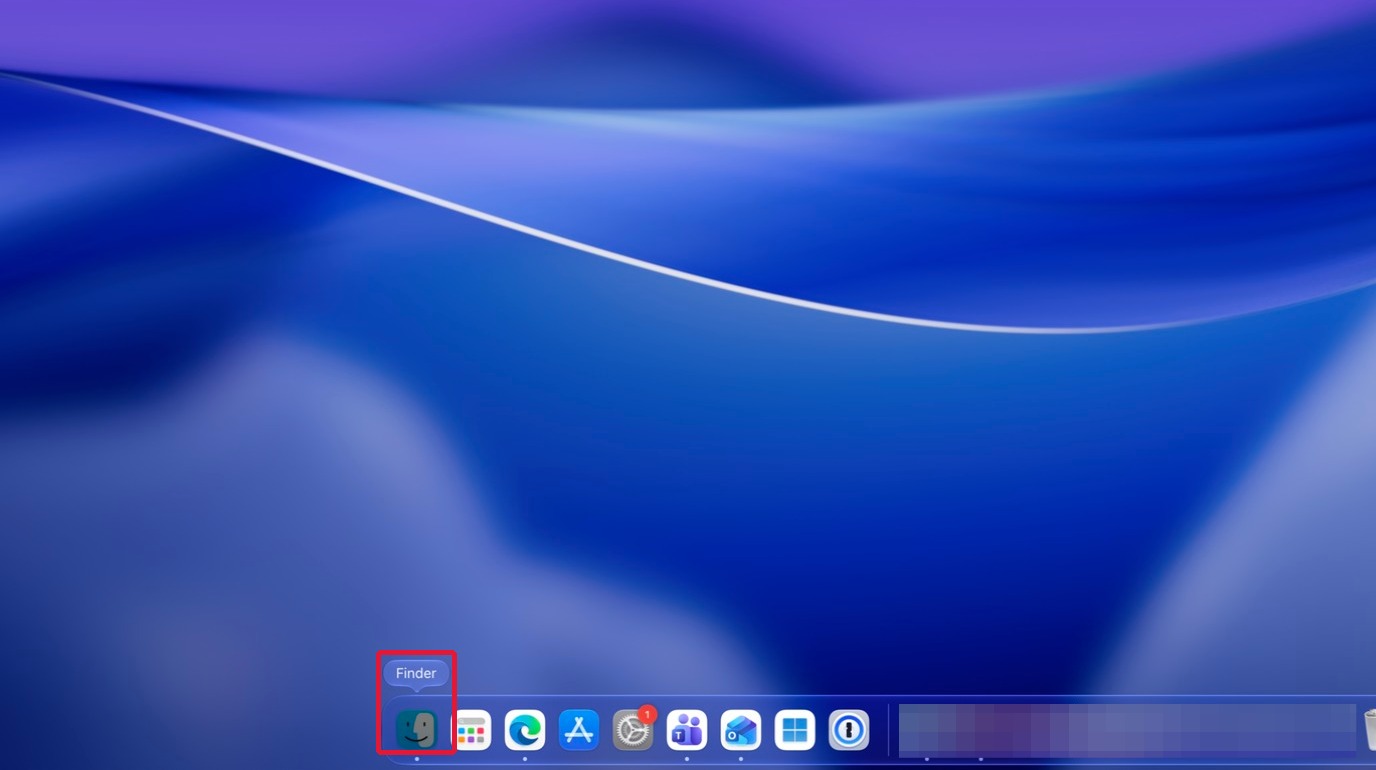
Open Applications
Select Applications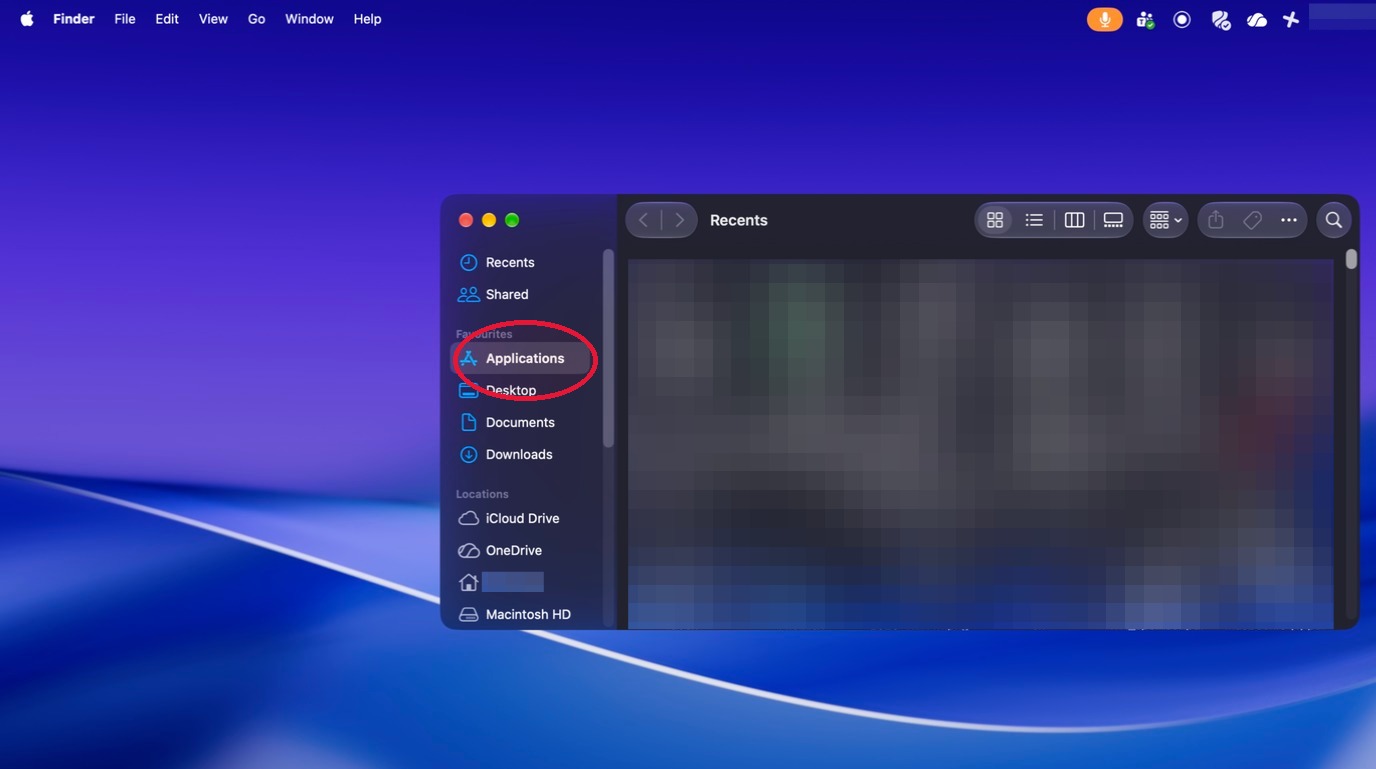
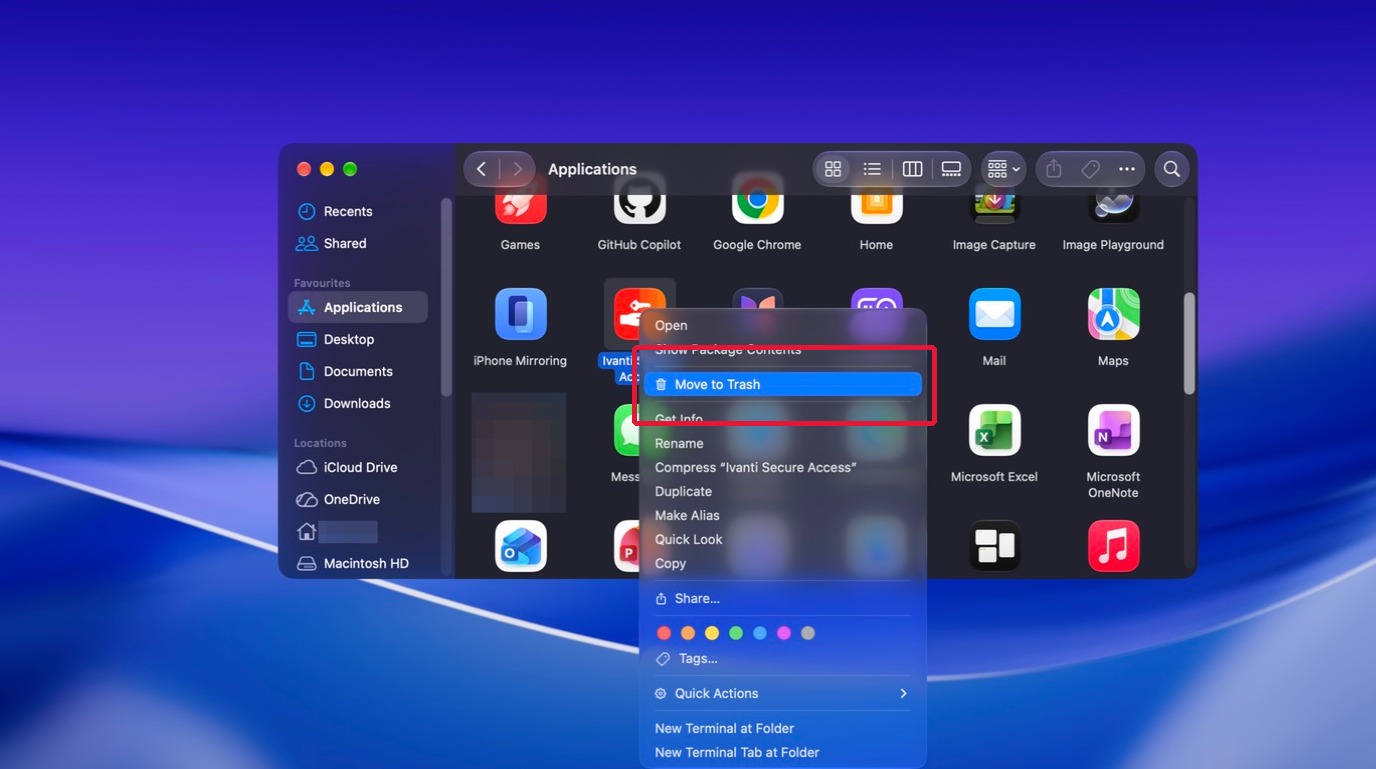
Move Ivanti to the Trash
Move Ivanti Secure Access to the Trash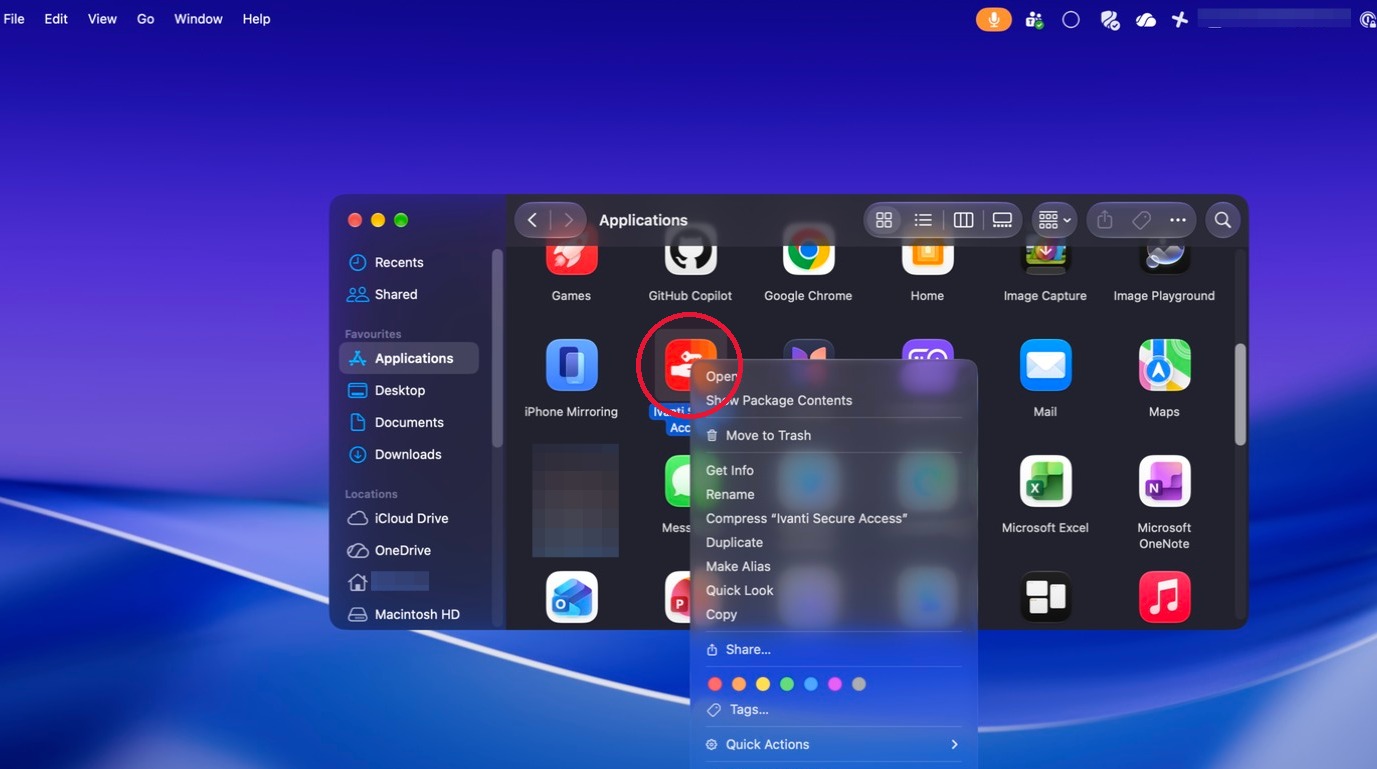
Allow the removal
Select Allow on the permission prompt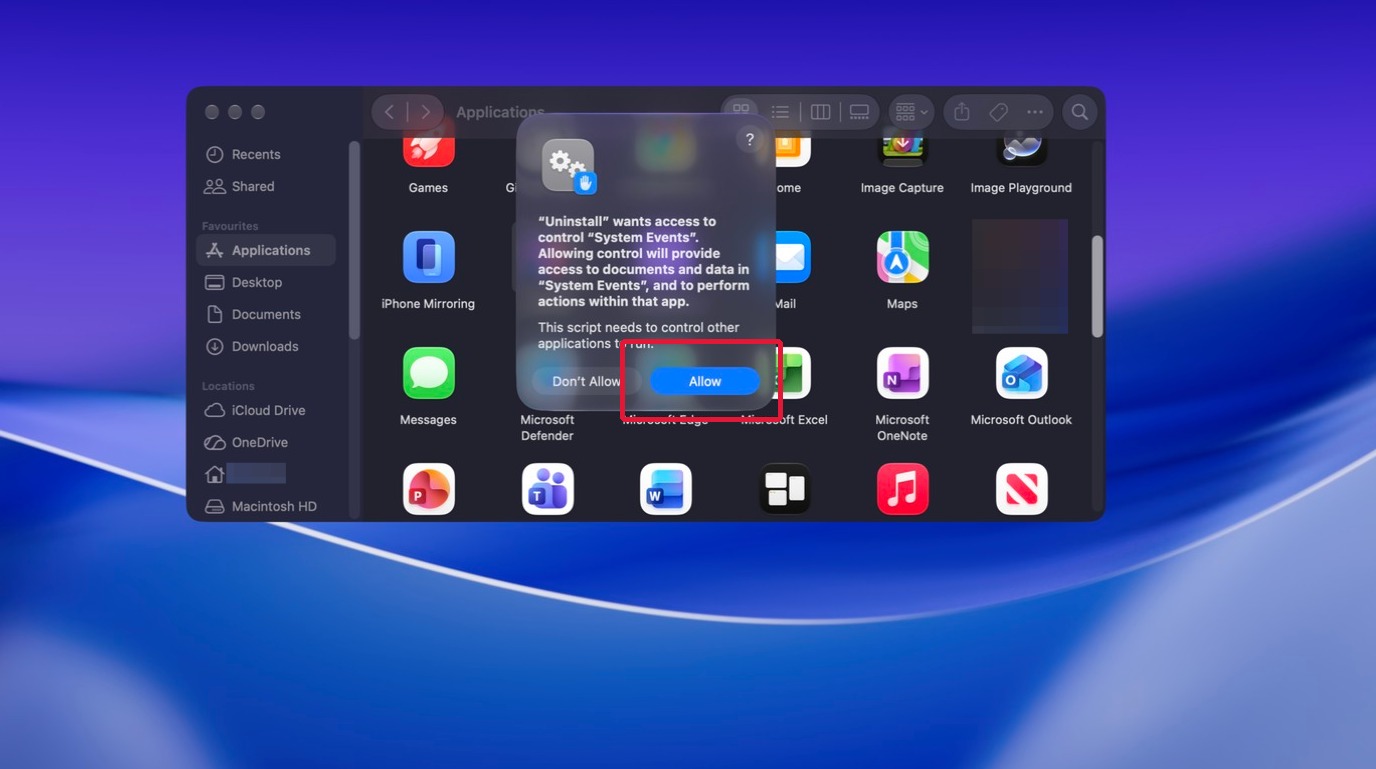
Remove the saved configuration
Select No when asked whether to save the configuration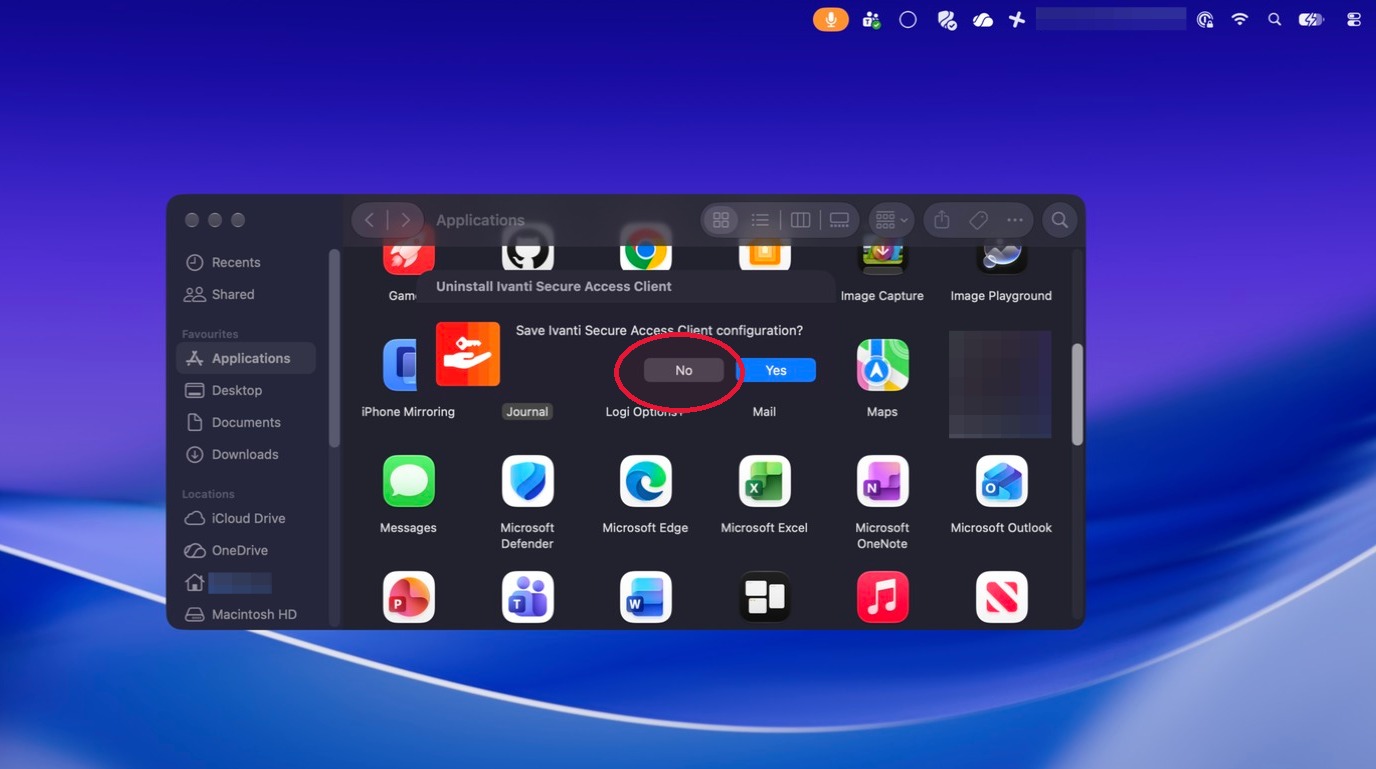
Remove the associated files
Select Continue to remove the associated files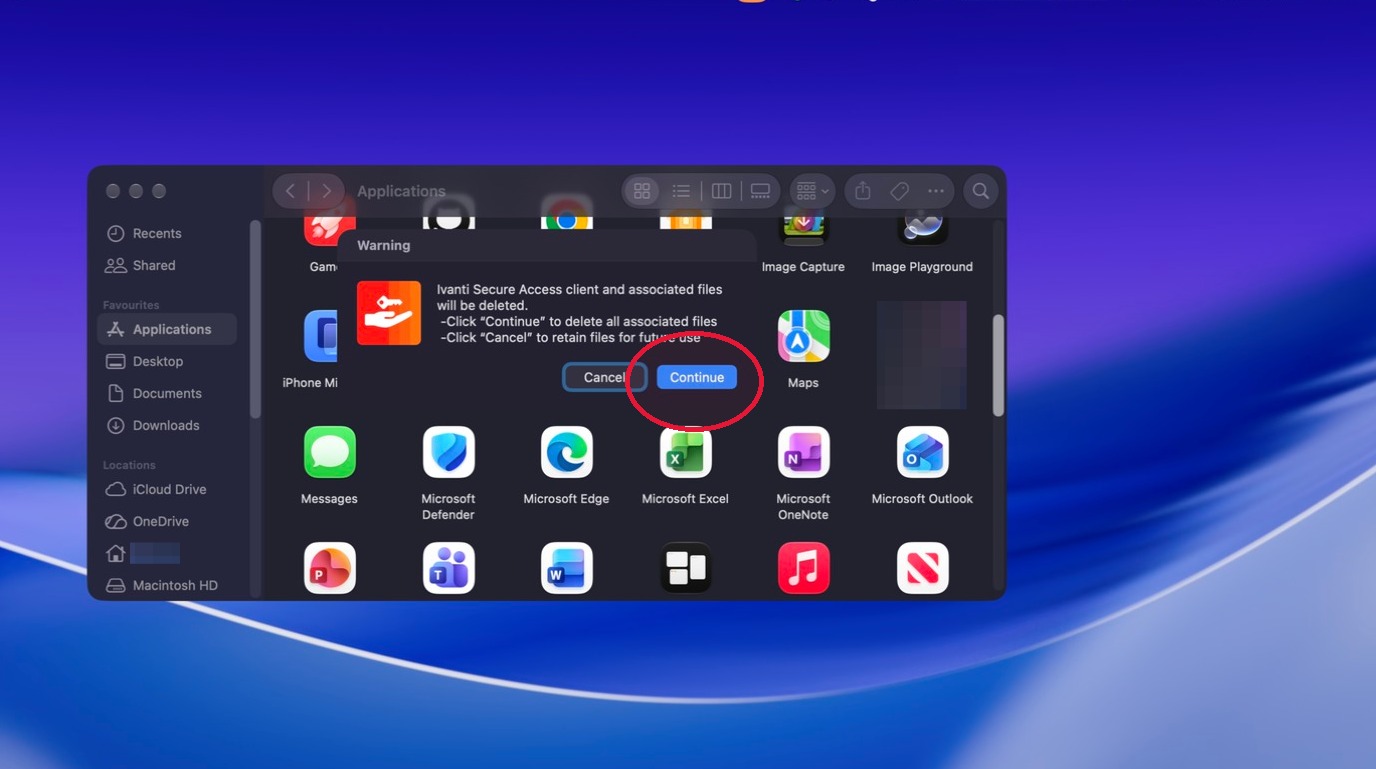
Open the Trash menu
Right-click Trash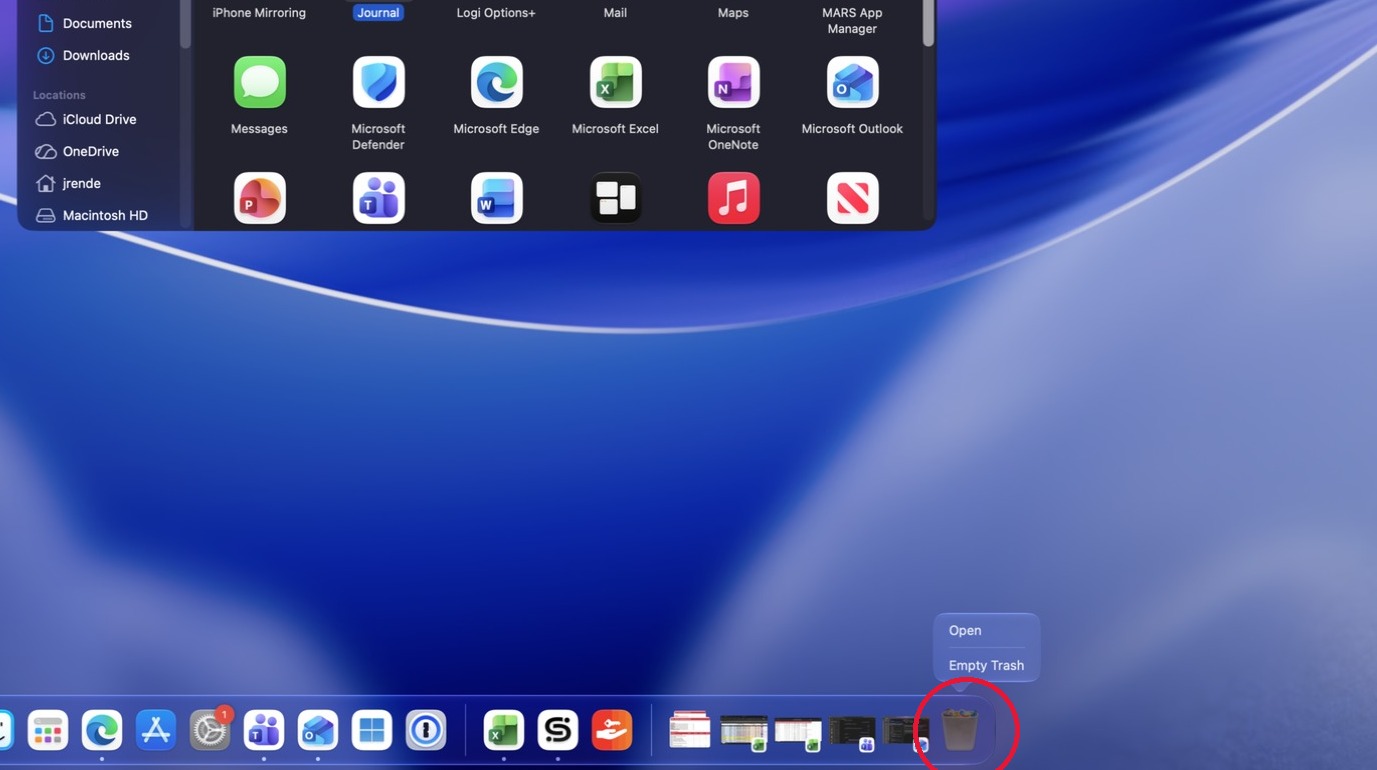
Choose Empty Trash
Review the contents of your Trash, then select Empty Trash if you are ready to delete those items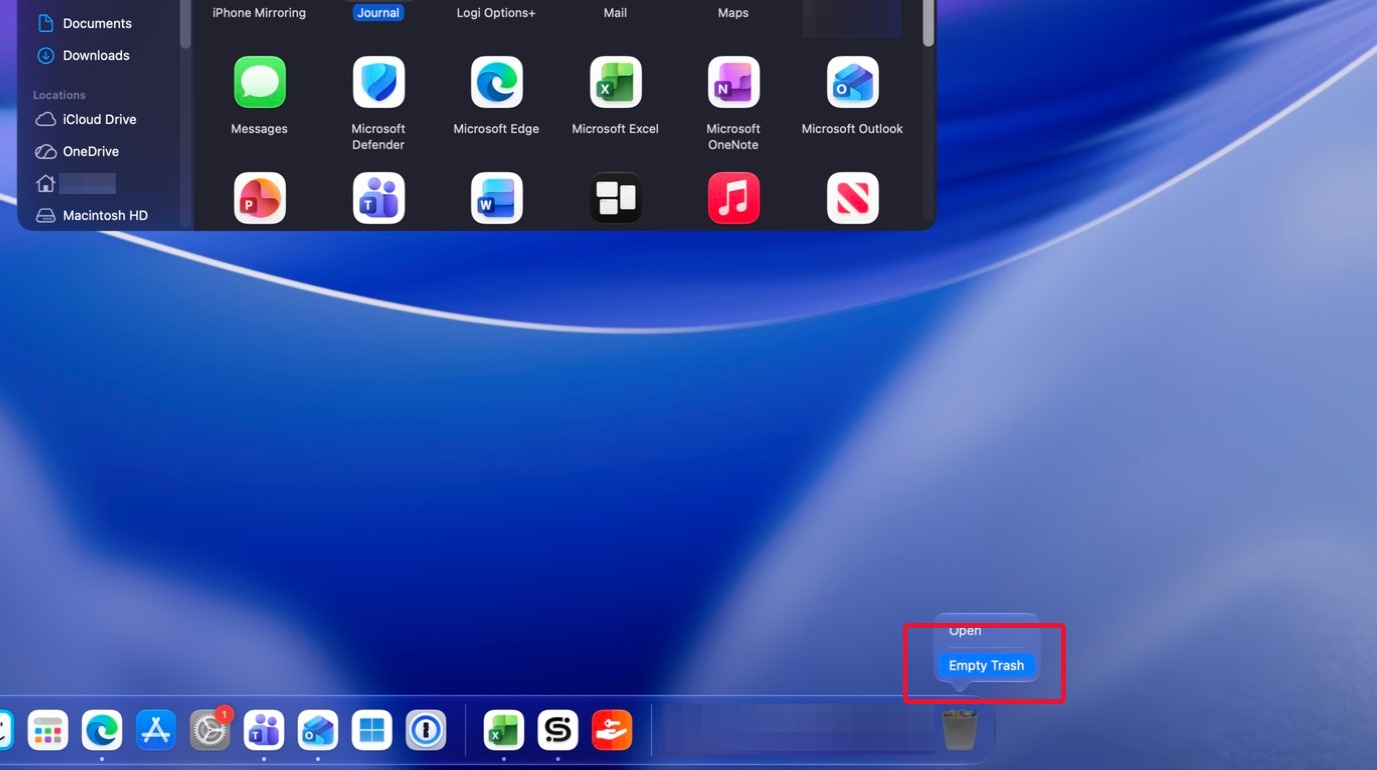
Confirm permanent deletion
Select Empty Trash to confirm. This permanently deletes the items in your Trash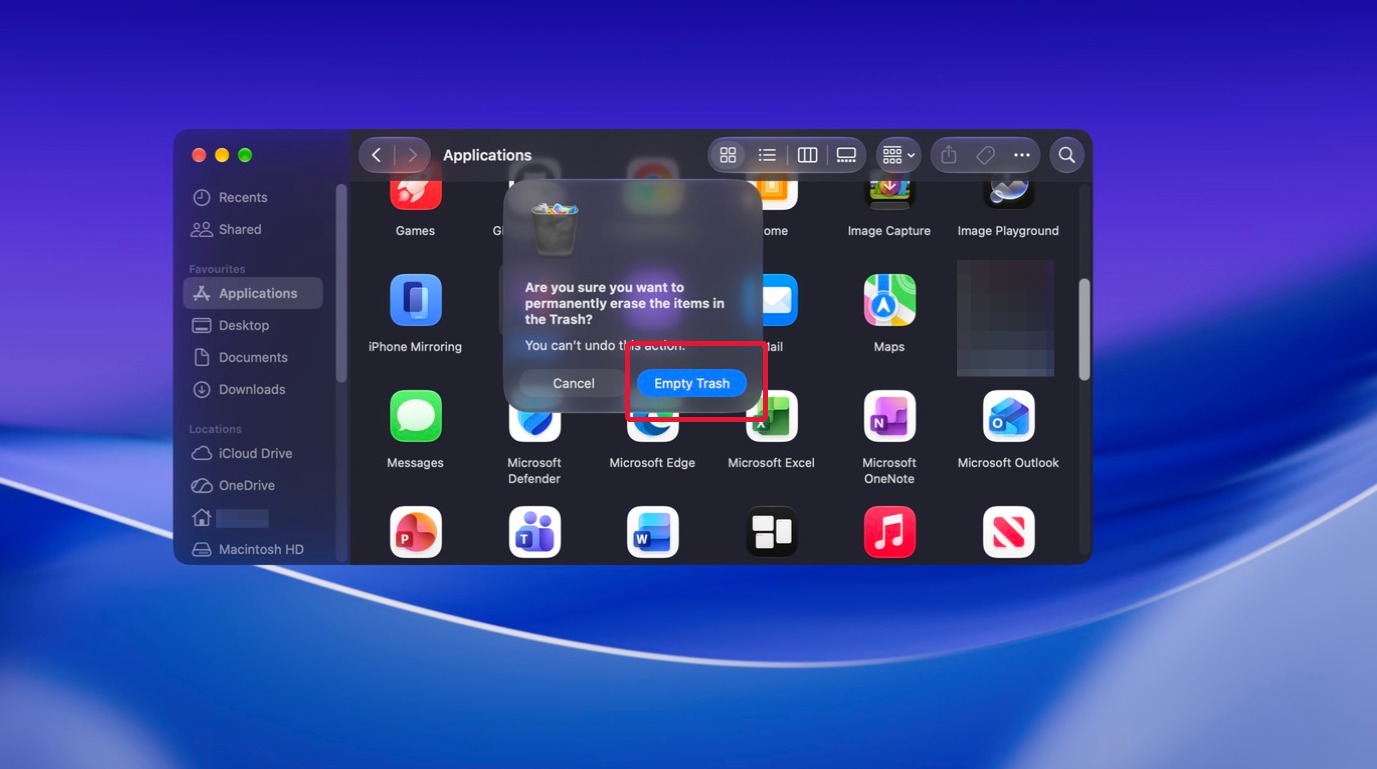
Check Ivanti’s supported platforms and browsers for compatibility with your client version
Frequently Asked Questions
AirYorkPLUS FAQs
If you have not changed your password in over a year you may need to change it now. Follow the instructions below to change your password:
- Close all open browser windows.
- Start up your web browser and go to mms.yorku.ca>>
- Click the checkbox beside "Click this box before logging in to change your Passport York password". Log in using your current Passport York username and password. Follow the prompts to change your password. Note: Password can only be 7 or 8 characters long and may not contain a semi-colon (;) or double quotes (").
- Wait around 10 minutes before connecting to AirYorkPLUS.
**Please note if you have forgotten your username or password, then follow the instructions for resetting Passport York>>
This is due to a misconfigured Wi-Fi client profile. Delete the Wi-Fi profile for AirYorkPLUS from your device and then recreate it. Use the AirYorkPLUS Setup Application tool if your computer is MS Windows.
If you see the following message, it means you have not followed the AirYorkPLUS configuration instructions fully. However, you can still connect to AirYorkPLUS and not see this message again by clicking on the Details arrow and verifying the following:
- Radius Server: authenticate.yorku.ca
- Root CA: GlobalSign Root CA
- Once verified, click Connect.
For best performance, particularly In high-density settings such as lecture halls and libraries, you need to ensure that the Wi-Fi radio in your client device is capable of supporting the performance features of AirYorkPLUS. Your Wi-Fi performance on campus may suffer if your wireless client device cannot operate in the 5 GHz radio band and does not support the Wi-Fi 5 protocol or later. For more information on how to achieve optimal Wi-Fi speeds at York, please consult UIT's recommendations on selecting/purchasing a Wi-Fi client device >>
For Windows 10 / 11 users, there are a few network adapter settings available that can help ensure optimal performance.
1. Click the Windows icon on your keyboard or bottom left of your screen and search for “Command Prompt” as an administrator (by searching for it in the same way but right-clicking on it and selecting “Run as administrator”) and run the command by copying and pasting this and pressing Enter:
control.exe /name Microsoft.NetworkAndSharingCenter.

2. Click on “Connections: Wi-Fi (AirYorkPlus)” and a new window should pop up.

3. Click on “Properties” and a new window should pop up.

4. Click on “Configure” and a new window should pop up.

AirYorkGUEST FAQs
Internet in Residence FAQs
VPN FAQs
eduroam FAQs
If you are visiting York University from another institution, please contact your home institution for instructions on connecting to eduroam at York.
If you are a York University Community member, please contact USC Client Services at askit@yorku.ca or 416-736-5800.
Reset your Passport York password>>
If you have not changed your password in over a year, you may need to change it now.
This is due to a misconfigured Wi-Fi client profile. Delete the Wi-Fi profile for eduroam from your device and then recreate it.
If you see this message, it means you have not followed the eduroam configuration instructions fully. However, you can still connect to eduroam and not see this message again by clicking on the details arrow and verifying the following:
- Radius Server: authenticate.yorku.ca
- Root CA: GlobalSign Root CA
- Once verified, click Connect.
For best performance, particularly in high-density settings such as lecture halls and libraries, ensure that the Wi-Fi radio in your client device supports the performance features of AirYorkPLUS. Your Wi-Fi performance on campus may suffer if your wireless client device cannot operate in the 5 GHz radio band and does not support the Wi-Fi 5 protocol or later. For more information on how to achieve optimal Wi-Fi speeds at York, please consult UIT's recommendations on selecting/purchasing a Wi-Fi client device >>
For Windows 10 / 11 users, there are a few network adapter settings available that can help ensure optimal performance.
1. Click the Windows icon on your keyboard or bottom left of your screen and search for “Command Prompt” as an administrator (by searching for it in the same way but right-clicking on it and selecting “Run as administrator”) and run the command by copying and pasting this and pressing Enter:
control.exe /name Microsoft.NetworkAndSharingCenter.
2. Click on “Connections: Wi-Fi (AirYorkPlus)” and a new window should pop up.
3. Click on “Properties” and a new window should pop up.
4. Click on “Configure” and a new window should pop up.

Learn More
Not finding what you are looking for or need technical assistance? We are here to support you!